| How to send Full Screen Slide Show | ||
| 2 |  |
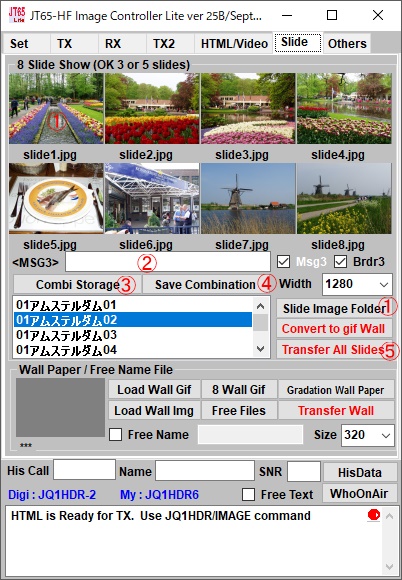
丂Minimum requirement is shown in Yellow. 1. Open the folder containing the image, paste the image on the 嘆 portion by dragging and dropping. Please set the image width to 1280 pixels 2. Image combinations can be saved.Give the name of the combination you want to save. 3. Determine the folder to save. 4. Press the save button and input the name to be saved and press the OK button. The name saved in list (5) below It shows.Clicking on this will load 8 images 5.丂Click Trasfer All Slide button. All 8 image will be transfered to your server. 偦傟偱偼丂僗儔僀僪僔儑乕HTML傪嶌惉偡傞偨傔偺弨旛傪峴偄傑偡丅丂Silde僞僽傪奐偄偰偔偩偝偄丅 嵟掅昁梫側晹暘偼墿怓偱帵偟傑偡丅 1.丂夋憸偺擖偭偰偄傞僼僅儖僟乕傪奐偗丄丂僪儔僢僌傾儞僪僪儘僢僾偱丂嘆偺晹暘偵夋憸傪揬傝晅偗偰偔偩偝偄丅 丂丂夋憸偺戝偒偝偼丂1280僺僋僙儖偵愝掕偟偰偍偄偰偔偩偝偄丅 2.丂夋憸偺慻傒崌傢偣傪曐懚偡傞偙偲偑弌棃傑偡丅丂曐懚偡傞慻傒崌傢偣偺柤慜傪晅偗傑偡丅 3.丂曐懚偡傞僼僅儖僟乕傪寛掕偟偰偔偩偝偄丅 4.丂曐懚儃僞儞傪墴偡偲丂曐懚偡傞柤徧傪僀儞僾僢僩偟偰OK儃僞儞傪墴偟偰偔偩偝偄丅丂壓偺儕僗僩嘍偵丂曐懚柤徧偑 丂丂昞帵偝傟傑偡丅丂偙傟傪僋儕僢僋偡傞偲丂8枃偺夋憸偑撉傒崬傑傟傑偡丅 5.丂揮憲儃僞儞傪墴偟傑偡丅丂偙傟偱8枃偺僗儔僀僪夋憸偑MyServer偵憲傜傟傑偡丅 |
 |
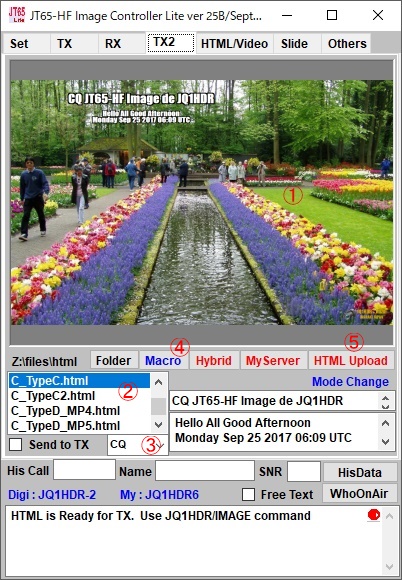
Open TX2 tab. 1. Click right on image and select "Select using image stored place for creating image with HTML template" and "Use server, can be used for HTML command" Also, double-click on C_TypeC.html to see the contents of HTML. Changing from <IMAGE 1> to <IMAGE 8> t丂o <SLIDE 1> to <SLIDE 8> will result in 8 received slideshow images. TX2僞僽傪奐偄偰偔偩偝偄丅丅 1.丂夋柺傪塃僋儕僢僋偟昞帵偟偨儊僯儏偺堦斣壓偺乭HTML僥儞僾儗乕僩偱夋憸嶌惉偵巊梡偡傞夋憸偺曐懚応強傪慖傇乭丂偐傜丂乭僒乕僶乕偐傜夋憸傪撉傒崬傓丂HTML偲偟偰憲怣壜擻乭傪慖傫偱偔偩偝偄丅 2.丂C_TypeC.html傪慖傫偱偔偩偝偄丅 3.丂彂偒崬傓儊僢僙乕僕傪慖傫偱偔偩偝偄丅 4.丂Macro儃僞儞傪墴偟偰偔偩偝偄丅丂偟偽傜偔偡傞偲HTML偑昞帵偝傟丂夋柺偵僐僺乕偝傟傑偡丅 5.丂HTML Upload儃僞儞傪墴偟偰偔偩偝偄丅丂僒乕僶乕偵HTML偑揮憲偝傟傑偡丅 師偵丂捠怣僜僼僩偱丂YourCall/IMAGE丂傪憲怣偟偰偔偩偝偄丅 側偍丄儘僑傕昞帵偱偒傞傛偆偵偟偰偁傝傑偡偺偱昁梫側曽偼TX僞僽偱塃僋儕僢僋偟儘僑偺嶌惉偲僒乕僶乕傊偺揮憲傪偟偰偔偩偝偄丅 傑偨丄C_TypeC.html傪僟僽儖僋儕僢僋偡傞偲HTML偺拞恎偑尒傞偙偲偑弌棃傑偡丅丂<SLIDE1>偐傜<SLIDE8>傑偱傪亙IMAGE1>偐傜<IMAGE8>傑偱偵曄峏偡傞偲丂庴怣夋憸8枃偺僗儔僀僪僔儑乕偵側傝傑偡丅 |
|