| TX with Enlarged Window | ||
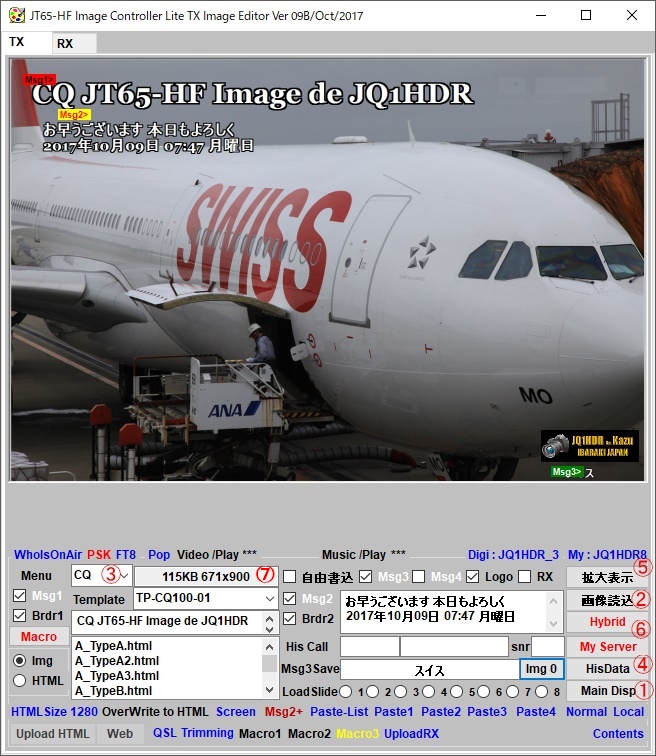 |
If you are using a display of sufficient size, Sending and receiving are easy to see and operate on a big screen. Right click on the image on the Lite TX tab and select the large screen editing start. A large editing screen pops up 1. Press the No Top button to change the position of the screen from one to the next. No Top: Decide which side of this screen, Lite screen is up. Both do not come to the top TX Top: This screen becomes the top surface. Main Top: The Lite screen will be on top. 2. Load the image to be sent 3. Select the message to be written to the image. The modification of these messages is the same as Lite's TX, and the character size Font, color etc. You can change with the same operation. もし、 十分な広さのディスプレイをお使いの場合は 大きな画面で 送受信をすると 見やすく、操作もしやすいです。 Lite TXタブで 画像を右クリックし 大画面編集スタート選んでください。 大きな編集画面がポップアップします。 1. No Topボタンを押すと 次から次へ画面の位置が変更されます。 No Top : この画面、 Lite t画面をどちらを上にするかを決めます。 どちらも最上面に来ないことを表します TX Top : この画面が最上面になります。 Main Top : Lite画面が最上面になります。 2. 送信する画像を読み込みます 3. 画像に書き込むメッセージを選びます。 これらのメッセージの修正はLiteのTXと同じで 字の大きさ フォント、色等 同じ操作で変更できます。 4. メッセージに相手局のコールやレポートが必要な場合に 押してください。 5. 作成された送信画像を大きく拡大して表示する。 6. 作成が完了すれば HYBRID MyServerボタンを押して 送信することが出来ます。 7. 送信する画像の大きさを設定できます。(右クリックで画像のサイズを変更します。) 次の読み込み時に有効になります。 いろいろと機能豊富な画面ですので 各機能は下記をご覧ください。 |
|
| 2 | 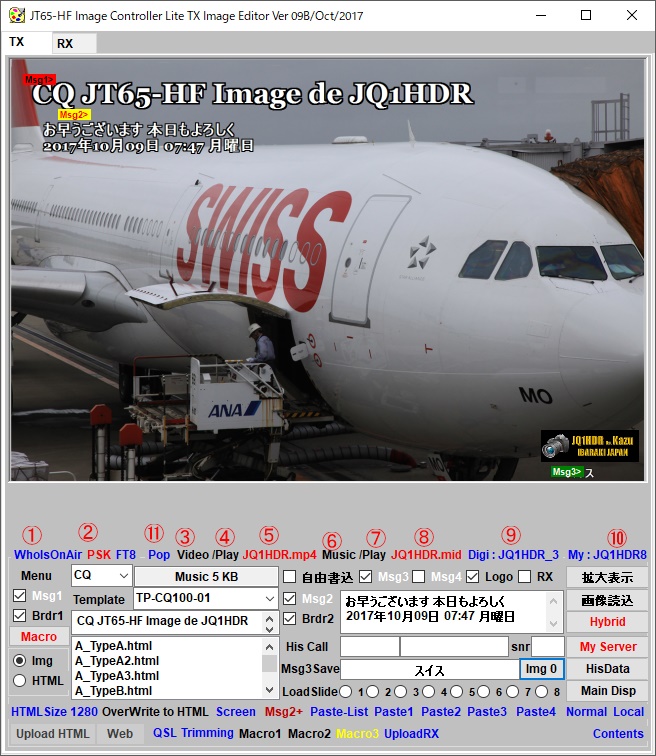 |
On the TX tab, you can send images, create and send HTML, etc. all on this
screen. Since various functions are substantial, it becomes very convenient if you can master it. 1. WhoIsOnAir Displays the station currently in operation. 2. Indicates operation of PSK. Red does not operate, when you click It changes to blue and starts receiving. 3. Video Click to read video files. 4. Paly Click to play the video. 5. Click the video file name to transfer it to MyServer. It changes to blue when the transfer is completed. 6. Music Click to load music file. 7. Paly Click to play music. 8. Click the music file name to transfer it to MyServer. It changes to blue when the transfer is completed. 9. Indicates the digisite server currently being used.Clicking You can change the DigiSite server. 10. Indicates the image transfer server currently in use.Clicking You can change the image transfer server. 11. Specify whether or not to pop up for confirmation when the transmitted image is transferred to the server Red does not pop up Blue pops up You can change it by clicking. TXタブでは、 画像の送信、HTMLの作成・送信等がこの画面ですべて可能になっています。 いろいろ 機能が充実していますので 使いこなせれば非常に便利になります。 1. WhoIsOnAir 現在運用中の局を表示します。 2. PSKの運用を示します。 赤は運用しない、 クリックすると 青に変わり 受信を開始します。 3. Video クリックすると ビデオファイルの読込が出来ます。 4. Paly クリックするとビデオを再生します。 5. ビデオのファイル名をクリックすると MyServer に転送します。 転送が完了すると 青色に変わります。 6. Music クリックすると 音楽ファイルを読み込みます。 7. Paly クリックすると音楽を再生します。 8. 音楽ファイル名をクリックすると MyServer に転送します。 転送が完了すると 青色に変わります。 9. 現在使用しているデジサイトサーバーを示します。 クリックすると デジサイトサーバーを変更できます。 10. 現在使用している画像転送サーバーを示します。 クリックすると 画像転送サーバーを変更できます。 11. 送信画像をサーバーに転送したときに確認為ポップアップするかどうかを指定する 赤はポップアップしない 青はポップアップする クリクすると変更できます。 |
 |
|
|
  |
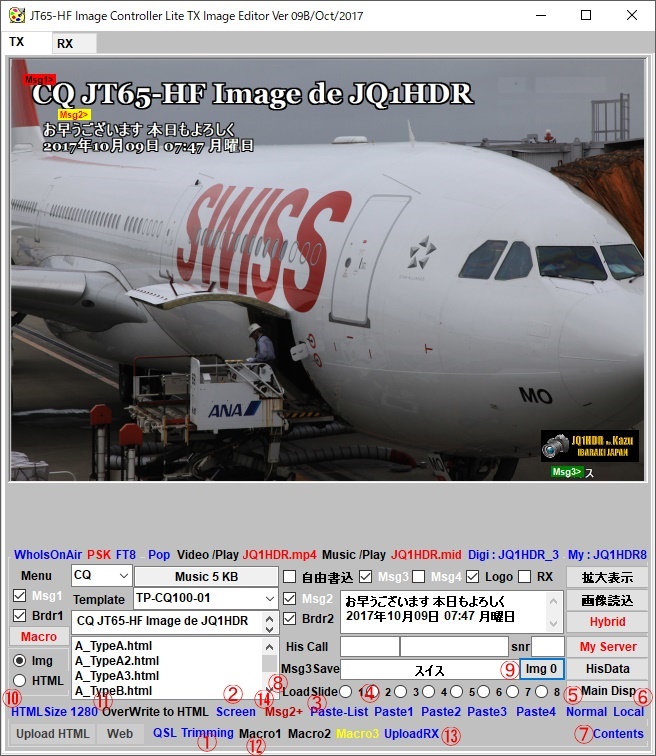
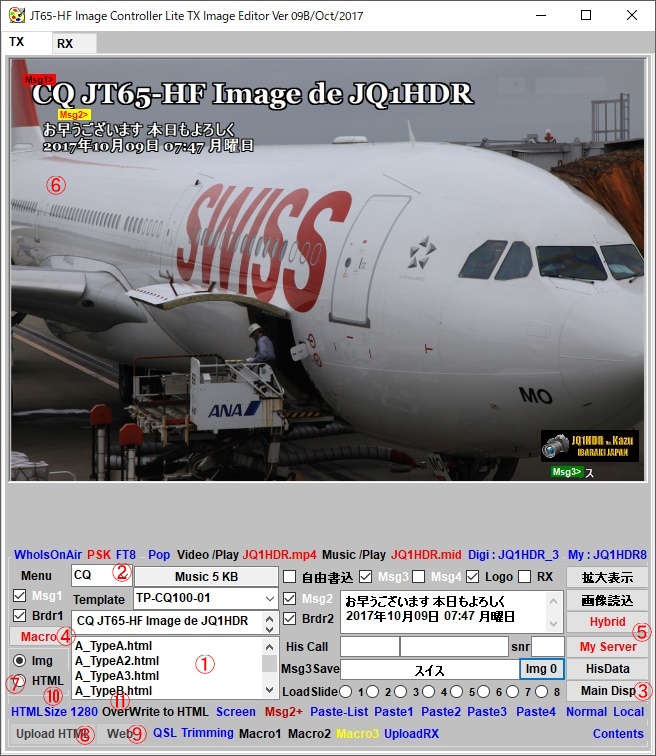
PasteList Clicking this will pop up an image list to paste in the sent
image. There are various pasting images, but if possible we would like to make the circumference of the image transparent.When writing without a frame, these pasting images blend into a part of the transmitted image and it is fun to be completed. In order to make a translucent image, you have to make a file with the extension .png, but since there is free software here for reference, please use those who are interested.Also, since there are lots of free illustration sites to use, I think that it is good to search and save the favorite folder to create a private folder and save it.In case There are many transparent backgrounds, but if the background is not transparent, please make the background transparent with the above software. Please drag and drop the created image and create the image list on the left. When pasting images are clicked on Picture 1 to Picture 4 and Logo respectively, they are placed in the transmission image. You can change the size of the pasted image by changing the position by dragging the image, turning the wheel of the mouse. Pasted images are red letters in the lower part. When you click on Picture 1-4, red turns blue and the image disappears. It means that there is an image when there is a blue character, and there is no image when it is a black character. Logo is displayed by checking the Logo check box. Received images are displayed by checking the RX check box on the received image displayed on the RX tab. At the same time, call sign SNR report etc is imported. PasteList クリックすると 送信画像に貼付けする画像リストが ポップアップします。 色々な 貼付け画像がありますが 出来れば画像の周りは透明に したいものです。 枠なしで書き込むと これらの貼付け画像は 送信画像の一部に溶け込み 面白いものが出来上がります。 半透明する画像を作るには 拡張子が.pngのファイルを作らないと いけないのですが 参考として 無料ソフトがここにありますので 興味のある方は使ってください。 また、使用するイラストは 無料の イラストサイトがたくさんあるので 検索して 気に入ったものを 専用フォルダーを作り 保存しておくとよいと思います。 背景が透明なものも多くありますが 背景が透明でない場合は 先ほどのソフトを使って背景を透明にしておいてください。 作成された 画像を ドラグアンドドロップして 左の画像リストを作成して ください。 貼付け画像は Picture1からPicture4とLogoで それぞれを クリックすると送信画像に配置されます。 貼り付けられた画像は 画像をドラッグで位置の変更、 マウスの フォイールを回すと大きさが変更できます。 貼り付けた画像は 下の部分で 赤い文字になっています。 Picture1-4をクリックすると 赤が青の変わり 画像が消えます。 青い文字になった場合は 画像があるという意味で 黒い文字の時は 画像がないことを意味しています。 Logoについては Logoチェックボックスをチェックすることで 表示されます。 受信画像は RXタブで表示されている受信画像をRXチェックボックスに チェックを入れると表示されます。 同時に コールサイン SNRレポート等を取り込みます。 |
|
 |
|
|
 |
1. WhoIsOnAir Click to display the current operation station. 2. Upload the received image to MyServer with the name Call_Received.jpg. It is used as the display of the received image with HTML etc. 3. Screen capture starts and you can capture any range of the screen. The captured image can be pasted as a Paste 1 to the transmitted image. 4. Indicates the currently used digital site. You can change it by clicking. 5. Display the received data on ⑬. 6. Click to display the contents of Digisite. Replace the image of Digisite, delete it and use it for maintenance. 7. List of received video and music files. 8. If you click it, download will be canceled if it is currently downloading.Red letter If you do not download it. 9. This is a list of HTML received.In case 10. Although the received HTML is basically closed automatically after a certain period of time, please click on it to see it continuously.HTML is not closed. 11. Play the video selected in ⑦. 12. Play the HTML selected in ⑨. 13. Received data and processing information at reception / transmission are displayed. 14. Display the received image large. 15 List of received images.When selected, the received image can be displayed. 16. Set whether to pop up the received image. Red will not pop up Blue pop up |
|
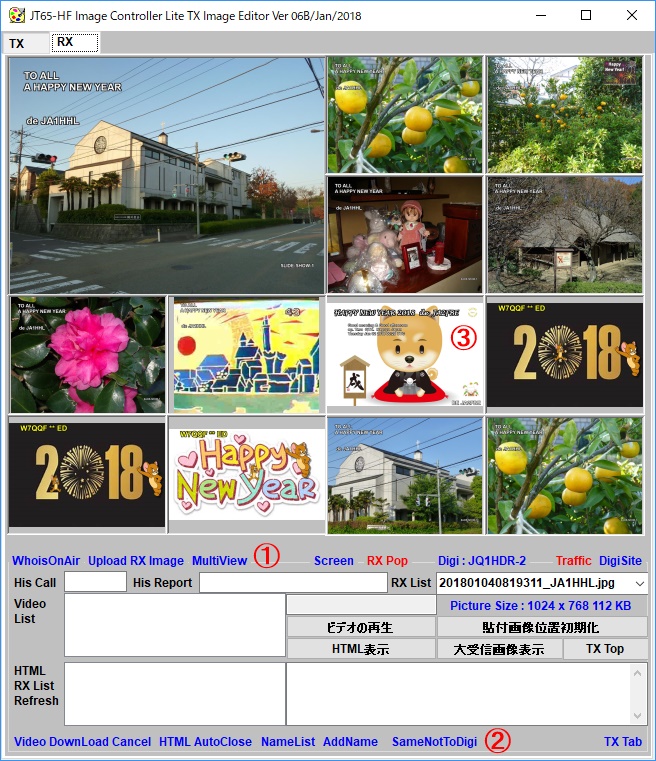 |
Display multiple RX images ① Click MultiView to display multiple received images. ② The same image will not be displayed when checked. ③ Double click to enlarge. 受信画像を複数表示させる ① MultiViewをクリックすると受信画像を複数表示できます。 ② チェックを入れると同じ画像は表示されません。 ③ ダブルクリックすると大きく表示します。 |
|