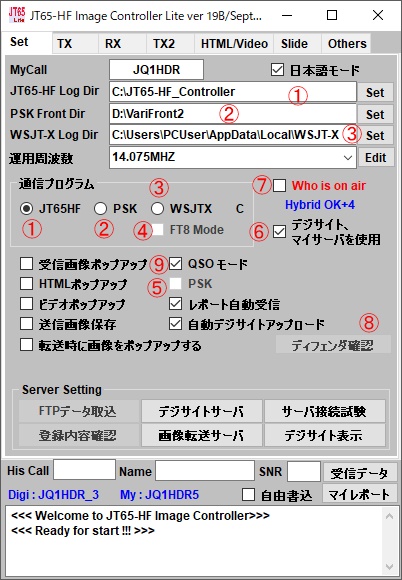
| Initial Setting | ||
| 2 |    |
It is necessary to set the connection with the program by the program for transmission / reception to be used before starting the program. Please input your call sign first. 1. This setting is for using HB9 HQX Edition for JT 65. Please set the folder where Lite is installed by pressing the set button on the right. There is also a setting of HB9 HQX so please refer to the bellow 2. This is the case when QSO is performed in PSK mode. VARI Image Front is required, please install. Please press the set button and specify the folder where Vari Image Front is installed 5. PSK It can be operated simultaneously when using HB9 HQX or WSJT - X.Please start up Veri Image Front and check it. 6. Please check this when using Digisite. Digisite can not be used if you do not have your own server This completes the setting. How to operate 7. Please check the Who is On Air. When you receive the image signal of JT65, PSK, FT8, the image will be displayed. 8. Programs that use the Internet are often closed with Windows defender or installed antivirus software.It is a button for confirmation.Please press for confirmation.Please allow Controller_Lite.exe and FTPS.exe if Windows defender is used when it comes out if it is blocked.For anti-virus software, please allow Controller_Lite.exe and FTPS.exe with exception setting or permission setting. In addition, ③ ④ is checked and it operates in FT 8 mode, but even if you change the mode of WSJT - X, for example it will receive JT 65 , so that images will appear. At this time there is no need to re-check Lite's WhoisiOnAir and it's okay to change only the WSJT-X picture. 9. If you are using Digisite, check if the setting is correct. Please press the server connection test 1. Push the button. The test image is transferred to the server. If the transfer is correct, it is displayed as correct in the part ②. If the ID or password is incorrect or the FTP Server is wrong, an error will be displayed, so press the DigiSIte server button to correct the setting value. The size of the transferred image is 28 KB as shown in ③. If this value becomes small 6 KB etc., please allow it because it may be closed by fender or anti-virus software. 5. Press the delete button at the end. プログラムをスタートする前に 使用する送受信用のプログラムにより プログラムとの結合設定が必要です。 まず、コールサインを入れてください。 1. JT65用としてHB9HQX Editionを使う場合の設定です。 設定は右にあるセットボタンを押して Liteがインストールされたフォルダーを設定してください。 HB9HQXの設定もありますので 下記を 参照してください。 2. PSKモードでQSOを行う場合です。 VARI Image Frontが必要になりますので インストールしてください。 セットボタンを押して Vari Image Frontがインストールされたフォルダーを指定してください。 3. WSJT-X または FTDXを使用する場合に使用します。 WSJT-XまたJTDXのログファイルはご自分のPCの USER ユーザー フォルダー内あります。 隠しファイルになっていますので Windows Expolore の設定を 隠しファイルも見えるようにするにしてください。 セットボタンで WSJT-Xの場合 ユーザーフォルダー⇒AppData⇒Local⇒WSJT-X を指定してください。 JTDXの場合は ユーザーフォルダー⇒AppData⇒Local⇒JTDX になります。 1,2,3が正しくないと 受信は出来ませんので 確実に設定してください。 4. WSJT-Xを使用すると FT8モード 15秒で送受信するスピーディなモード が 使用できます。 FT8で運用する場合は FT8にチェックを入れてください。 5. PSKの場合 HB9HQXやWSJT-Xを使用している場合に 同時に運用することが出来ます。 Veri Image Front を起動して チェックを入れてください。 6. デジサイトを使用する場合はチェックを入れてください。 ご自分のサーバーをお持ちでない方は デジサイトは 使用できません。 以上で 設定は完了します。 運用するには 7. Who is On Air にチェックを入れてください。 これでJT65、PSK, FT8の画像信号が 受信すれば 画像が表示されます。 8. インターネットを使用するプログラムは 多くの場合 Windowsのディフェンダーやインストールされた アンチウイルスソフトで 閉止 され場合があります。 その確認用のボタンです。 確認のために 押してください。 ブロックされていますと出た場合は Windowsディフェンダーが使用されている 場合は Controller_Lite.exe と FTPS.exe を 許可してください。 また アンチウイルスソフトの場合は 例外設定 あるいは 許可設定で Controller_Lite.exe と FTPS.exe を 許可してください。 なお、 ③④にチェックを入れて FT8モードで運用しますがWSJT-Xのモードを変更しても 例えば JT65にする JT65を受信し画像が出るようになっています。 この時に LiteのWhoisiOnAirの再チェックは必要なく WSJT-X画だけの変更で大丈夫です。 ------------------------------------------------------------ 9. デジサイトをお使いの場合は 設定が正しいかどうかをチェックします。 サーバー接続試験ボタンを押してください。 1. ボタンを押してください。 試験画像がサーバーに転送されます。 転送が正しければ ②の部分に 正しいと表示されます。 IDやパスワードが間違っている場合や FTP Server が 間違っている場合は エラーと表示されますので DigiSIteサーバーボタンを押して 設定値を修正してください。 転送された画像の大きさは ③ に あるように 28KB あります。 もし、 この値が 小さな 6KB等に なる場合は しフェンダーやアンチウイルスソフトで 閉止されている可能性がありますので設定を許可に してください。 4. ボタンを押してください 正しく おなじ画像が表示されれば 問題ありません。 表示されない場合は My URLが間違っているので My Image サーバーボタンを押して My URLを修正してください。 5. 最後に削除ボタンを押してください。 |