| Right Click Menu On TX tab | ||
| 2 | TX Image Right CLick Menu �@ �@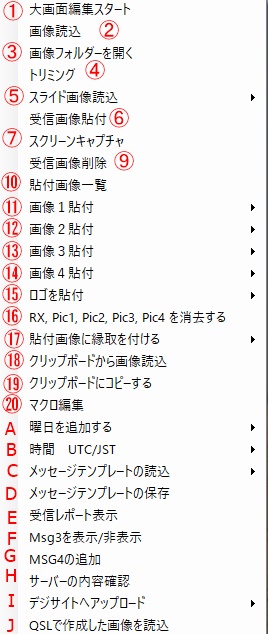 |
5. If you select to load slide images, the 8 slides you read in the Slide
tab will be displayed. Clicking it will become the transmission image.
If you display further menus, Slide 1 to Slide 8 can be read. 16. Erase the pasted image on the send screen except for the Logo image. 18. You can import images created with other image editing software in the clipboard here. I. Upload the transmitted image to Digisite. You can choose the method to add as upload method and the method to change Image 1. J. We will send QSL card image created with the attached software QSL software as a transmission image. �E�N���b�N�������ɂ��낢��ƃ��j���[���\������܂��B�@�قƂ�ǂ̐����������̂ňӖ���������Ǝv���܂����ꕔ�ɂ��Đ��������܂��B 5.�@�X���C�h�摜�Ǎ���I�ԂƁ@Slide�^�u�œǂݍ���8���̃X���C�h���\������܂��B�@�N���b�N����Ƒ��M�摜�ƂȂ�܂��B�@����Ɂ@���j���[��\��������Ɓ@Slide1�@����@Slide8�܂ł�Ǎ��ނ��Ƃ��o���܂��B 16.�@���M��ʂɓ\��t�����@�摜���@Logo�摜�����������܂��B 18.�@���̉摜�ҏW�\�t�g�ō쐬�����摜���N���b�v�{�[�h�ɓ���Ē����@�����œǂݍ��߂܂��B I.�@���M�摜���f�W�T�C�g�փA�b�v���[�h���܂��B�@�A�b�v���[�h�̕��@�Ƃ��ā@�lj�������@��Image1�����ւ�����@��I�ׂ܂��B J.�@�����̃\�t�g�@QSL�@�\�t�g�ō쐬�����@QSL�J�[�h�摜�𑗐M�摜�ɂ��܂��B |
Msg1Text Box Right CLick Menu �@ �@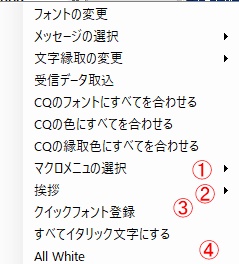  |
When right clicking, the menu will be displayed in various ways.Here will explain some of them. 1. You can register three types of macros for messages. You specify here which to choose here. 2. Insert a greeting. 3. You can change the font by holding down the CTRL key while turning the mouse wheel for the message mark Msg1, Msg2, Msg3, Msg4, but register that font.Quick. Font Window will be displayed, please register your favorite font. 4. Reset write character Change all characters to white and border color to black. �E�N���b�N�������ɂ��낢��ƃ��j���[���\������܂��B�@�ꕔ�ɂ��Đ��������܂��B 1.�@���b�Z�[�W�p�̃}�N����3��ޓo�^�ł��܂��B�@�ǂ��I�Ԃ������Ŏw�肵�܂��B 2.�@����������}�����܂��B�@ 3.�@���b�Z�[�W�}�[�N�@Msg1�AM�����Q�AMsg3�AM�����S�@���@CTRL�L�[�������Ȃ���}�E�X�z�C�[�����ƃt�H���g���ύX�ł��܂����A���̃t�H���g��o�^���܂��B�@Quick Font�@Window���\������܂��̂Ł@�C�ɓ������t�H���g��o�^���Ă��������B 4.�@�������ޕ��������Z�b�g�@���ׂĂ̕����𔒐F�A�����F�����ɕύX���܂��B |
|
Msg2Text Box Right CLick Menu �@ �@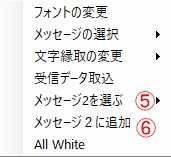  |
5. Select Language 1 or Language 2. 6. Add a sentence to message 2. Message 2 below opens. 7. This is the place to write the sentences to be added. Macros are also possible. To add to Msg 2, click �F to expand the sentence below and add it to message 2. 8. You can save the created sentences with a name. Also, correction overwrite saving is also possible. 9. Call up the saved sentences. 5.�@Language1 ���@Language2��I�т܂��B 6.�@���b�Z�[�W2�ɒlj����镶�͂� �@�@���L��Message�@�Q���J���܂��B 7.�@�lj����镶�͂��L������ꏊ�ł��B�@�}�N�����\�ł��B�@Msg2�ɒlj��́@�F���N���b�N����Ɓ@���ɕ��͂��W�J����@���b�Z�[�W2�ɒlj�����܂��B 8.�@�쐬�������͂́@���O��t���ĕۑ��ł��܂��B�@�܂��A�C���㏑���ۑ����\�ł��B 9.�@�ۑ��������͂��Ăяo���܂��B |
|
Staus Text Box Right CLick Menu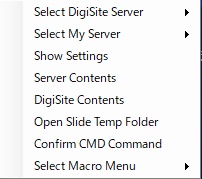 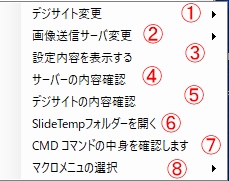 |
1. You can change the DigiSite. 2. You can change the image transfer server (MyServer). 3. You can check the image transfer server. 4. You can check the contents of the My Server. 5. Open the folder that contains the slide or wallpaper. 6. You can check the latest automatically generated commands. 7. You can change the message macro. 1.�@�f�W�T�C�g�̕ύX���o���܂��B 2.�@�摜�]���T�[�o�[(�}�C�T�[�o�[�j�̕ύX���o���܂��B 3.�@�摜�]���T�[�o�����m�F�ł��܂��B 4.�@�f�W�T�C�g�̓��e���m�F�ł��܂��B 5.�@�X���C�h��ǎ����ۑ�����Ă���t�H���_�[���J���܂��B 6.�@�ŐV�̎����I�ɍ��ꂽ�R�}���h���m�F�ł��܂��B 7.�@���b�Z�[�W�}�N���̕ύX�ł��܂��B |
|
| Right Click Menu On RX tab | ||
RX�@Image Right CLick Menu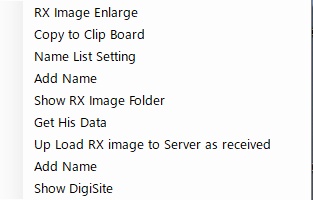 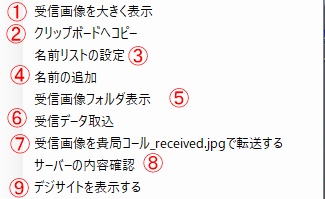 |
1. Display the received image in a larger size. 2. Copy the consultation image to the clipboard. 3. You can check inside the image transfer server to automatically load the name. By default, there is a folder called Ini in the folder where Lite is installed, and it will do the name.txt file in it. 4. Add a name. When you click it, the memo pad opens and it is confirmed whether to create name.txt at the beginning, so please press OK. The name registration is written on a single line with CallSign comma name, eg JQ1HDR, Kazu. Further additions will be written in the same manner below. Finally save and exit. This will automatically display the name when calling in Hiscall. 5. Display the received image saving folder. 6. Load the call sign, name, SNR report of the receiving station displayed on the RX. 7. Transfer the examination image to my server with the name mycall_received.jpg. 8. Display the contents of My Server. 9. Display the contents of the digi site. 1.�@��M�摜��傫���\�����܂��B 2.�@��f�摜���N���b�v�{�[�h�փR�s�[���܂��B 3.�@�����I�ɖ��O��ǂݍ��ނ��߂ɉ摜�]���T�[�o�����m�F�ł��܂��B �@�@�f�t�H���g�́@Lite���C���X�g�[�������t�H���_�[�̒��Ɂ@Ini�@�ƌ����t�H���_�[���@����@���̒��́@name.txt�@�t�@�C�������Ă��܂��B 4.�@���O��lj����܂��B �@�@�N���b�N����Ɓ@���������J���@�ŏ��́@name.txt�@���쐬���邩�m�F����܂��̂Ł@OK�������Ă��������B�@ �@�@���O�̓o�^�́@CallSign�@�J���}�@���O�@�@�Ⴆ�@JQ1HDR,Kazu�@�Ɓ@1�s�ɏ����܂��B �@�@����Ɂ@�lj��͂��̉��ɓ����v�̂ŏ�������ł����܂��B�@�Ō�ɕۑ������ďI�����܂��B �@�@����Ł@Hiscall�@�ɃR�[��������Ɓ@�����I�ɖ��O���������ĕ\�����Ă���܂��B 5.�@��M�摜�ۑ��t�H���_�[��\�����܂��B 6.�@RX�ɕ\�����ꂽ��M�ǂ́@�R�[���T�C���A���O�ASNR���|�[�g��ǂݍ��݂܂��B 7.�@��f�摜���@����call_received.jpg�@�ƌ������O�Ł@�}�C�T�[�o�[�ɓ]�����܂��B 8.�@�}�C�T�[�o�[�̓��e��\�����܂��B 9.�@�f�W�T�C�g�̓��e��\�����܂��B |
|
| Right Click Menu On TX2 tab | ||
TX2�@Image Right CLick Menu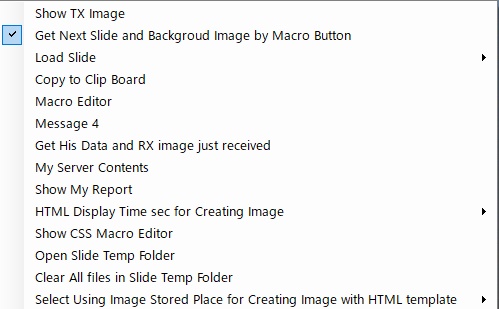 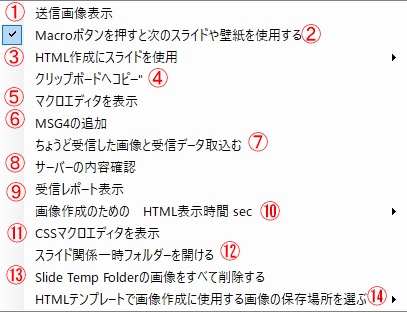 |
1. Enlarge the TX2 image to be transmitted. 2. When the MACRO button is pressed, slides and background images to be read are read in order. 3. Select slide and create it when creating HTML. 4. Copy the created image to the clipboard. 5. Modify / edit the message macro. 6. Add message 4. 7. Read the data of the image just received. 8. Display the contents of My Server. 9. Display WhoIsOnAir list. 10. When you press Macro, I will create an image in HTML, but it may take some time to collect images from My Server. In that case, please increase the creation time. 11. HTML is created with HTML for the template and CSS file for determining image layout and characters. You can edit HTML by double clicking on the template selected in the template list. You can edit CSS with this. We will cover all CSS. 12. Open the folder where you want to save the image or background image for which you want to create HTML. 13. Delete all of its contents. 14. There are two ways to create HTML images, one using HDD images and the other downloading from the server. When sending as an image all the images in the HDD can be fine, but if you send HTML, you have to change to a server. You can make this change here. 1.�@���M����TX2�摜���g��\������B 2.�@MACRO�{�^�������������@�Ǎ��ރX���C�h��w�i�摜�����Ԃɓǂݍ���ł����B 3.�@HTML���쐬����Ƃ��ɃX���C�h��I��ō쐬����B 4.�@�쐬�����摜���N���b�v�{�[�h�փR�s�[����B 5.�@���b�Z�[�W�}�N���̏C���E�ҏW���s���܂��B 6.�@���b�Z�[�W4��lj����܂��B�B 7.�@���x�@���@��M�����摜�̃f�[�^��ǂݍ��݂܂��B 8.�@�}�C�T�[�o�[�̓��e��\�����܂��B 9.�@WhoIsOnAir���X�g��\�����܂��B 10.�@Macro���������Ƃ���HTML�ʼn摜���쐬���܂����A�摜���}�C�T�[�o�[���W�߂�ꍇ�͎��Ԃ��|����ꍇ������܂��B�@���̏ꍇ�́@�쐬�̎��Ԃ����Ă��������B 11.�@HTML�́@�e���v���[�g�p�́@HTML�Ɖ摜�z�u�╶�������肷�邽�߂�CSS�t�@�C���̓�ō쐬���܂��B�@HTML�̕ҏW�́@�e���v���[�g���X�g�̑I�@�e���v���[�g���_�u���N���b�N����ƕҏW�ł��܂��B�@CSS�͂���ŕҏW�ł��܂��B ���ׂĂ�CSS��ΏۂƂ��܂��B 12.�@HTML���쐬����@�摜��w�i�摜��ۑ�����t�H���_�[���J���܂��B 13.�@���̒��g�����ׂč폜���܂��B 14.�@HTML�摜���쐬������@�́A�@���ׂā@HDD�̉摜���g�p������@�Ɓ@�T�[�o�[����_�E�����[�h������@������܂��B�@�摜�Ƃ��đ��M����ꍇ�́@���ׂ�HDD���̉摜�ł����Ȃ��̂ł����AHTML�𑗐M����ꍇ�́@�T�[�o�[�ɕύX���Ȃ���Ȃ�܂���B�@���̕ύX�������ōs�Ȃ��܂��B |
|
Tempalte List Right CLick Menu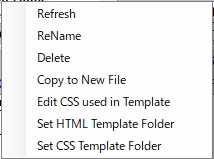 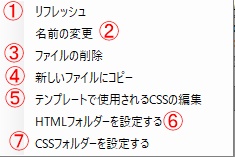 |
1. Refresh the template list. 2. Change the name of the selected template. 3. Delete the selected template. 4. Create a template file by attaching Copy_ to the selected template. 5. Selected template You can edit only the CSS you use. 6. Set the folder where the HTML template is saved. 7. Set the folder to save the CSS used for HTML. 1.�@�e���v���[�g���X�g�����t���b�V�����܂��B 2.�@�I�e���v���[�g�̖��O��ύX���܂��B 3.�@�I�e���v���[�g���폜���܂��B 4.�@�I�e���v���[�g��Copy_��t���ăe���v���[�g�t�@�C�������܂��B 5.�@�I�e���v���[�g�g�p����CSS�݂̂�ҏW�ł��܂��B 6.�@HTML�e���v���[�g���ۑ�����Ă���t�H���_�[��ݒ肵�܂��B 7.�@HTML�Ɏg�p�����CSS��ۑ�����t�H���_�[��ݒ肵�܂��B |
|