| RXing | ||
| 2 |  |
It If you check "Who is On Air" on the Set tab, reception starts.
Please extend the bottom side of Lite If the previous setting is correct,
I think that the received signal of JT 65 or FT 8 is visible. If you can
see it with communication software and you can not see it here, please
correct the setting as there are many cases where the previous setting
is incorrect 1. When receiving starts, a red indicator is displayed. 2. The contents received by the communication software will be displayed. Setタブで Who is On Airにチェック入れると 受信を開始します。 Liteの下側を伸ばしてください。 先の設定が正しければ JT65やFT8の受信信号が見えていると思います。 通信ソフトでは見えて ここでは 見えない場合は 先の設定が間違っている場合が多いので設定を修正してください。 1. 受信を開始すると 赤いインディケーターが表示されます。 2. 通信ソフトで受信された内容が表示されます。 3. 受信した局の受信画像の名称でRXフォルダーに保存されます。 選ぶことで過去の受信画像も見ることが出来ます。 4. His Dataボタンを押すと、 受信局のデータが取り込まれます。 送信時に使用します。 過去の画像100枚までデータを保管しています。 5. 受信した画像が直前に受信した画像と同じであればデジサイトにはアップロードしません。 |
  |
The received image pops up greatly on the screen as it is received.These
settings are set as default values: Image / HTML / Video: Pop up and not
close automatically.Also, transfer received images to DigiSite,You can
change settings such as transfer of reports to receiving stations Each setting is as follows. Indicates the action when checked. 1. Pop up the received image greatly. 2. Pop up the received HTML and display it. 3. Pop up and display the received video and music. 4. Save the transmitted image in the TX folder. 5. When transferring the image to the server at the time of transmission, you can display the image on the server and check the transmitted image. 6. Receive and send reports automatically. 7. Transfer the received image to DigiSite. 8. Display the received image in actual size. 9. Close the received image that pops up automatically. Set it with the number of seconds on the right side. 受信画像は受信と同時に画面に大きくポップアップします。 これらの設定はデフォルト値として 画像/HTML/ビデオ : ポップアップし自動的には閉じない設定になっています。 また、デジサイトに受信画像の転送、 受信局へのレポートの転送等 設定変えることが出来ます。 各設定は下記の通りです。チェックした時の動作を示します。 1. 受信した画像を大きくポップアップします。 2. 受信したHTMLをポップアップし表示します。 3. 受信した ビデオや音楽をポップアップし表示します。 4. 送信画像をTXフォルダーに保存します。 5. 送信時にサーバーに画像を転送したときに サーバーにある画像を表示し 送信画像を確認できます。 6. 自動的にレポートを受信したり 送信したりします。 7. デジサイトに受信画像を転送します。 8. 受信画像を実際の大きさで表示します。 9. ポップアップした受信画像を自動的に閉じます。 右側の数字 秒で 設定します。 |
|
 |
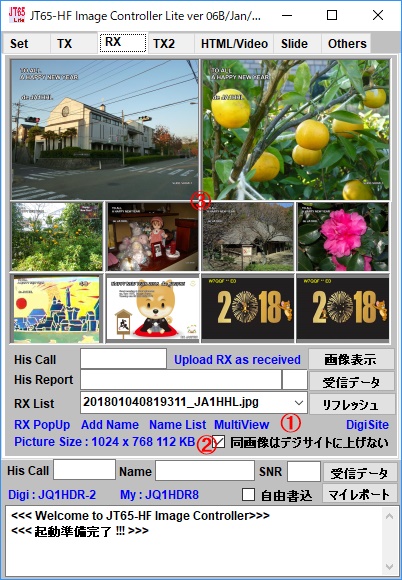
Display multiple RX images ① Click MultiView to display multiple received images. ② The same image will not be displayed when checked. ③ Double click to enlarge. 受信画像を複数表示させる ① MultiViewをクリックすると受信画像を複数表示できます。 ② チェックを入れると同じ画像は表示されません。 ③ ダブルクリックすると大きく表示します。 |
|