| Receiving JT65-HF HTML | ||||
| 1 | 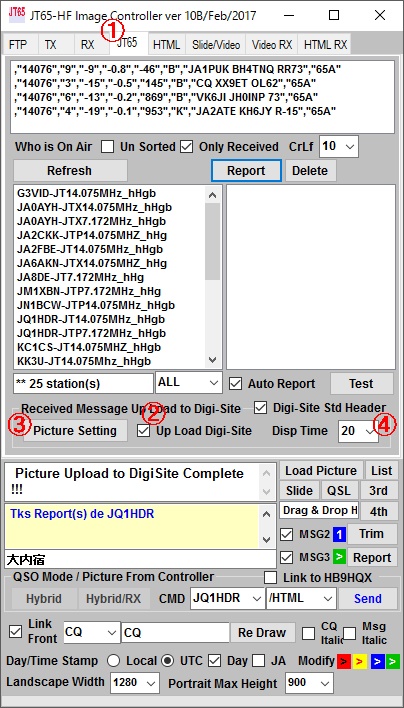 |
1. Go to JT65 Tab on JT65-HF Image Controller 2. Check "Up Load Digi-Site", if you have registered in Digi-Site. 3. Click "Picture Setting" button for Setting of HTML receiving 4. Inteval time for Down load HTML file. Change bigger value, if HTML is not displayed completly. If you don't want to up load to Digi-Site or you have no your own server, don't check "Up Load Digi-Site" and Check "HTML pop up" on FTP tag. You can get HTML pop up window . This window will be applied as the receiving reports of video, GIF or music files and not only for HTML. 1. JT65タブを開いてください。 2. デジサイトに登録されているのであれば "Up Load DigiSite"にチェックを入れてください。 3. HTMLを受信するための設定を行うため "Picture Setting"ボタンを押してください。 4. HTMLを表示する時間です。 もし、 表示されるHTMLが不完全であるならば 大きな値を 設定してください。 もし デジサイトにアップロードしたくない あるいは 専用のサーバーをお持ちでない方は "Up Load DigiSite" に チェックを入れず FTPタブにある "HTML Up"にチェックを得てください。 受信したHTMLが ポップアップで表示されます。 |
||
| 2 | 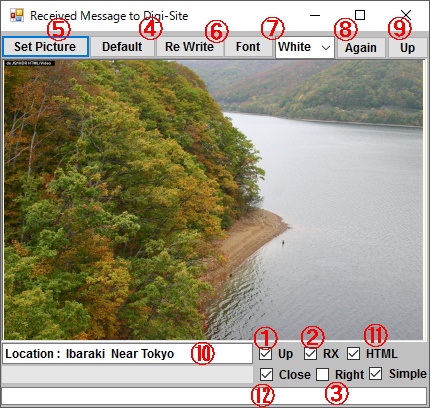 |
***** Case of up loading Report Only ***** 1. Check "Up" for up loading to Digi-Site. 2. Check "RX" for Display Received HTML. 3. Default location is left and top for report writting. Checked Rigiht and top. 4. Default is blank picture. 5. Your picture may be used for up loading picture. 6. Rewite your report on your picture. 7. Chage report Font and Color. 8. Re load picture and report. 9. Test for up loading your picture and report to Digi-Site. 10. Comment can be added for report. ***** Case of up loading received HTML***** 11. Check "HTML" for up loading received HTML Picture to Digi-Site. 12. Checked, close this window after up loading to Digi-Dite. This window is also used for up loading of WMV, MP4 Video, MP3 for music and GIF animated file. ***受信したレポートだけをデジサイトに送る場合*** 1. ”UP"にチェックを入れてください。 2. 受信したHTMLを表示のため "RX" にチェックを入れてください。 3. レポート文字は デフォルトで 左上に書かれます。 4. また デフォルトでは ブランクの背景になります。 5. ブランクの代わりに 自由な画像を利用することが出来ます。 6. れ歩とを書き直し確認する場合に押してください。 7. レポート文字の フォントやサイズの変更をします。 8. 画像の再取り込みと文字の再書き込みをします。 9. デジサイトに作成された レポート画像がアップロードされます。 10. 追加コメントを挿入できます。 *** 受信したHTMLの画像をデジサイトにアップロードするとき *** 11. "HTML” にチェックを入れてください。 12. デジサイトにアップロードしたあと自動的にすべてを閉じます。 また、この処理は 動画 WMV, MP4、音楽 MP3 やGIF動画を受信したときにも 開き デジサイトに画像としてアップロードします。 |
||
| 2 | 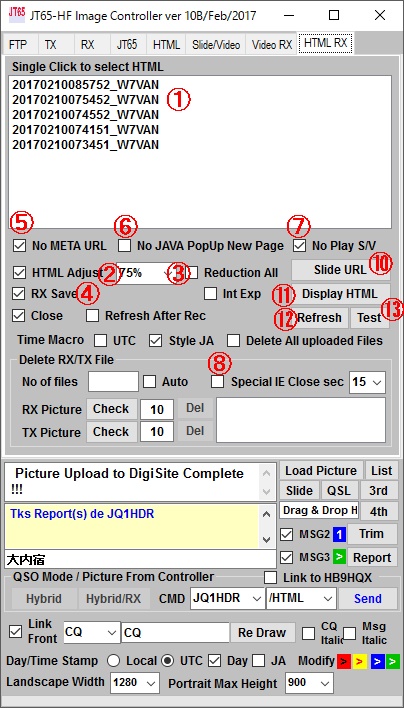  |
Go to HTML RX tab on JT65-HF Image Controller for another setting. 1. HTML received list. 2. If checked, pop up window size will be reduced to 75% to save area of screen.. 3. If checked, All received HTML size will be reduced. 4. If checked, save received HTML file. 5. When a received HTML has META Tag. It will open another HTML. if you check , It does not open new HTML 6. When a received HTML has JAVA script to open another HTML,.It will linked to new HTML and will pop up New window on display. if you check, JAVA script will be deleted not open new window 7. The received HTML might sound the music or Video. if you check musicor Video does not play. 8. If New window is pop upped by JAVA script, when checked, new window will be closed after settled second. 10. Set Slide URL as below for Macro 11. Selected HTML will be displayed. 12. Refresh HTML List 13. Test HTML will be pop upped, then determine its location, width and height. 14. Input your DigiSite URL, image1 is not required but last character shall be /. 15. Input your DigiSite URL, image1 is not required but last character shall be /. If you use different folder from DigiSite, in the same server, you can add it here. その他 いろいろのHTML用の設定と操作 HTML RXタブを開いてください。 1. 受信したHTMLのリストになります 2. チェックを入れると 受信したHTMLの表示を75%縮小します。 3. チェックするとすべてのHTMLを縮小します。 4. チェックすると受信したHTMLを保存しリストに表示します。 5. 受信したHTMLの中に MEATタグに他のHTMLを開く記載のある場合 無視します。 6. 受信したHTMLの中に JAVAスクリプトで 他のHTMLを開く記載がある場合に 無視をします。 7. 受信した ビデオや音楽の 自動演奏を停止します。 8. もし、 JAVAやその他の方法で 新しいIEウィンドウが表示された場合 設定された時間後に 自動的に閉じます。 10. HTMLで使用する マクロのために デジサイトのURLを登録します。 11. リストで選ばれた HTMLを表示します。 12. リストをリフレッシュします。 13. ポップアップするHTMLの 大きさ 位置を設定するための テスト リンクです。 14. マクロで使用する デジサイトのURLを登録してください。 最後の 文字は / としてください。 15. マクロで使用する 送信画像が入るURLを登録してください。 最後の 文字は / としてください。 通常はデジサイトと同じものとしてください。 |
||
| Sending JT65-HF HTML | ||||
| 3 | 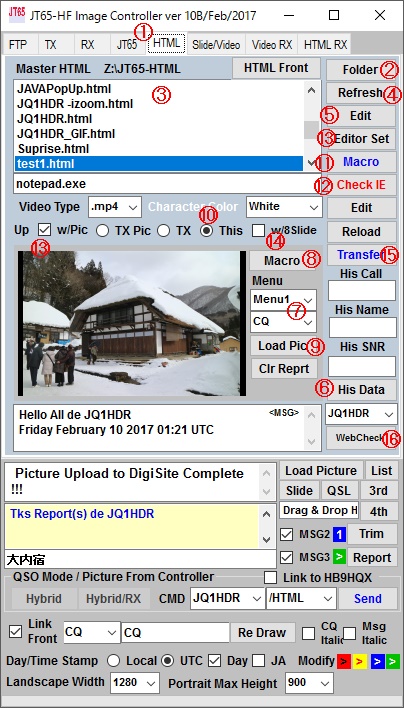 なお、テンプレートHTMLはほとんど問題なく動作しますが、ご自分で作られる場合 特に JAVA Script を利用した 高度のものは 動いていく画像とか 色々な画像がスクリプトで書かれますが それらのリンク先に特に注意が必要です。 マクロを駆使して テンプレートを参考にして http:// ............ になるように 工夫してください。 |
******* IMPORTANT ******* As you know, HTML is an expression method with infinite possibilities and at the same time it is dangerous depending on the content. Therefore, All HTML will be down loaded and checked wriiten script. As for uploaded HTML, so please confirm, As for uploaded HTML, click "Web Check" button wherther it works or not. If you want to use HTML, you need your own server and your URL shall be registered into JT65-HF Image Controller's Master Data. 1. Go to HTML tab on JT65-HF Image Controller 2. Select your HTML Template folder, default is HTML in the installed Program. Default folder is C:\JT65-HF_controller\HTML 3. Temlplate list will be dsplayed, if there is no template. please down load from here and unzip and copy it your HTML template folder. And also read instructions. 4. Refresh list of HTML. 5. Select template on list, then you can edit it with NotePad. 6. Click "His Data" button to get His Call, His report 7. Select message written on HTML. 8. To edit Macro, click this button. then you can modify Macro. 9. Click "Load Picture" button and select your picture to send. Your selected picture will be displayed. 10. Select "This", it means just loaded picture. 11. Select Master.html and Click "Macro" button. Macro makes the HTML for sending, it includes His Call, SNR report and Picture you want to send. Of cource you can make your own template. 12. Click here to show your HTML. If it is not HTML what you want to send, adjust macro, picture and message. 13. To upload HTML with your picture. 14. To upload HTML with your 8 slide pictures. 15. Click "Transfer" button to up load HTML and picture files.. 16. You can see your HTML in your server. ******* IMPORTANT ******* ご存知のように HTMLは無限の可能性のある表示方法です と 同時に内容によっては 危険なものとなる場合があります。 受信したHTMLはすべてをダウンロードし 内容を確認して います。 送信するHTMLは"Web Check"ボタンで 動くかどうか確認をお願いします。 HTMLを使用するためには貴局専用のサーバーが必要で また そのURLは プログラムのマスターに登録が必要となります。 1. HTMLタブを開いてください。 2. HTMLテンプレートが保存されているフォルダーを指定してください。 デフォルトは C:\JT65-HF_controller\HTML となっています。 3. HTMLリストが表示されるはずです もい 表示されない場合は ここから必要なテンプレート from here and unzip and copy it your HTML template folder. ダウロードしてください。 4. リストをリフレッシュします。 5. 選ばれたHTMLを編集できます。 メモ帳での編集になりますが、 変更は可能です。 6. クリックすると 受信した局のコール、 名前、 レポートを表示します。 7. HTMLに書き込む メッセージを選びます。 8. 書き込まれる文章のマクロを編集します。 9. HTMLに使用する画像を読み込みます。 10. 参考に デフォルトで入っている Master.htmlを選んで ください。 11. ”Macro" ボタンを押してください。 12. 作成されたHTMLを確認することが出来ます。 13. HTMLをサーバーにアップロードします。 14. チェックすると 画像も同時にアップロードします。 15. チェックすると 8枚スライド用の画像もアップロードします。 16. サーバーにある 実際のHTMLを確認できます。 |
||
| 4 | 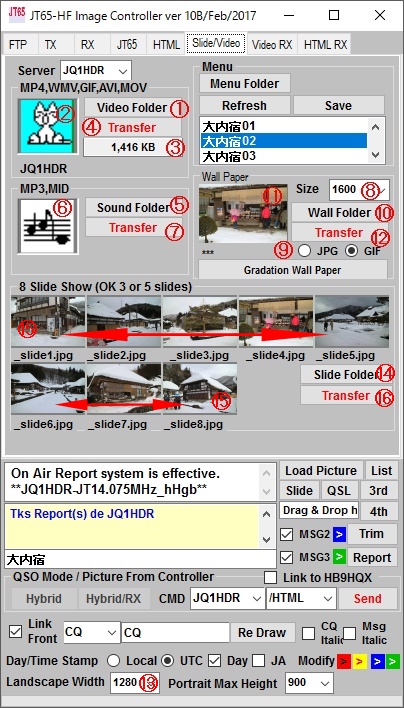 |
As you know, HTML is an expression method with infinite possibilities. Therefore, here will explain the upload when using the material image, music, video etc.. At first ,goto "Slide /Video" tab. Video File 1. Open your video folder. 2. and drag and drop on cat picture. to confirm Video, click cat, you can see your video with Windows Media player. 3. Size of video file. 4. Up load Video File to you server. The format of the video, WMV, MP4, GIF, AVI and MOV will be recognized automatically. If <VIDEO> is used for a macro, it will automatically change the file format at macro expansion. File name is youcall.wmv, .mp4, .gif, .avi or .mov. Macro is <VIDEO> If you fix format of video, macro is <MP4>, <WMV> also. Music File 5. Open your music folder. 6. and drag and drop on music note picture, click music note, you can see your music with Windows Media player. 7. Up load Music File to you server. File name is youcall.mp3 or .mid. HTML Background picture(Wall paper) 8. Select wall paper size. if you use picture, bigger size is better. 9. Select format of wall paper. 10. Open picture folder and select your picture 11. Drag and drop on the picture box. Click picture to see big picture. 12. Up load your wall paper. File name is youcall_wall.jpg or .gif. Macro is <WALLJPG> or <WALLGIF> Pictures for slide show 13. Select slide picture size. 14. Open slide picture folder and slect your picture. 15. Drag and drop your picture on picture box. repeat 8 pictures also 16. Up load all slide pictures at once. File name is youcall_slide1.jpg, youcall_slide2.jpg, youcall_slide3.jpg youcall_slide4.jpg, youcall_slide5.jpg, youcall_slide6.jpg, youcall_slide7.jpg, youcall_slide8.jpg Macro is <SLIDE1>, <SLIDE2>, <SLIDE3>, <SLIDE4>, <SLIDE5>, <SLIDE6>, <SLIDE7>, <SLIDE8> If you create various slide shows in Slide Show Editor beforehand, you can easily load images and movies for HTML slideshow. |
||
| 4 |  |
ご存知のように HTMLは無限の可能性のある表示方法です。従って、使用する素材もいろいろあります。 そこで まず 動画について説明します。Slide/Videoタブを開いてください。 ビデオについて 1. ビデオが保存されているフォルダーを開けてください。 2. 動画選び猫のところにドラッグ、ドロップしてください。 猫をクリックすると 動画を Windows Media プレイヤーで見ることが出来ます。 3. 動画のサイズを示します。 4. 動画をさーばーにアップロードします。 動画の形式は WMV, MP4, GIF, AVI, MOV等が 自動的に認識され取り込まれます。 もし、 HTMLのマクロに <VIDEO> を使用すると マクロ展開時に自動的に挿入されます。 転送される ファイル名称は 貴局のコール.動画の拡張子 になります。 また、 固定のマクロ <MP4> <WMV> も利用できます。 音楽について 5. 音楽が保存されている フォルダーを引けてください。 6. 音楽を選び ドラッグ ドロップで 楽譜の上に入れてください。 楽譜をクリックすると 音楽を再生します。 7. 音楽ファイルをアップロードします。 使用できる音楽は MP3とMIDとなります。 ファイル名称は 貴局のコール。拡張子となります。 HTMLの背景画像 8. 背景画像のサイズを選んでください。 画像を背景に使用する場合は大きい数値がベターです。 9. HTMLに使用する画像の種類を選んでください。 10. 画像の保存されているフォルダーを開き画像を選んでください。 11. ドラッグアンドドロップで画像を入れてください。 画像をクリックすると大きな画像で確認できます。 12. 壁紙をアップロードします。 アップされた画像名称は 貴局のコール_wall。拡張子 HTMLに記載するマクロは <WALL> または <WALLGIF> です。 スライドショー用の画像 13. まず、 画像の大きさを選んでください。 14. 画像の保存されたフォルダーを開けてください。 15. 画像を選び ドラッグアンドドロップで 順に画像入れてください。 8枚 同じ要領で 繰り返してください。 16. 8枚のスライド画像をアップロードします。 アップロードされた画像名称は Call_slide1.jpg, Call_slide2.jpg, Call_slide3.jpg, Call_slide4.jpg, Call_slide5.jpg, Call_slide6.jpg, Call_slide7.jpg, Call_slide8.jp になり マクロは <SLIDE1>, <SLIDE2>, <SLIDE3>, <SLIDE4>, <SLIDE5>, <SLIDE6>, <SLIDE7>, <SLIDE8> をHTMLに 記載します。 Slide Show Editor で事前にいろいろな門を作成しておくと 簡単に読み込めます。 |
||
| 5 | 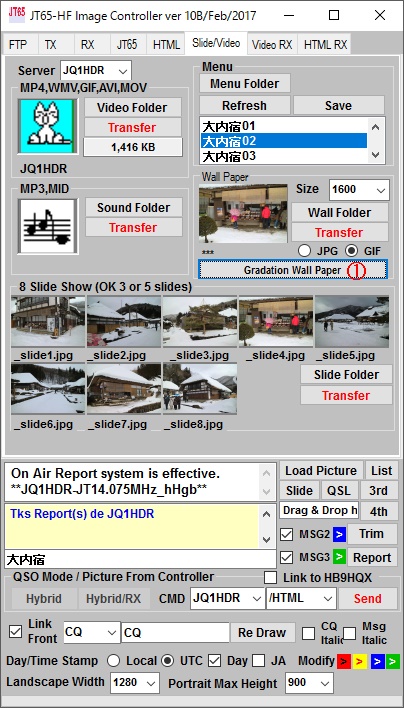 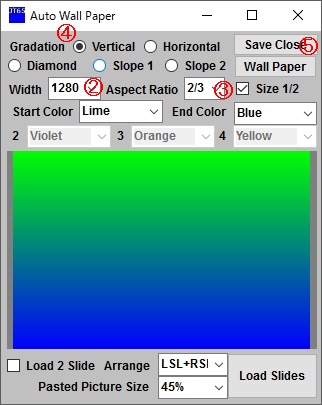 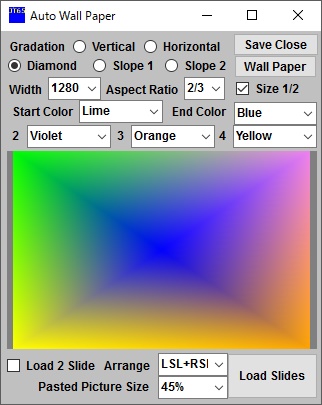 |
Gradation watll paper and other 1. Click "Gradation Wall Paper" button then gradation setup window is pop upped. 2. Set Wal Paper size 3. Select Aspect ration, 3/4 is for normal digital camera and 2/3 is for Single-lens reflex camera 4. Select type of gradation. Vertical, Horizontal, slope1, slope2 and diamond. Select gradation color(s). 5. Click "Save Close" button. Then you can see your gradation in the picture box. Click "Transfer" button to up load. グラデーションの壁紙 1. "Guradation Wall Paper"ボタンを押してください。 2. 壁紙のサイズを選んでください。 3. 縦横比を選んでください。 通常のデジタルカメラは 3/4 一眼レフでは 2/3 となります。 4. グラデーションの種類を選んでください。 垂直、 水平、 斜め、ダイアモンドがあります。 グラデーションをする色を選んでください。 5. "Save Close"ボタンを押すと 作成した壁紙が保存され コントローラーに表示されます。 |
||
| 6 | 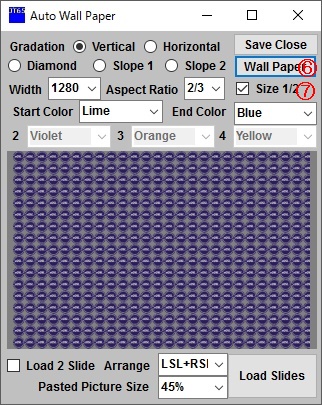 |
6. Click "Wall Paper" button and select your wall paper file. 7. Pasted file size. If want to small size, check 1/2. 更に 複雑な壁紙 6. ”Wall Paper"ボタンを押して 利用できる壁紙を選んでください。 7. 利用した壁紙素材が大きい場合小さくできます。 |
||
| 7 | 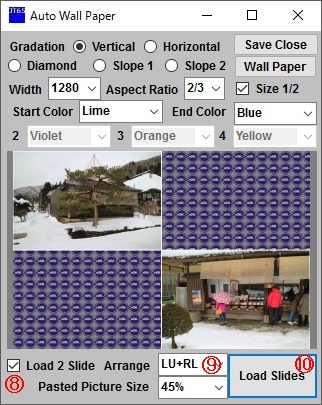 |
8. If "Load 2 slide" is checked, you can use 2 slide picture
as background. 9. Select "Slide arrange", LU+RL : 1st slide / Left upper and 2nd slide / Right lower LU+LL : 1st slide / Left upper and 2nd slide / Left lower RU+LL : 1st slide / Right upper and 2nd slide / Left lower RU+RL : 1st slide / Right upper and 2nd slide / Left lower LU+RU : 1st slide / Right upper and 2nd slide / Left upper LL+RL: 1st slide / Right lowerand 2nd slide / Left lower LSL+RSL: Small size. 1st slide / Right lowerand 2nd slide / Left lower 10. Then Click "Load Slide" button. 8. If unchecked and click "Load Slide", then 4 slide picture is loaded. 8. "Load 2 Slide" をチェックを入れると 2枚のスライド背景とできます。 9. 配置を選んでください。 配置は上記のとおりです。 10. "Load SLide"ボタンを押してください。 もし、"Load 2 Slide" にチェックを入れないで "Load SLide"ボタンを押すと 4枚のスライドが 読み込まれます。 |
||
| 8 | 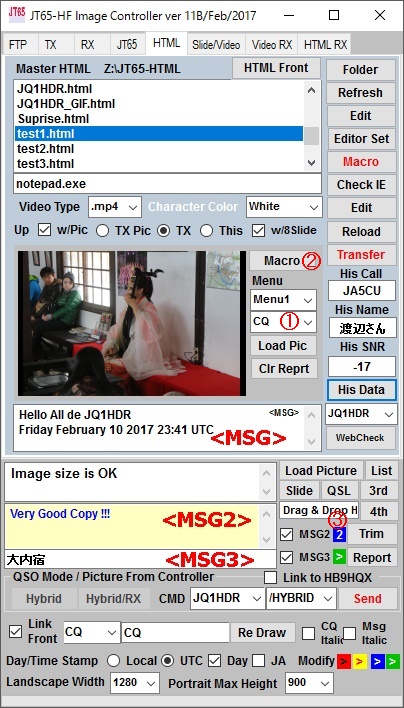 |
How to use Macro to write messages on the HTML There are 3 macros to write message on the HTML as below. <MSG>, <MSG2> , <MSG3> 1. Select MSG. 2. To register Macro, Click this button. 3. Click Blue label to change MSG2 Macro. If Macro is written in the HTML like below: <TD colspan="4" align="center"><B><FONT SIZE="+3" COLOR="#ffffff" FACE="Georgia"><FONT FACE="Georgia"><MSG><FONT></FONT></FONT></B> <FONT COLOR="#ffffff"><B><FONT SIZE="+3" FACE="Georgia"> <FONT FACE="Georgia"></FONT></FONT></B><BR> <MSG2><BR><MSG3></FONT><BR> </TD> Sample HTML This sample shows only relation btween Macro and actual picture. どのようにHTMLにメッセージを書き込むか マクロには<MSG>, <MSG2>, <MSG3>の3種類があります。 1. は MSG用のメッセージです。 2. 色々なメッセージ用のマクロの登録です。 3. 青いマークをクリックすると メッセージが変更できます。 もし、HTMLにマクロが下記のように書かれていた場合 <TD colspan="4" align="center"><B><FONT SIZE="+3" COLOR="#ffffff" FACE="Georgia"><FONT FACE="Georgia"><MSG> <FONT></FONT></FONT></B> <FONT COLOR="#ffffff"><B><FONT SIZE="+3" FACE="Georgia"> <FONT FACE="Georgia"></FONT></FONT></B><BR> <MSG2><BR><MSG3></FONT><BR> </TD> HTML表示は下のようになります。 サンプルはマクロと実際の画像の関係を示すもです。 |
||
Click "Macro" button, message of <MSG>, <MSG2> and
<MSG3> will be added into HTML as below.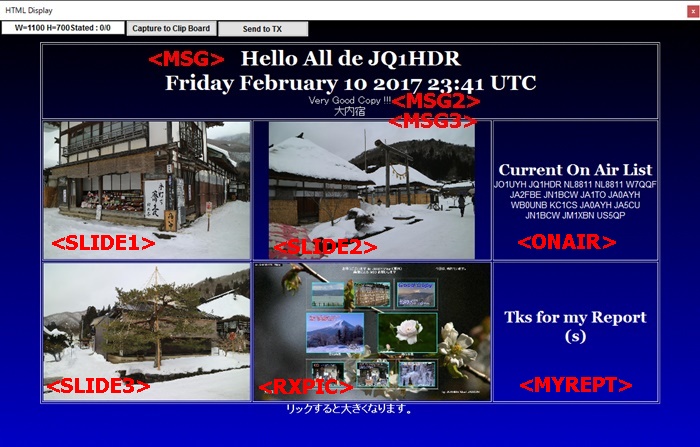 |
||||