| Receiving JT65-HF Picture | ||||
| 1 | 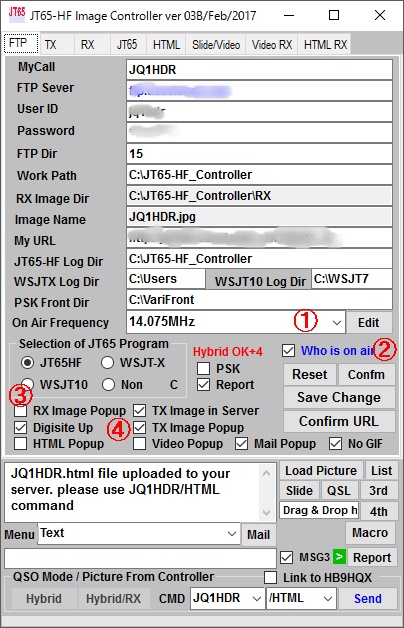 |
1. Select on Air Frequency. 2. Check "Who is on air", then you can receive JT65-HF signal. 3. If checked, display large pop up window for received picture 4. If checked, received picture will be up loaded to your Digi-Site. 1. 運用する周波数を選んでください。 2. ”Who is on air"にチェックを入れてください。 3. 受信時にさせる動作を選んでください。 RX Image Popup : 受信画像がポップアップします。 Digisite Up : 受信した画像をデジサイトに転送します。 HTML Popup : 受信したHTMLを単独でポップアップ表示します。 デジサイトに受信したHTMLを画像として転送する場合 別途の方法を使いますので 通常はチェックを 入れないでください。 Video Popup : 受信したビデオをポップアップし表示しますが HTMLと 同様にチェックを入れずに使います。 Mail Popup : 自局あてにメールの場合 ポップアップします。 |
||
| 2 | 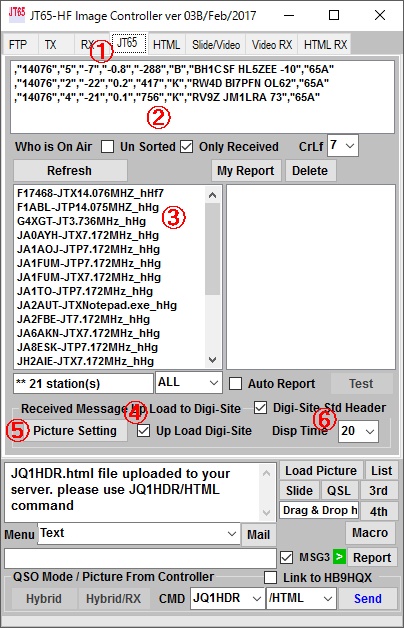 |
1. Select JT65 Tab. 2. JT65-HF Log Dir is correct, you can see JT65 Signal traffic. If no traffic data, check JT65-HF Log Dir. 3. QRV stations are shown on this list. 4. If received HTML, check to transfer HTML Image to Digi-Site. 5. Then click "Picture Setting" and set various check box as mentioned at HTML receive and send.. 6. When receive HTML, HTML window will be pop upped and select second to close pop up window. 1. JT65タブを開けてください。 2. すべての設定が正し場合 JT65プログラムが受信した信号が表示されます。 3. 現在、運用中の局のリストです。 4. 受信したHTMLを画像としてデジサイトにアップロードする場合にチェックを入れてください。 5. その後、"Picture Setting"ボタンを押して HTMLの受信送信に書かれている通りセットしてください。 6. HTMLを受信すると別な画面が表示されます。 表示時間を選んでください。 時間が経過すると自動的に閉じます。 |
||
| 3 | 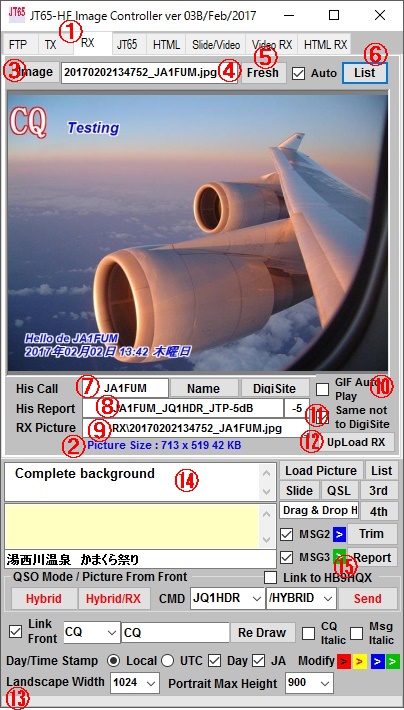 |
1. Select RX Tab. If All setting data are correct and JT65-HF Traffic data includes command, received picture will be displayed. 2. Recived picture size. 3. Large pop up window for received picture. 4. Received picture's file name. will be strored into RX folder. Select old file name to see privious received picture 5. RX folder refresh. 6. Auto refresh at receiving picture. 7. His call sign. 8. Sending report from receiver. 9. Received picture's file name. 10. If checked, received GIF will be animated on the RX . 11. If checked, same size picture is not up loaded to the Digi-Site. 12. When received picture is used for HTML, Click this button. Picture name is YourCall_received.jpg. 13. If you have your Digi-Site and setting is correct, Green progress bar will run from left to right for up loading your received picture to Digi-Site. If you have no run progress bar or circling mouse display, check your Digi-Site data such as FTP, ID, Passwor, Directory and etc. 14. Up loading process is complete in back ground. 15. Another report window will be pop upped. Most of the cause when you can not receive the image is located in the log settings of JT65-HF.Please check the settings again. 1. RXタブを開けてください。 2. 受信した画像のサイズを表示します。 3. 受信した画像を大きく表示します。 4. 受信した画像を保存する名称です。 5. 受信時に自動的にリストを更新します。 6. 受信画像のフォルダーを開きます。 7. 受信した相手局 8. 受信した信号のレポートです。 9. 受信した画像の保存名称です。 10. チェックを入れると 受信した動画GIFを動作させます。 11. 同じサイズ すなわち 同じ画像が 連続する場合は 2枚目以降は デジサイトにアップロードしません。 12. 受信した画像をHTML等で 使用する場合はこのボタンを押して 画像を転送してください。 13. デジサイトにアップロードする過程を表示します。 14. デジサイトへのアップロードや受信時のメッセージを表示します。 15. 自局に送られたレポートを見ます。 なお、受信がうまく行かない場合のほとんどの場合は ログフォルダーの 指定間違いが多いです。 再度 チェックしてください。 |
||
| Sending JT65-HF Picture | ||||
| 4 | 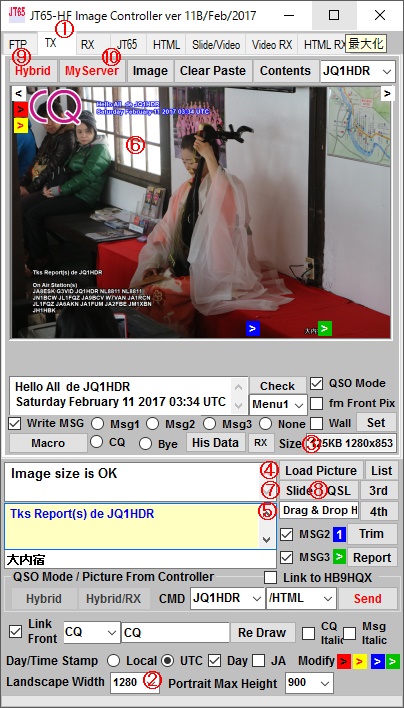 ******* IMPORTANT ******* If you want to use your own server, your URL shall be registered into my Master Data. Please allow me to register your URL, If you are over sea station and have registered on Digi-Site officailly If you are domestic user, please let me know your URL. Before registred URL into Master, you can use HYBRID command only. |
How to Send Picture 1. Select TX Tab. 2. Select Picture Size, default is 1024. 3. Click here to show Writting menu. ---- How to loadPicture ---- 4. Click "Load Picture" button, then select picture. Selected picture will be resized automatically. ---- 5. Open Windows explore, then drag and drop the selected picture the picture will be resized automatically. ---- If you are using a picture editor, copy it to the clip board after processing the image. 6. Click here and will be displayed Sending Picture. Size of sending picture should be determined by the picture editor. ---- 7. Click to load Slide picture for sending. Enter Slide no. and click OK button. Slide will be loaded from No.1 to No.2 automatically. This actionn is effective only slides have been loaded on the Slide/Video Tab. ---- 8. Click QSL button to load QSL Card image which is created on the JT65-HF QSL program. Now Sending Picture is ready, then 9. Click "Hybrid" button , then the program will send your picture to hybrid server. You must use "YourCall/HYBRID". 10. Click "My Server" button , then the program will send your picture to your server. You must use "YourCall/PHOTO". Send Command "Your Call/HYBRID" or "Your Call/PHOTO using the free text of JT65-HF, WSJT-X or JT65-HF HB9HQX Edition.. In order to facilitate the transmission, it is better to register your software with various macro. 画像の送り方 1. TXタブを開いてください。 2. 画像の大きさを選んでください。通常は1024ピクセルです。 3. ここをクリックして 文字書き込みメニュを出してください。 ----- 画像の読み込み方法 ----- 4. "Load Picture"ボタンを押してください。 画像を選ぶと 選ばれた画像が指定サイズで 読み込まれます。 ----- 5. ウィンドウエクスプロラーで画像フォルダーを開いてください。 送る画像をドラグして ここに張り付けてください。 画像が指定サイズで読み込まれます。 ----- もし、画像を編集するソフトをお使いなら 編集した画像をクリップボードにコピーしてください。 6. 画像部分をクリックすると 画像が張り付けられますが 画像の大きさは 編集ソフトで 指定した大きさになります。 ----- 7. ”Slide”ボタンを押すと Slide/Videoタブで読み込まれたスライド画像8枚を使います。 どのスライドを使うのか 番号を入れてOKを押すと画像が読み込まれます。 次に再度Slideボタンを押すと 番号は自動的に繰り上がり、次の画像が読み込まれます。 ---- 8. JT65-HF QSLで作成した QSLカードイメージを読み込みます。 これで送信準備が完了します。 9. ”HYBRID" ボタン これは 画像をシステムの廃部リドサーバーに送り 使用する送信コマンドは 貴局のコール/HYBRID を使用します。 10. ”My Server"ボタンは 画像を貴局のサーバーに送り 使用する送信コマンドは 貴局のコール/PHOTO を使用します。 使用する JT65のソフトで フリーテキストに 貴局のコール/HYBRID や 貴局のコール/PHOTO を登録しておくと 送信が便利になります。 |
||
| 5 | 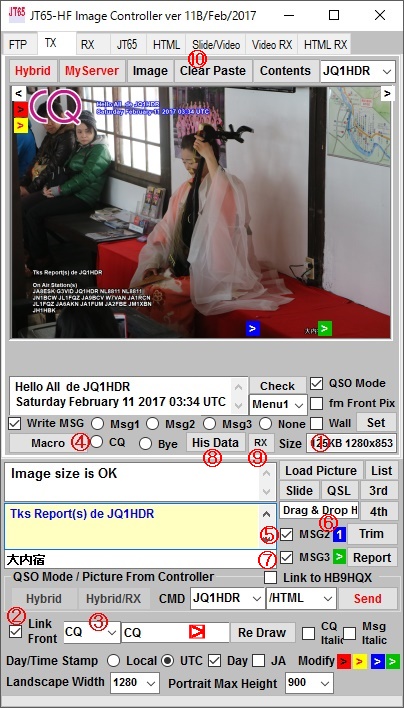 |
How to write a message on the sending picture. 1. Click here to show Writting menu. 2. Check "Link Fron" to use Front Macro. 3. Select Menu such as CQ, RRR, 73. Selected macro will be written on the picture. 4. Click to edit Macro. See next section. 5. Write "MSG" 6. Write "MSG2" Click "Blue" mark to change MSG3 Macro. Click again is next macro. 7. Write "MSG3" Drag "Red", "Yellow", "Blue" or "Green" mark to move location of written message with mouse. To paste RX picture on teh sending picture. 8. Click "His Data" button to get his call, his name and his SNR. 9. Click "RX" button to paste RX picture on the sending. Drag RX picture to move location and use mouse wheel to change RX size. 10. Clcick "Clear Paste" button to erase RX picture. 画像にメッセージを書く 1. メッセージ書き込みメニュを開いてください。 2. ”Link Front”をチェックし フロントのマクロを使うようにします。 3. ここでメニュを選んでください。CQ、RRR,73等です。 4. マクロを編集するボタンです。次のセクションで説明します。 5. MSGの内容です。 6. MSG2の内容と チェックを入れると MSG2を書き込みます。 7. MSG3の内容と チェックを入れると MSG3を書き込みます。 8. ”His Data”ボタンを押すと 相手局のコール、名前、レポートが取り込まれます。 9. "RX"ボタンを押すと 受信した相手局の画像が送信画像に貼付けられます。画像をドラッグすれば 貼付け位置の変更、 また、 マウスホイールで画像の大きさを変えられます。 10. ”Clear Pastet "ボタンで RX貼付け画像を消します。 |
||
| 6 | 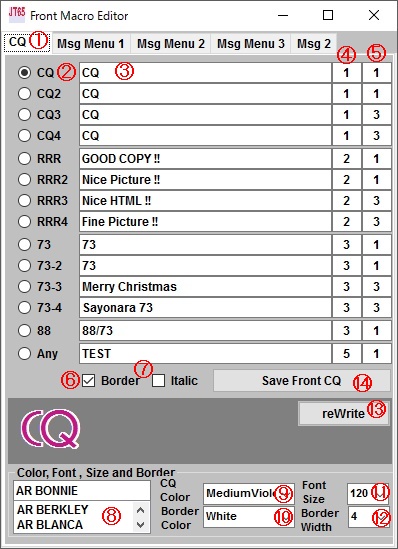 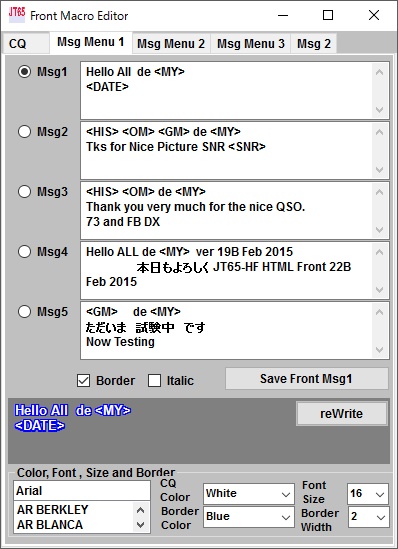 |
---- How to make Macro for writting messages---- If CQ, RRR or 73 is chosen, big CQ and small letter message will be writen in the sending picture.This menu will be written in combination with CQ and message. 1. Select CQ Tab. 2. Select the item to edit. 3. It is the contents of CQ written when choosing CQ. 4. It is the number of messages written at the same time as CQ and it is 1 to 5 5. This indicates the menu number on which the message is written and it is 1 to 3. 6. Border charaacter 7. Italic character. 8. Font 9. Character color 10. Border color 11. Size 12. Border width 13. Confirm changed Font. 14. Saves all changes To edit a message, please select Msg Menu and edit it the same way. ----- マクロの編集 ----- 1. CQタブを選んでください。 2. 編集する項目にチェックを入れてください。 3. 選ばれた ここでは CQ 能登に書き込まれる内容です。 4. CQが選ばれたときに 書かれるメッセージの番号で 1から5までです。 5. メッセージの種類 Menu1からmenu3 まであります。 6. 縁取り文字にします。 7. イタリック書体とします。 8. 文字のフォントを選べます。 9. 文字の色 10. 文字縁取りの色 11. 文字サイズ 12. 文字縁取りの幅 13. 変更時の書き直し 14. すべての変更を保存します。 |
||