| Sending with various picture arrangement | ||||
| 1 |  |
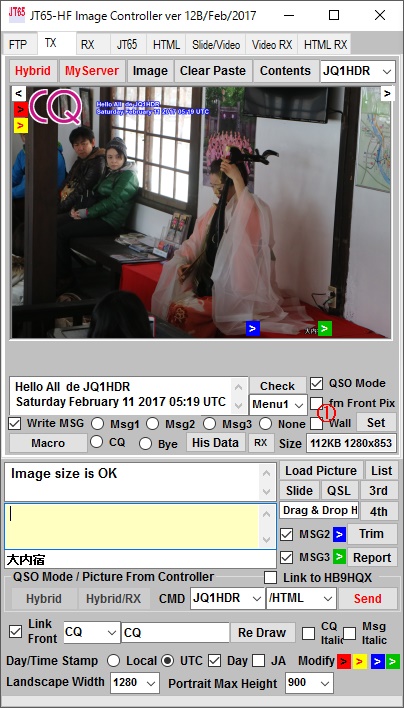
1. Check "Wall" 1. "Wall"にチェックを入れてください。 |
||
| 2 |  |
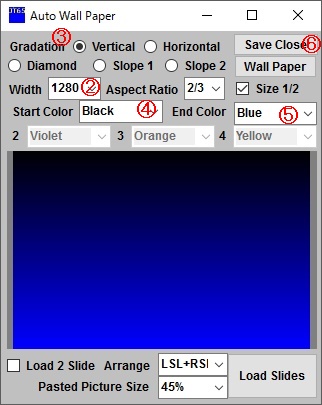
Then Auto Wall Paper window will be displayed. 2. Select Picture size. 3. Select Gradation type, Vertical, Horizontal, Slope1, Slope2 or Diamond. 4. Select Start Color 5. Select End Color 6. Click "Save Close" button to send wall image to the controller. そうすると Auto Wall Paper が立ち上がります。 2. 画像の大きさを設定してください。 3. グラデーションのする意を選んでください。 種類には 垂直方向、 水平方向、 斜め1、 斜め2 ダイヤモンドがあります。 4. 最初の色、 5. 最後の色 を選んでください。 6. "Save Close" ボタンを押してください。 作成された壁紙がコントローラーに送られます。 |
||
| 3 |  |
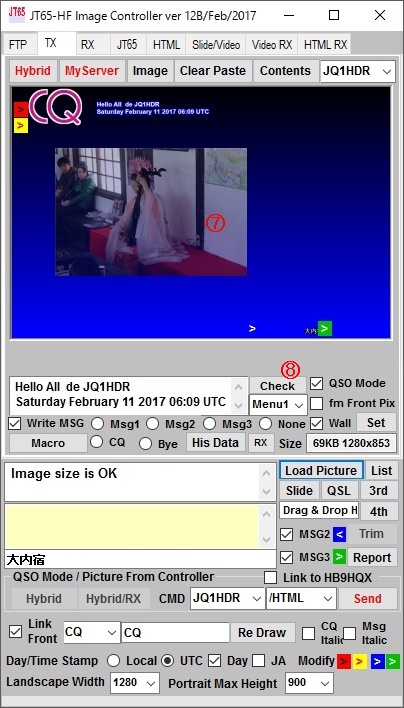
Then Auto Wall Peper windo will be close and your TX picture will be changed to created Wall Paper with Translucent box. Click "Load Pic" or other button to load sending picture and it is shown in the ranslucent box 7. Drag the ranslucent box to move location, use mouse wheel to change size. 8. Click "Check" button to see your sending picture. At the background of the image display order is Wall Paper, then semitransparent image ,the letters are at the top. コントローラーに作成された壁紙とその上に半透明の枠が現れます。 "Load Pic"ボタンを押して 送信画像を取り込みます。 押して 画像を選択すると 背景にするのか 送信画像にするのかを 聞いてきますので No を選んでください。 そうすると 半透明の枠の中に表示されます。 7. 枠をドラッグすると その位置が変更できます。 マウスホイールで その 大きさを変更できます。 8. "Check" ボタンで 作成された画像を確認できます。 グラデーション画像に書かれる 画像の順番は 最初に壁紙、 次に枠の画像、 最後に文字となります。 |
||
| 4 |  |
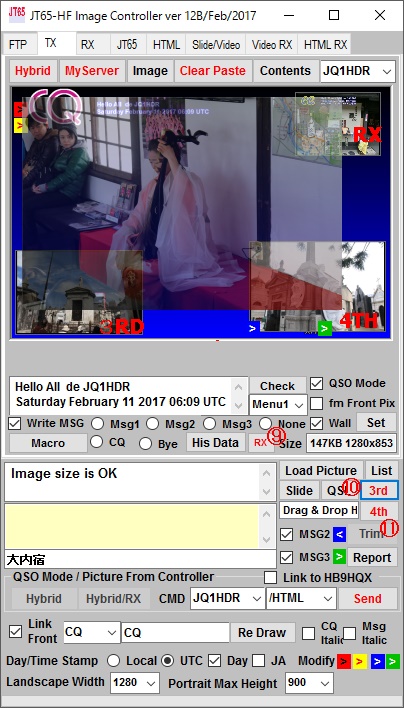
9. RX picture can be pasted also 10. Click "3rd" button and load picture, 3rd picture can be pasted. 11. Click "4th" button and load picture, 34th picture can be pasted. Drag a picture to move location, use mouse wheel to change size. 9. 受信画像も張り付けることが出来ます。 10. さらに、 第3の画像 11. さらに 第4の画像も挿入することが出来ます。 これらの画像は 同じように ドラッグで位置を マウスホイールで 大きさを変更できます。 |
||