| Setting Program and Configuration File | ||
| 1 | Set Up Program here for Windows 7 and 8 JT65-HF Image Controller Sorry XP version is finished |
|
| 2 |  |
Setting of FTP.cfg file 1. Input your call sign, use upper case 2. Provider FTP address like ftp.xxxxxx.com 3. User ID 4. User Password。Special characters can not be used. 5. FTP Directory if any. if no directory, delete this item 6. Directory name JT65-Controller is installed(Automatically created) 7. Received Image folder (Automatically created) 8. Your image name (Automatically created) 9. If you you have own web site for Digisite, input here like http:xxxxx.xxx.xxx/dir/. Last letter shoulnd be "/". 10. JT65-HF or WSJT-X Log file Directory, 6 and 10 is equal is better and it can change at JT65-HF setting . 11. Check your JT65 program. 12. If PSK Front Dir is setteled, PSK checkbox will appear. 13. Reoad ftp.cfg /Save changes to FTP.cfg file, After input your data Click "Save Changes". If you have no own server, Input item 1, 6 and 10 so that you can enjoy "HYBRID" command for picture sendding. Of cause you can receive any command from other station. 1. コールサインを入れてください。 2. プロバイダより指示された FTPサーバーのアドレスを入れてください。 3. ユーザーIDを入れてください。 4. パスワードを入れてください。 特殊文字は使えません。 5. サーバーにディレクトリーがある場合は それを入れてください。 6. コントーローがインストールされたフォルダー名称 自動的に入ります。 7. 受信画像が保存されるフォルダー名称 自動的に入ります。 8. 送信する画像名称 自動的に入ります。 9. デジサイトのURLを入れてください。 デジサイトに独自のディレクトリーを設けている場合は http://xxxx/xxx/xxxZZZ/ ZZZ が独自のディレクトリー で 最後は / スラッシュ としてください。 10. 使用する JT65用のソフトで ログファイルを作る場所 ⑥と同じにしてください。 WSJT-Xの場合は C:\Users\PCUser\AppData\Local\WSJT-X としてください。 11. 使用するプログラムにチェックを入れてください。 12. VariFront を使用する場合は チェックを入れてください。 13. インプットが完了 あるいは 修正したら "Save Change" ボタンを押してください。 |
| 3 | 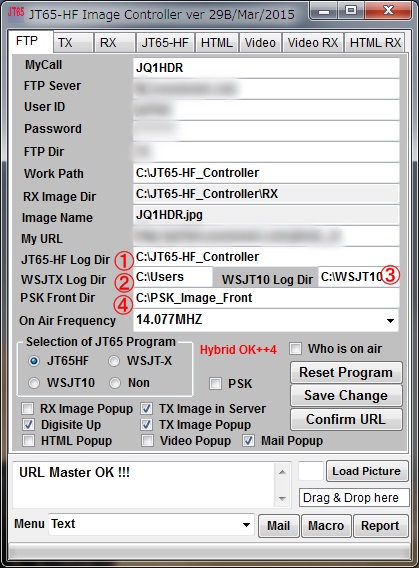 |
Setting of Log File Folder According to selected JT65 program, Log Folder should be allocated. 1. JT65-HF or JT65-HF HB9HQX Edition, Click label "JH65-HF Log Dir", then Folder selection window will be pop upped, select folder as mentioned below. 2. WSJT-X ver1.4 are selected, Click label "WSJT-X Log Dir", then Folder selection window will be pop upped, select folder C:\Users\PCUser\AppData\Local\WSJT-X. 3. WSJT10 is used, Click label "WSJT10 Log Dir", then Folder selection window will be pop upped, select folder WSJT10 program is installed. 4. PSK Mode is used, then install PSK Image Front and Click label "PSK Front Dir", then Folder selection window will be pop upped, select folder PSK Image Front is installed. 使用するJT65プログラムにより ログを保存するフォルダーを指定しないとプログラムは動作しません。 1. JT65-HF HB9HQX や JT65-HFを使う場合は 必ず コントローラーのインストールされた フォルダーとして下さい。 2. WSJT-Xの場合は C:\Users\PCUser\AppData\Local\WSJT-X としてください。 3. WSJT10やWSJT7の場合は WSJT10やWSJT7がインストールされたフォルダーとしてください。 4. VariFrontを使用する場合は VariFrontがインストールされた フォルダーとしてください。 |
| 4 | For JT65-HF, the above ⑥ and below ④ shall be equal. HB9HQXを使用する場合は コントローラーがインストールされているフォルダーとしてください。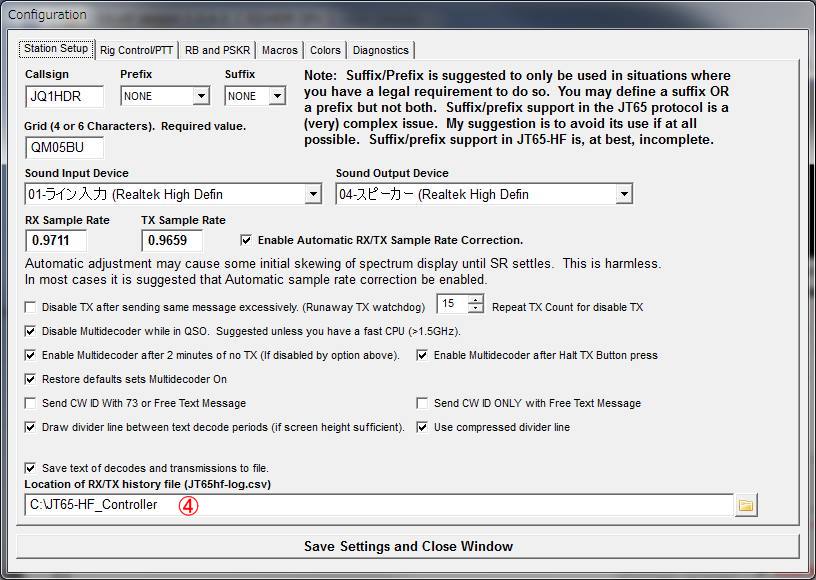 |
|
| For JT65-HF HB9HQX Edition, the above ⑥ and below ⑤ shall be equal, and
also ⑥ shall be checked. HB9HQXの場合は 下記の ⑤ コントローラーのインストるされたフォルダー ⑥ コントローラー用のログ保存にチェックを入れる 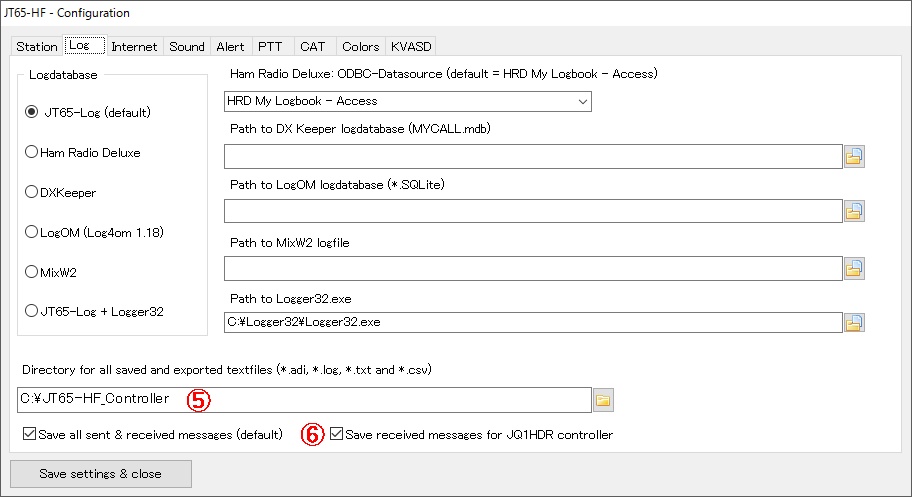 |
||
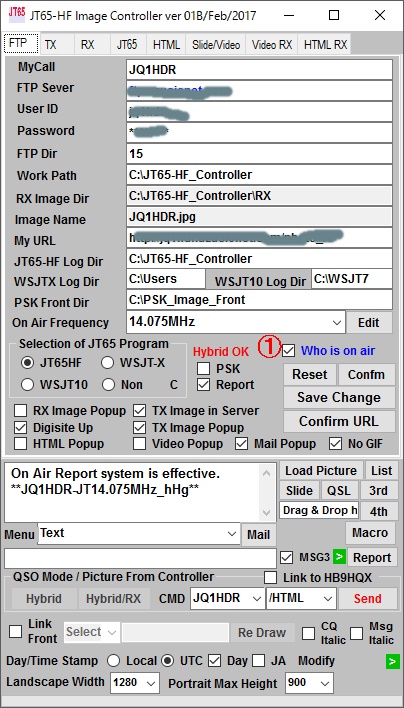 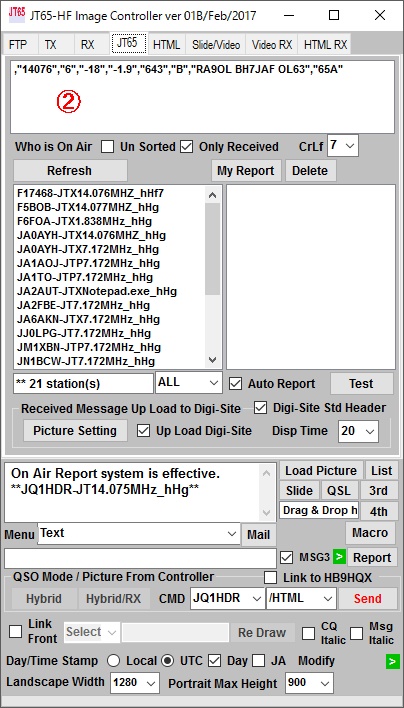 |
Confirming Connection between Controller and your JT65 How to confirm connection is correct or not. 1. Check Who is on Air. 2. Open JT65 Tab, look at small window. If connection is correct receiving data will be displayed. If not check log folder is JT65-HF Image Controller installed. 設定が正しいかどうかの確認 確認方法 1. Who is on Air にチェックを入れてください。 2. JT65タブを開けて 最上部の②の部分を見てください。 受信データが表示されれば 設定は正しいです。 表示されない 場合は 設定がコントローラーがインストールされたフォルダー になっていることを確認してください。 |
|