| TOPICS�@15/January/2017 version INSTRUCTION HERE �Z�b�g�A�b�v���� | ||||||||||||||||||||||||||||||||||||
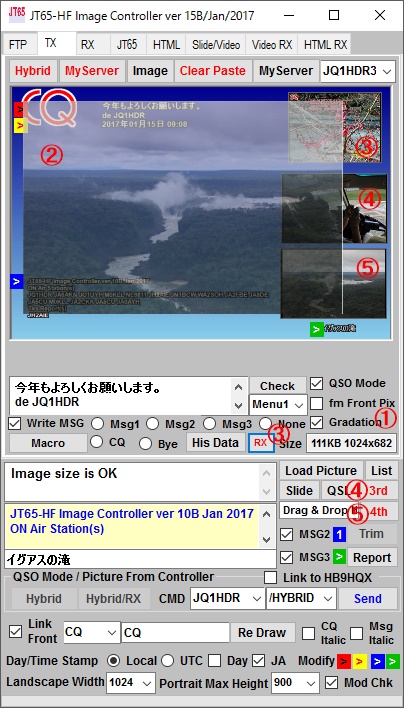 |
JT65-HF Image Controller : Revised 1. Gradation can be applied to normal Picture for background. �@�@Check "Gradation", then set Gradation type. It will be backgrond of �@�@picture. �@�@4 pictures can be set on backgroud. 2. Click "Load Picture" button, Program ask whethe it is TX image or �@�@ background image, so select TX image. Please adjust the size �@�@�@as it will contain translucent images. If click "Slide" button, it will be �@�@�@for TX image.�@Use mouse wheel to change the size. 3. 2nd picture is RX image. 4.5. 3rd and 4th can be set on background picture with click "3rd" or "4th" �@�@�@button. Drag picture to set location and use mouse wheel to change �@�@�@ size.�@ 6. To delete 3rd or 4th image, click 3rd or 4th button again. 7. The order of priority when images and characters overlap is �@�@1�j�@Characters �@�@2�j�@RX Image �@�@3�j�@4���� Image �@�@4�j�@3���� Image �@�@5�j�@Background Image 8. Fixed bugs. 1.�@�ʏ�̉摜�ɂ��O���f�[�V�����o�b�N�O�����h���o����悤�ɂ��܂����B �@�@Gradation�@�Ƀ`�F�b�N������Ɓ@�O���f�[�V�����̌`�������Ă��Ă��������B �@�@�w�肳�ꂽ�O���f�[�V�������o�b�N�O�����h�ƂȂ�܂��B �@�@4���̉摜���o�b�N�O�����h��ɔz�u�ł��܂��B�@�摜�̑傫���̓}�E�X�z�[�C�[�� �@�@�ōs���Ă��������B 2.�@Load�@Picture�{�^���������Ɓ@TX�摜�p���o�b�N�O�����h�p���� �@�@������܂��̂Ł@TX(No)��I��ʼn������B�������ȉ摜������܂��̂� �@�@�傫���߂��Ă��������B�@�Ȃ��ASlide�{�^���ł�TX�p�̉摜�ƂȂ�܂��B 3.�@2���ڂ͎�M�摜�ł� 4. 5.3���ځA4���ڂ͎��R�ȉ摜�����邱�Ƃ��o���܂��B�@3�����A4�����{�^���������� �@�@�摜����荞�߂܂��̂Ł@�ʒu�̒����@�傫���̓}�E�X�z�C�[���� �@�@�s�Ȃ��Ă��������B�@ 6. 3rd 4th �̉摜�������ɂ́@�ēx�@�����{�^���������Ă��������B 7. �摜�╶�����d�Ȃ����ꍇ�̗D�揇�ʂ� �@�@1�j�@���� �@�@2�j�@��M�摜 �@�@3�j�@4�����摜 �@�@4�j�@3�����摜 �@�@5�j�@�o�b�N�O�����h�摜�@�ɂȂ�܂��B 8.�@�o�O�̏C�������܂����B |
|||||||||||||||||||||||||||||||||||
| TOPICS�@25/December/2016 version INSTRUCTION HERE �Z�b�g�A�b�v���� | ||||||||||||||||||||||||||||||||||||
| JT65-HF Image Controller : Revised 1 Fixed other bugs. 2. Digi-Site up load format was changed to show call sign for the latest �@�@Digi-Site. 3. When QSO Mode is checked, the commnad will be also transfered �@�@automatically. so no need to click "Send" button. 4. When "Same no�� to DigiSite" is checked, RX picture received same as �@�@before will not be up loaded to DigiSite on the both JT65 and PSK mode. 5. Added QSO Mode on VARI Image Front 1. �o�O���C�����܂����B. 2.�@�f�W�T�C�g�ւ̃A�b�v���[�h�t�H�[�}�b�g���@�ŐV�f�W�T�C�g�ŃR�[���� �@�@�\������悤�ɕύX���܂����B 3.�@QSO���[�h�̎��ɁA�R�}���h�͎����I�ɑ��M����@Send�{�^���������K�v�� �@�@����܂���B 4.�@"Same no�� to DigiSite"���`�F�b�N�����Ɓ@��M�����摜���O�Ɠ������̂� �@�@�f�W�T�C�g�ɃA�b�v���[�h����܂���B�@JT65���[�h�����PSK���[�h�� �@�@�L���ł��B 5. VARI Front ��QSO���[�h�@�g�p�R�}���h�@CMD�@��lj����܂����B |
||||||||||||||||||||||||||||||||||||
| TOPICS�@01/December/2016 version INSTRUCTION HERE �Z�b�g�A�b�v���� | ||||||||||||||||||||||||||||||||||||
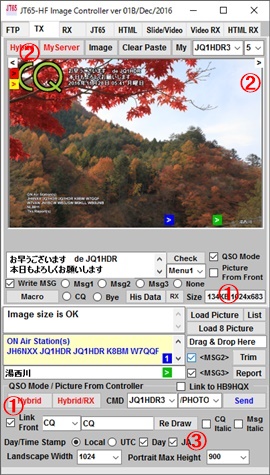 |
JT65-HF Image Controller : Revised 1. To be able to use the registered MSG, MSG 2, MSG 3 settings of �@�@the JT65-HF Front. Click "Show Others" on the TX tab to open �@�@the menu. 2. It possible to rotate the image. Click the mark of the white < > on �@�@the left and right of the TX tab to rotate the image. �@�@Image height is that set it with Protrait Max Height. �@�@Rotation direction is clockwise or couter clockwise 90 deg only. 3. The date and time format of images can now be selected. 4. Change the background color of the TX tab and HTML tab to Silver �@�@not to disappear 5. Report window will be pop upped if checked "Link COntroller" at �@ HB9HQX. 6. Fixed other bugs. 1. �t�����g�̊e��o�^����MSG�AMSG2�AMSG3�̐ݒ���g����悤�� �@�@���܂����BTX�^�u��ShowOthers���N���b�N������j�����J���܂��B 2.�@�摜�̉�]���ł���悤�ɂ��܂����B�@TX�^�u�̍��E��ɂ��锒������ �@�@�}�[�N���N���b�N����Ɖ摜�͉�]���܂��B�@�摜������ �@�@Protrait�@Max�@Height�Ł@�ݒ肵�Ă��������B��]�����́@�E�܂��͍�90�x�ł��B 3.�@�摜�̓��t�A���Ԃ̌`����I�ׂ�悤�ɂ��܂����B 4.�@TX�^�u�����HTML�^�u�̔w�i�F��Silver�Ƃ��ĕ����������Ȃ��Ȃ�Ȃ� �@�@�l�ɂ��܂����B 5.�@HB9HQX�́hLink Controller" �Ƀ`�F�b�N������@���|�[�g���|�b�v�A�b�v���܂��B 6.�@���̑��@�o�O�̏C�������܂����B |
|||||||||||||||||||||||||||||||||||
| TOPICS�@01/November/2016 version INSTRUCTION HERE �Z�b�g�A�b�v���� | ||||||||||||||||||||||||||||||||||||
 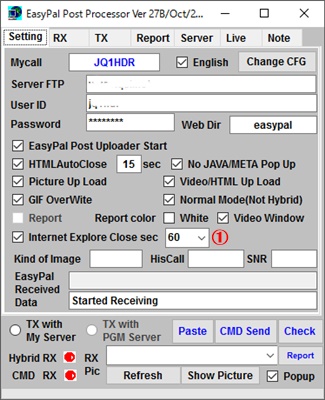 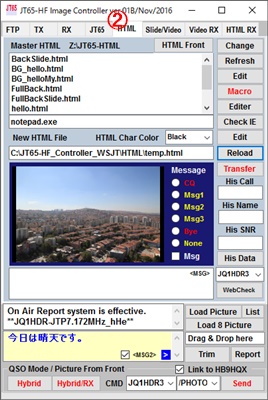 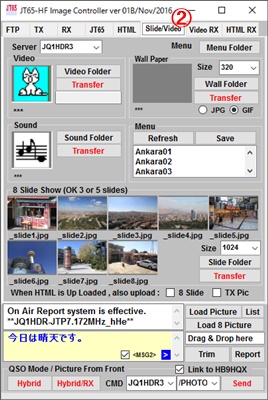 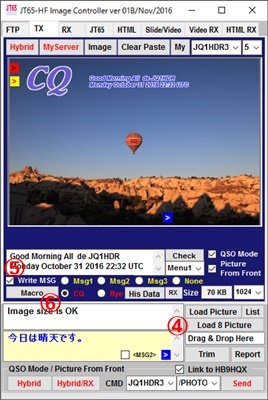 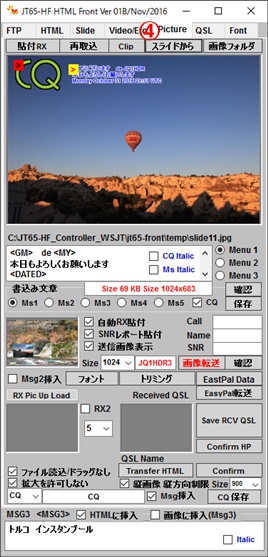 |
November01 2016 Version JT65-HF Image Controller : Revised JT65-HF IHTML Front : Revised JT65-HF Slide Show Editor : Newly Added EasyPal Post : Revised 1. When Intenet Explore is pop upped, Controller and EasyPal Post will �@�@close the pop up window automatically. 2. The Controller added function like Front. 3. Added new program "JT65-HF Slide Show Editor" of easy preparation �@�@on making 8 silde show, video and/or music �CThese slide picture can be �@�@used for Picture image individually., 5. Check, then you can write message on the picture like Front. �@ 6. Click, then you can make your Macro for writing. �@ �@Added a lot of othe features and the fact that you enjoyiment of using. 1. �C���^�[�l�b�g�G�L�X�v�����[���|�b�v�A�b�v�����ꍇ�́@�����I�� �@�@����悤�ɂ��܂����B 2. �R���g���[���[�Ƀt�����g�@�\��lj����܂����B 3. �V���ɁhJT65-HF �X���C�h�V���[�G�f�B�^�[���@�X���C�h�p�̉摜��r�f�I �@�@���y�̊ȒP�ȕҏW�p�ɕt�����܂����B�@�C�����̉摜�́@�ʂ� �@�@���M�p�ɗ��p���邱�Ƃ��o���܂��B 5. �`�F�b�N����ƃt�����g�Ɠ����悤�ɕ������������Ƃ��o���܂��B �@ 6. �������ޕ����̃}�N���͂��̃{�^���œo�^���܂��B �@���̑��@�����̋@�\��lj����܂������@�g���Ă̂��y���݂Ƃ������Ƃ��܂��B |
|||||||||||||||||||||||||||||||||||
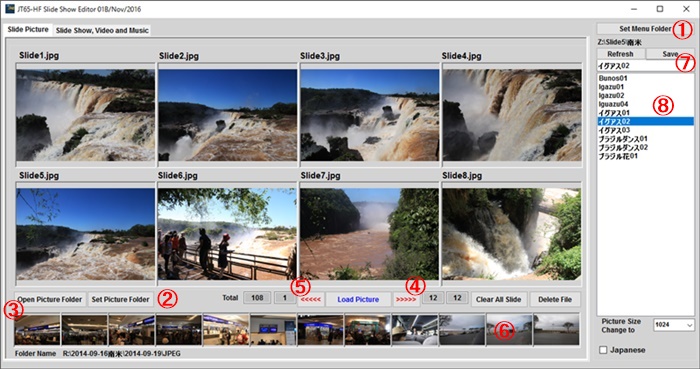 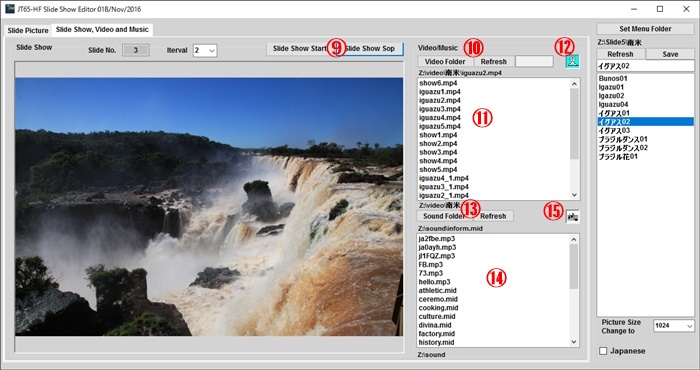 |
JT65-HF Slide Show Editor : Newly Added 1. Click ICON Slide Show Editor to start program. This program is a lot of image, is intended to be able to read the video and music to efficiently organize and controller or front. Slide Picture 1. Click this button to determine the directory which saved Menu for �@�@pictures, video and music. If necessary, make sub directory. �@�@sample shows main directory is Z:\Slide5 and �@�@sub directory is South_america and this name is menu name �@�@which conatins�@8 slide pictures, Video and Music. 2. Click this button to open your picture folder. 3. If open your picture folder, 12 sumunel pictures will be loaded from �@�@your folder. 4.5. Next or Privious 12 Pictures 6. Click sumunel to copy, then Click Side1 to Silde8 any place you want. �@�@ �@then picture will be pasted.�@Left Click is Copy or Paste and Right Clicck �@�@is to show your large picture. 7. To save your manu, click this button, then window ask you sane Name. �@�@then click OK button. If you name same name as privious one, �@�@it overwrite on privious. 8. To read privious one, select menu on menu list. Slide Show, Video and Music 9. To start or stop slide show. 10. Click to open your video folder, then WMV or MP4 file will be shown on the List. 11. To select Video File , Click file name on the list. 12. Click here to play video. 13.14.15. Music file is same as Video. These�@Menu can be load from JT65-HF Image Controller (Silde/Video Tab) or JT65-HF HTML Front (Slide Tab) ���̃v���O�����͑����̉摜�A�r�f�I�≹�y�������ǂ��������R���g���[���[��t�����g�ɓǂݍ��߂�悤�ɂ�����̂ł��B Slide Picture 1. ���̃{�^���̓X���C�h�A�r�f�I�≹�y��g�ݍ��킹�Ƃ��ĕۑ����邽�߂� �@�t�H���_�[�����肵�܂��B�@��ł́@���C���t�H���_��Z*\Slide5�@�T�u �@�Ƃ��ā@��Ă�ݒ肵�Ă��܂��B�@�K�v�ɉ����ā@�T�u�t�H���_�[�� �@�쐬���Ă��������BClick this button to determine the directory which saved 2. ���̃{�^���́@�摜���ۑ�����Ă���t�H���_�[�����߂܂��B. 3. �摜�t�H���_�[�����Ă���@�t�B���_�[���̉摜���T���l�[���ƂȂ��� �@12���Âǂݍ��܂�܂��B�@ 4.5. ����12���@�܂��́@�O��12��s 6. �T���l�[�����N���b�N����Ƃ��̉摜�̓R�s�[����@��̃X���C�h1���� �@�@�X���C�h8���N���b�N����ƒ���t�����܂��B���N���b�N�́@�R�s�[�܂��� �@�@�\�t���Ł@�E�N���b�N�́@�摜��傫���\���ł��܂��B 7. 8���̃X���C�h�����肷��@�ۑ��{�^���������Ă��������B�@�ۑ����� �@�@���O���Ă��܂��̂Ł@���t����OK�������Ă��������B�@���łɂ��閼�O�� �@�@�������O�ɂ���Ə㏑������܂��B 8. ���j����ǂݍ��ނɂ́@���X�g�ɕ\�����ꂽ�@���ڂ��N���b�N���Ă��������B Slide Show, Video and Music 9. 8���̃X���C�h�V���[���J�n�A��~���܂��B. 10. ���̃{�^�����N���b�N���ā@�r�f�I���ۑ�����Ă���t�H���_�[���w�肵�� �@�@���������B�@WMV�܂���MP4�̃r�f�I�t�@�C�����\������܂��B 11. Video���X�g���N���b�N����ƃ��B�f�I���I������@ 12. �L���N���b�N����ƃr�f�I���Đ�����܂��B. 13.14.15. ���y�t�@�C��(MP3�܂���MID)���r�f�I�̑���Ɠ����ł��B �����ō쐬���ꂽ���j���́@�R���g���[���[��t�����g�œǂݍ��ނ��Ƃ� �o���܂��B�@�R���g���[���[�́@Slide/Vide�^�u�̂Ƃ���Ł@�t�����g�� Slide�^�u�̂Ƃ���ł��B |
|||||||||||||||||||||||||||||||||||
| TOPICS�@01/October/2016 version INSTRUCTION HERE �Z�b�g�A�b�v���� | ||||||||||||||||||||||||||||||||||||
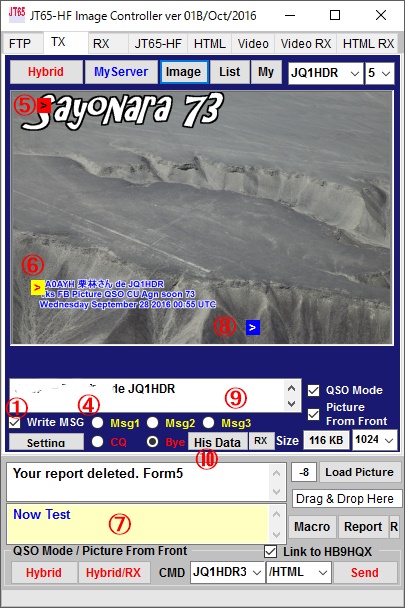 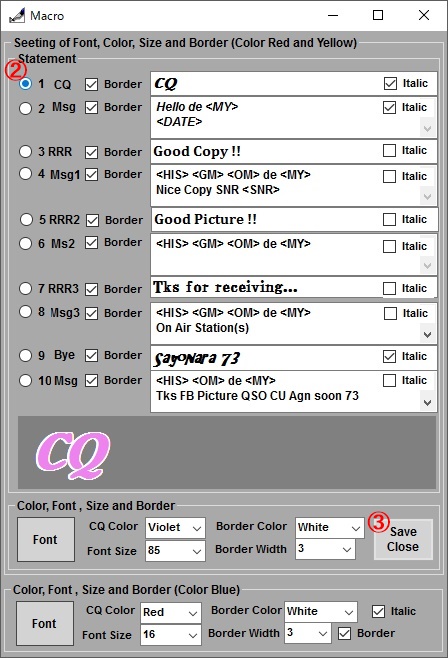 |
October 01 2016 Version JT65-HF Image Controller Added Program for Easy Wrinting on the picture. To Write 1. Checked Write MSG Check box. 2. Then open Macro Window. �@Writting Message is combination of Odd and �@Even number. �@Font size, Color, Border color, Boder width �@Font, Italic style can be changed each �@message. 3. Finaly Click Save Close button �@to save setting. 4. Load your picture, then Select Msg check. 5. 6. 8 Loaction can be changed by mouse �@ drag of Red, Yellow and blue Mark. Alseo use mouse wheel to change �@Font size. 7. 3rd message can be added also if any. 7. 9. Sentence can be modifid directory and �@click 7 or 9 to rewrite message on the �@ picture. 10. Click to get His Call and His SNR for Macro �ȒP�ɉ摜�ɕ������������[�e�B����lj����܂��� 1. Write MSG�Ƀ`�F�b�N�����Ă������� 2. Macro �ݒ�p�̃E�B���h�E���J���܂��B�@������镶���� �@��Ƌ����̐ݒ�̑g�ݍ��킹�ƂȂ�܂��B�@�܂��A �@�t�H���g�A�����̑傫���A�F�A�{�[�_�[�̐F�ƕ��A������ �@�C�^���b�N�\�����@�ݒ�o���܂��B 3.�@�ݒ芮���́@"Save Close" �{�^���������Ă��������B 4.�@�摜����荞�݁@�L������@Msg�@�Ƀ`�F�b�N�����Ă������� 5.6.8�@�ʒu�́@�ԁA���A�Ƀ}�[�N���h���b�O���邱�ƂŕύX �@�@�o���܂��B�@�܂��A�}�E�X�z�C�[���ŕ����̑傫����ύX�ł��܂��B 7�@�K�v�����3�Ԗڂ̃��b�Z�[�W�ݓ�����܂� 7.9.�@�����͒��ځ@�C�����\�Ł@�}�E�X�ŃN���b�N����� �@�����̏������������܂��B 10. �{�^���������ƃ}�N���p�̃R�[���ƃ��|�[�g����肵�܂��B |
|||||||||||||||||||||||||||||||||||
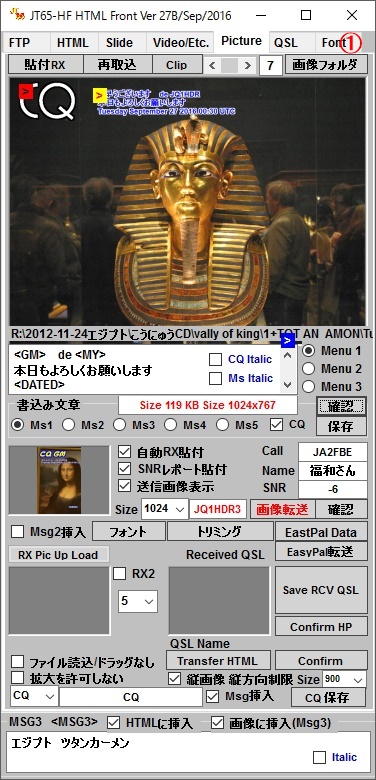 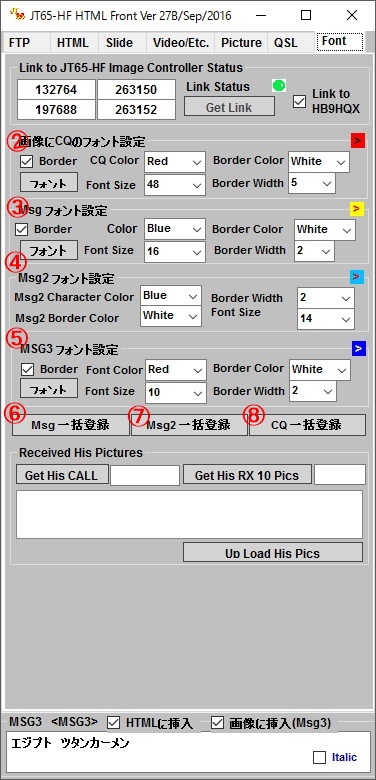 |
October 01 2016 Version JT65-HF HTML Front Added Program for Easy Wrinting on the picture. To Write 1. Click Font Tab to set sentence and its format. 2. 3. 4. 5. Settinh Format for each message independently. �@These are very troublesome. 6. 7. 8. Therfore, use 6. 7. 8 for Easy Setting. for exsample, Click 6 button. 1.�@Font�^�u���N���b�N���Ă��������B 2.�@3.4.5.�@�����́@�X�Ƀt�H���g��ݒ�ł��܂����@���X�ʓ|�Ȃ��̂ł��B 6.7.7�@�́@�ꊇ�Őݒ肪�ł���悤�ɂ��Ă��܂��B �Q�l�Ƃ��ā@6���N���b�N���Ă��������B |
|||||||||||||||||||||||||||||||||||
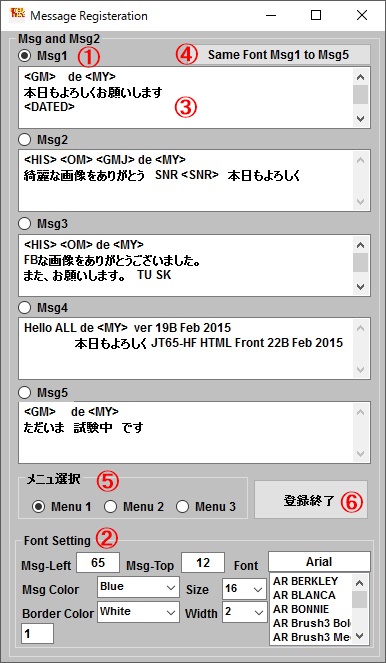 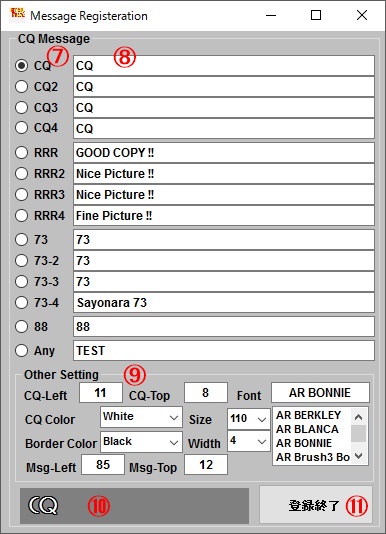 |
Message Regisitration Window will be openned. Deflts are displyed , 1. Select message Number. 2. Slect Color Size Borde color, border width or Font. 3. Modify sentence. 4. Click to same font style Msg 1 to Msg5. 5. Select Menu. 6. Click Save button to save whole setting. ���b�Z�[�W�ݒ��ʂ��J���܂��B �f�t�H���g���\������܂��B 1.�@���b�Z�[�W�ԍ���I��ł��������B 2.�@���b�Z�[�W�̃t�H���g�A�T�C�Y�A�F�A�{�[�_�[�F�A�����̐ݒ肪�\�ł��B 3.�@���͂̐ݒ肪�ł��܂��B 4.�@���b�Z�[�W1�̃t�H���g���e�Ɠ����Ɂ@M�����Q����Msg�R�ɐݒ肵�܂��B 5.�@Menu1�@����@Menu3�@�܂Ł@�ύX�ł��܂��B 6.�@�ݒ��ۑ�����ɂ́@�h�o�^�I���h�@�{�^���������Ă��������B 7. Select Sentense 8. Writting sentense, modify it 9. Setting Font format. 10. Actual appearance. 11. Click "Save" button to save whole format and sentense. CQ�ꊇ�o�^�̏ꍇ 7.�@���͂�I��ł��������B 8.�@���͂�ҏW�ł��܂��B 9.�@�I�ꂽ���͂̃t�H���g�Ł@�ύX�ł��܂��B 10.�@���ۂ̕\��������܂��B 11.�@�ݒ��ۑ����邽�߂Ɂ@�h�o�^�I���h�@�������Ă��������B |
|||||||||||||||||||||||||||||||||||
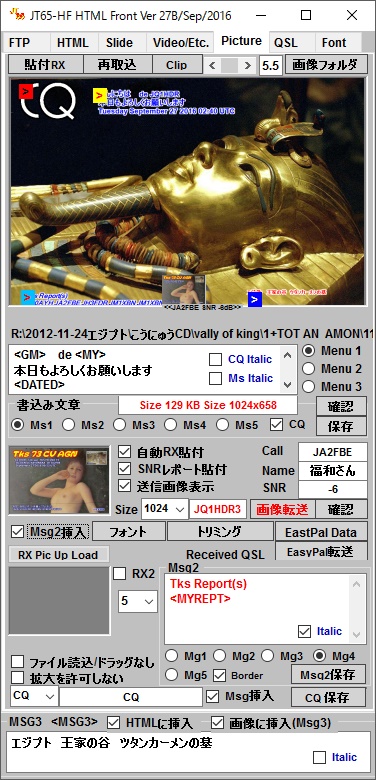 |
To write message on the picture. Load picture on the Front at first 1. Click CQ check button. 2. Red Mark is CQ position and drag to change its location �@Use mouse wheel to change font size. 3. Yellow Mark is Msg1 position, drag to cahnge its location. �@Use mouse wheel to change font size 4. To change message to write with CQ, select Ms1 to Ms5 5. Sycronize CQ with Msg, check this button. 6. Click CQ save button to save CQ location and Msg �@�@number to write with CQ and its location. 7. To change CQ message, select here and also Msg1 to �@�@Msg5 to write combination with CQ. 8. To write Msg2, check here. 9. Select Msg 10. To write Msg3, check here. Also use mouse wheel to change pasted RX pic size. ���b�Z�[�W���摜�ɏ����ɂ́@�܂��@�摜�����Ă��������B 1.�@CQ�`�F�b�N�{�^���Ƀ`�F�b�N�����Ă��������B 2.�@�Ԃ��}�[�N��CQ�������ʒu�ɂȂ�@�h���b�O�ňʒu��ύX�ł��܂��B �@�@�}�E�X�z�C�[���ŕ����̑傫����ύX�ł��܂��B 3.�@���F�̃}�[�N�����b�Z�[�W�������ʒu�Ł@�h���b�O�ŕύX�ł��܂��B �@�@�}�E�X�z�C�[���ŕ����̑傫����ύX�ł��܂��B 4.�@CQ�ƂƂ��ɏ������ޕ��͂́@MS1����M���T�őI��ł��������B 5.�@CQ��I���Ɂ@Msg�@�����������Ƃ��́@Msg�}���Ƀ`�F�b�N�� �@����Ă��������B 6�@.CQ�̃��b�Z�[�W�Ɓ@Msg�̑g�ݍ��킹�₻�̈ʒu��ۑ�����Ƃ��Ɂ@CQ �@�ۑ��@�{�^���������Ă��������B 7.�@CQ���b�Z�[�W��ύX����ꍇ�Ɂ@�����őI��ł��������B�@���̎��� �@�\������M�������@Ms1����Ms5�őI��ł��������B�@���ꂼ��̏ꏊ�� �@�������@CQ�ۑ��{�^���������Ă��������B 8.�@Msg2���������ނƂ��ɂ����������Ă��������B�@ 9.�@�܂��A�@Mg1����@ �@�@Mg5�őI��ł��������B�@ 10.�@Msg3���������ނƂ��Ƀ`�F�b�N��t���� 11.�@���͂���������ł��������B Msg1�AMsg2�AMsg3�̂�������@�ҏW���邱�Ƃ��o���܂��B�@�ύX�̕ۑ��� ���ꂼ��ɂ���@�ۑ��{�^���������Ă��������B �܂��A�@���ꂼ��̏������ݏꏊ���@�N���b�N����Ɖ摜�ɍĕ`�悵 �_�u���N���b�N�ł��̓��e���������܂��B �X�ɁA����t������M�摜�Ń}�E�X�z�C�[���ɂ��傫�����ύX�ł��܂��B �@ |
|||||||||||||||||||||||||||||||||||
| TOPICS�@10/September/2016 version INSTRUCTION HERE �Z�b�g�A�b�v���� | ||||||||||||||||||||||||||||||||||||
| September 10 2016 Version JT65-HF Image Controller, JT65-HF HTML Front 1. Big character like CQ or 73 van be write on the picture. 2. Bugs are fixed. 1.�@CQ�A73�̂悤�ȑ傫�ȕ������L���ł���悤�ɂ��܂����B 2.�@�F�X�ȃo�O���C�����܂����B |
||||||||||||||||||||||||||||||||||||
| TOPICS�@10/July/2016 version INSTRUCTION HERE �Z�b�g�A�b�v���� | ||||||||||||||||||||||||||||||||||||
| July 10 2016 Version JT65-HF Image Controller, JT65-HF HTML Front 1. Server Domain Name shall be changed because service of domain server will be stopped by End of July. �@�@Please version up and old version will not worked well. 1.�@�h���C���T�[�o���T�[�r�X�𒆎~�ɂȂ邽�߁@�h���C�����̕ύX���K�v�ł��B �@�@�o�[�W�����A�b�v�����肢���܂��@�Â��o�[�W�����͎g���Ȃ��Ȃ�܂��B |
||||||||||||||||||||||||||||||||||||
| TOPICS�@25/February/2016 version INSTRUCTION HERE �Z�b�g�A�b�v���� | ||||||||||||||||||||||||||||||||||||
| February�@25 2016 Version JT65-HF Image Controller, JT65-HF HTML Front, EasyPal Post Processor 1. Master Server has been changed 2. Picture and video file can be read by open dialogue on JT65-HF Front. 1.�@�}�X�^�[�p�̃T�[�o�[��ύX���܂����B�B 2.�@�t�����g�ʼn摜��r�f�I�̎�荞�݂��h���b�O�łȂ����@�ŏo����悤�ɂ��܂����B |
||||||||||||||||||||||||||||||||||||
| TOPICS�@08/February/2016 version INSTRUCTION HERE �Z�b�g�A�b�v���� | ||||||||||||||||||||||||||||||||||||
| February�@08 2016 Version JT65-HF Image Controller, JT65-HF HTML Front, EasyPal Post Processor 1. Minor bugs fixed. 2. Bugs on uploading Digi-Site fixed. 1.�@�o�O���C�����܂����B 2.�@�f�W�T�C�g�ɃA�b�v���[�h����ۂ̃o�O���C�����܂����B ------------------------------------------------------ January�@30 2016 Version JT65-HF Image Controller, JT65-HF HTML Front, EasyPal Post Processor 1. Minor bugs fixed. 2. Report will be fixed on Separete Report Window. 1.�@�o�O���C�����܂����B 2.�@�ʃ��|�[�g�E�B���h�E�Ń��|�[�g���\�����ꑱ����悤�ɂ��܂����B�@�f�[�^�̓T�[�o�[���玩�����ɏ����Ă��܂��B ------------------------------------------------------ January�@25 2016 Version JT65-HF Image Controller, JT65-HF HTML Front, EasyPal Post Processor 1. Minor bugs fixed. 2. Function added to limit pop up screen size on EasyPal Post. 1.�@�o�O���C�����܂����B 2.�@�|�X�g�Ł@�|�b�v�A�b�v��ʂ̑傫���𐧌��ł���@�\��lj����܂����B ------------------------------------------------------ January�@22 2016 Version JT65-HF Image Controller, JT65-HF HTML Front, EasyPal Post Processor 1. Minor bugs fixed. 2. Function added to changed EasyPal Post server. 1.�@�o�O���C�����܂����B 2.�@�|�X�g�Ł@�T�[�o�[���ȒP�ɕς�����悤�ȋ@�\��lj����܂����B ------------------------------------------------------ January�@17 2016 Version JT65-HF Image Controller, JT65-HF HTML Front, EasyPal Post Processor, HB9HQX 1. Latest combination makes automatic receiving repot after TX. Check Link Controller on HB9HQX. 2. Bugs fixed on RX picture location 3. Othe minor bugs fixed. 1.�@�ŐV�̑g�ݍ��킹�Ł@JT65���M��̎������|�[�g��M���ł��܂��B�@HB9HQX��Link�@Controller�� �@�@�`�F�b�N�����Ă��������B 2.�@�t�����g��RX�摜�\�t���̈ʒu�s�ǂ̃o�O���C�����܂����B 3.�@���̃o�O���C�����܂����B ------------------------------------------------------ December 28 2015 Version JT65-HF Image Controller, JT65-HF HTML Front, EasyPal Post Processor �����ł́@Passive Mode�͎g�p����K�v�͂���܂���B �t�ɐڑ��Ɏ��Ԃ������邱�Ƃ�����܂��B�@�g�p����Ă�����Ŏ��Ԃ��|���肷����A�b�v���[�h�̏ꍇ�� �`�F�b�N���O���Ă��������B 1. FTP method is changed, add Passive Mode to avoid PC security problem. 2. To use Passive mode, double click text box of FTP Server on JT65-HF FTP TAB, Check Box will appear. �@�@For JT�U�T-HF HTMLFront a, double click character of FTP Server and for EasyPal Post Processor, double click �@�@Server FTP 1.�@PC�̃Z�L�����e�B�[����������邽�߁@�A�b�v���[�h������@�Ƀp�b�V�u���[�h��lj����܂����B 2.�@�p�b�V�u���[�h���g�p���邽�߂ɂ� �@�@JT65-HF Image Controller��FTP�^�u��FTP�@Server�̃e�L�X�g�{�b�N�X���_�u���N���b�N����ƃ`�F�b�N�{�b�N�X�� �@�@����܂��̂Ń`�F�b�N���Ă��������B�@�t�����g�́@FTP�@Server�̕������_�u���N���b�N�A�|�X�g��Server FTP�� �@�@�_�u���N���b�N����ƌ���܂��B�@ �|�X�g�̃}�j���A�����{��͂�����ł��B ------------------------------------------------------ December 26 2015 Version EasyPal Post Processor 1. Bug fixed. 1.�@�o�O���C�����܂����B�@���{��}�j���A�����Q�Ƃ��������B�@���{��͂�����ł��B -------------------------------------------------------------------- December 16 2015 Version JT65-HF Image�@Controller �@JT65-HF HTML Front 1. Bug on PSK report is fixed. 1.�@PSK�̃��|�[�g�Ƀo�O������܂����̂ŏC�����܂����B ------------------------------------------------------ December 10 2015 Version JT65-HF Image�@Controller �@JT65-HF HTML Front 1. Link to HB9HQX Edition�@Ver 1.1. This version is OK to HB9HQX Ver 1.0 and 1.1. 2. If want to link HB9HQX Edition, please set log saved directory to folder installed JT65HF Image Controller. 1.�@HB9HQX�G�f�B�V���� ver 1.1�Ƀ����N�ł���悤�ɂ��܂����B�R���o�[�W������ HB9HQX ver 1.0�����Ver1.1�� �@�@�Ή����Ă��܂��B 2.�@HB9HQX�ƃ����N������ɂ́@Configyre�ݒ�Ł@Log�^�u�̃��O�̕ۑ���́@JT65-HF�@Image�@Controller�̃t�H���_�[ �@�@�Ƃ��Ă��������B |
||||||||||||||||||||||||||||||||||||
| TOPICS�@05/December/2015 version INSTRUCTION HERE �Z�b�g�A�b�v���� | ||||||||||||||||||||||||||||||||||||
| If Use CMD mode. check off Hybrid and user defined server �����A�@CMD���[�h�����g���̏ꍇ�́@HYBRID ��[�U��`�T�[�o�[�̃`�F�b�N���O���Ă��������B Please Check All Check box withou Report Color as below: ���L�̂悤�Ƀ��|�[�g�J���[�������`�F�b�N�����Ă��������B 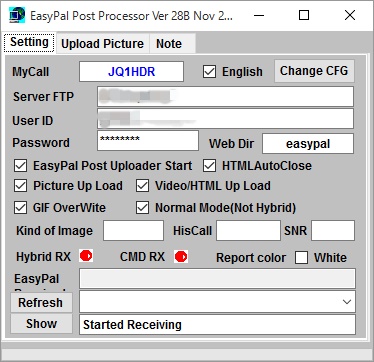 EasyPal Post Manual is here.. �}�j���A���͂����ɂ���܂� ���{��͂�����ł��B �Ȃ��A���݂̓f�W�T�C�g�փA�b�v���[�h����Ă�����̂ݓ����܂��� �f�W�T�C�g�A�b�v���~�����Ă���Ɠ����܂���̂ł����ӂ��������B �܂��A�f�W�T�C�g�ɃA�b�v�ł��Ȃ����͎g���܂���̂ł��e�͂��������B CMD���[�h���g�p����ꍇ��EasyPal��FTP�͂Ȃ����Ă��@OFF�@�ł� ����M�ł��܂��BFTP���Ȃ����邢��OFF�̎���HYBRID���[�h�� ��M�ł��܂���B |
December 5 2015 Version JT65-HF HTML Front 1. Trouble when click "Get Link" button on RX tab of HTML Front and link is all good but Front program is close �@�@This bug removed.. 1.�@�t�����g��Get LInk�{�^���Ń����N��������@OK�ɂ�������炸�@�v���O�������I�����Ă��܂��ꍇ������ �@�@���̃o�O���C�����܂����B ------------------------------------------------------------- December 3 2015 Version JT65-HF HTML Front 1. Due trouble of linkage with Tablet PC and Tatch Panel PC, Auto Linkage function is deleted. �@�@Please link it by manual, after confirming whether your link is OK or Not OK. �@�@Link procedure is described as below. 1.�@�����N����Ƃ��Ƀ^�u���b�gPC��^�b�`�p�l��PC�ɖ�肪����悤�ł��̂Ł@���������N�@�\�� �@�@�폜���܂����B�@�����N�����܂��������ǂ����m�F�̏�@�����N���蓹�ōs���Ă��������B �@�@�����N������菇�͏����ɏ�����Ă��܂��B ------------------------------------------------------------- December 01 2015 Version JT65-HF Image�@Controller Program bug Fixed. 1. Due trouble of linkage to HB9HQX, added Link to HB9HQX check box on QSO mode menu. �@�@Default is�@unlink to HB9HQX. please check it if link to HB9HQX. 1.�@HB9HQX�Ƀ����N����Ƃ��Ƀg���u��������悤�ł��̂Ł@Link to HB9HQX�ƌ����@�`�F�b�N�{�b�N�X�� �@�@QSO Mode ���j���ɒlj����܂����B�f�t�H���g�̓����N���Ȃ��ł��̂Ł@ �@�@�����N������ꍇ�̓`�F�b�N���Ă��������B JT65-HF HTML Front 1. Same as the above, added HB9HQX check box on RX Tab. �@�@The default value is not linked to HB9HQX and controllers. �@�@�@Please enable link or not on the confirmation by the following method. �@�@Link Checking �@�@�@a Start HB9HQX Ver 1.0. . It does not work with HB9HQX ver 1.1. �@�@�@b. Please check to start the controller WhoisOnAir. �@�@�@c. Start the front Please select the RX tab. �@�@�@d. Please press the Get Link button. Number four box lamp enters is you can link if change to green. �@�@�@�@�@If you do not change, please try to another opportunity because you can not link. �@�@�@e. Please put a check in the Link to HB9HQX. In addition, of the place of the controller QSO Mode �@�@�@�@�@Please put a check in the Link to HB9HQX.�@ �@�@�@In addition, please try to another opportunity because there also when �@�@�@�@the lamp does not lead in the red. The lead not the case, please forgive me. 1. .��������RX�^�u��HB9HQX check box��lj����܂����B�@�ݒ�͓����ł��B �@�@�f�t�H���g�l�́@HB9HQX��R���g���[���[�Ƀ����N���Ȃ��悤�ɂȂ��Ă��܂��B�@���܂������N���邩 �@�@���L�̕��@�Ŋm�F�̏�@�����N��L���ɂ��Ă��������B �@�@�����N�m�F���@ �@�@a. HB9HQX ver 1.0 ���N���@�@ver1.1�ł͓��삵�܂���B �@�@b. �R���g���[���[���N����WhoisOnAir�Ƀ`�F�b�N���Ă��������B �@�@c. �t�����g���N�����@RX�^�u��I��ł��������B �@�@d. Get Link�{�^���������Ă��������B�@4���ɐ����͓���@�����v���ɕς������N���ł��܂��B �@�@�@�@�ς��Ȃ��ꍇ�́@�����N���ł��܂���̂Ł@�ʂȋ@��Ɏ����Ă��������B �@�@e. Link to HB9HQX�Ƀ`�F�b�N�����Ă��������B�@�܂��A�@�R���g���[���[QSO Mode�̂Ƃ���� �@�@�@Link to HB9HQX�ɂ��`�F�b�N�����Ă��������B �@�Ȃ��A�����v���ԂłȂ���Ȃ��ꍇ������܂��̂Ł@�ʂȋ@��Ɏ����Ă��������B�@����ł� �@�Ȃ���Ȃ��P�[�X�@�Ⴆ�@�^�u���b�gPC�Ƃ�������܂��̂Ł@���̏ꍇ�́@���e�͂��������B �@ ------------------------------------------------------------- November 28 2015 Version JT65-HF Image�@Controller/JT65-HF HTML Front/EasyPal Post 1. Program bugs are fixed 2. Front Program was strengthening copperation with JT65-HF Image Controller and HB9HQX Edition.. �@�@For example, when you send an image CMD part of the Controller is changed from the Front, �@�@enter the command automatically Free Text of HB9HQX. When not link well, rebut Front 1. �o�O���C�����܂��� 2. �t�����g�v���O�����̃R���g���[���[�����HB9HQX�ւ̘A�g���������܂����B �@�@�Ⴆ�A�t�����g����摜��]������Ɓ@�R���g���[���[��CMD�����ύX���ꂽ��AHB9HQX�� �@�@Free Text���ɃR�}���h�������I�ɓ���܂��B ���܂��q����Ȃ����̓t�����g���ċN�����Ă��������B November 26 2015 Version JT65-HF Image�@Controller/JT65-HF HTML Front 1. New Mode for EasyPal, CMD File sending with Normal EasyPal, is added. �@�@When EasyPal Post is running, received CMD file will be change to Picture or HTML screen. 2. DigiSite up loading speed changed. 3. Added aspect ratio 1/2 and 1/3 to trimming window. 4. When Picture drang and dropped or transfer HTML file to serve at HTML Frontr, �@�@Who is on air and your report will be refreshed.4. 5. Program bugs are fixed 1.�@�V���[�h��EasyPal�p�ɒlj����܂����B�@CMD�t�@�C����Easy���ʏ탂�[�h�ő��M����� �@�@EasyPal�@Post�������Ă���Ɓ@�摜��HTML���\������܂��B 2. �f�W�T�C�g�ւ̃A�b�v�X�s�[�h�����P���܂����B 3. �g���~���O�ɏc����@1/2�@1/3�̌Œ�l��lj����܂����B 4. �t�����g�ʼn摜���h���b�O�A���h�h���b�v������AHTML��]�������Ƃ��Ɂ@Who is On Air���X�V���� �@�@�悤�ɂ��܂����B�B 5. ���̑��o�O���C�����܂����B |
|||||||||||||||||||||||||||||||||||
| TOPICS�@17/December/2015 version INSTRUCTION HERE �Z�b�g�A�b�v���� | ||||||||||||||||||||||||||||||||||||
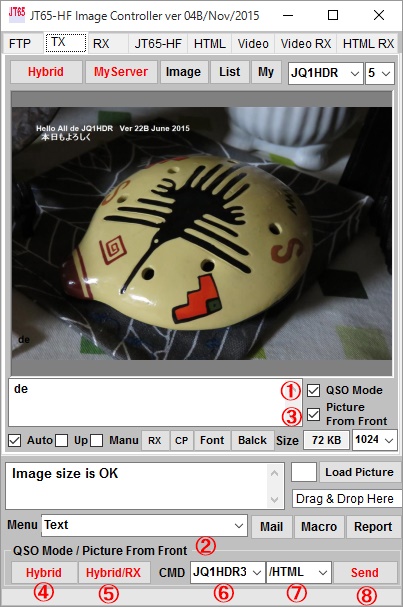 |
November 17 2015 Version JT65-HF Image�@Controller Program bug Fixed. 1. Due trouble of server, Auto delete report sysytem is stopped, serve trouble is solved so auto report �@�@delete system is effective from this version.�@After seeing your report, it will be deleted after 3 min. 2. Parameter sent to HB9HQX Edition is ingonored. This bug are fixed, so you can use �@�@"Auto Select TX" button corectly. 1.�@���|�[�g�̃X�^�C����ύX�ł���悤�ɂ��܂����B�@JT65-HF�^�u�Ł@CrLf�@�̐�����I�Ԃ� �@�@�I�ꂽ�������Ƃɉ��s����܂��B���|�[�g���������Ɓ@�R����ɏ����܂��B 2. HB9HQX�G�f�B�V�����ɓn���p�����[�^���Ԉ���Ă��܂����̂ŏC�����܂����B�@Auto�@Select�@TX�� �@�@�������R�}���h���쐬�����͂��ł��B JT65-HF HTML Front 1. Bug fixed 1.�o�O���C�����܂����B -------------------------------------------------------------- November 14 2015 Version JT65-HF Image�@Controller Program bug Fixed. 1. Report on picture style will be changed by CrLf on JT65-HF Tab. Report will be added Carrge Retrun �@�@every selected value. 1.�@���|�[�g�̃X�^�C����ύX�ł���悤�ɂ��܂����B�@JT65-HF�^�u�Ł@CrLf�@�̐�����I�Ԃ� �@�@�I�ꂽ�������Ƃɉ��s����܂��B JT65-HF HTML Front 1. EasyPal Front Page function is added. This is expected to prepare a separate description �@�@because a little complicated. 1.�@EasyPal�l�Ƀt�����g�y�[�W�@�\��lj����܂����B�@����͏������G�ł��̂Ł@�ʓr�ɐ����� �@�@�쐬����\��ł��B -------------------------------------------------------------- November 08 2015 Version JT65-HF Image�@Controller Program bug Fixed. 1. Frequency selection on Who is On Air. 2. When no HTML file in your server, No-Data report will be sent to Report. 3. <MYREPT> <MYREPTDB> is effective for HTML macro 1.�@Who is On Air �̎��g���I����L���ɂ��܂����B 2.�@HTML�t�@�C�����T�[�o�[�ɂȂ��ꍇ�@No-Data�����|�[�g�ɑ����܂��B 3.�@<MYREPT> <MTREPTDB> ��HTML�}�N���Ƃ��ėL���ł��B JT65-HF HTML Front 1. <MYREPT> <MYREPTDB> is effective for HTML macro 1.�@<MYREPT> <MTREPTDB> ��HTML�}�N���Ƃ��ėL���ł��B EasyPal�@Post�@Processor 1. Program start check box is memorized.. 2. Be able to check Pop up window size. 1. �v���O�����̃X�^�[�g�`�F�b�N���L������悤�ɂ��܂����B 2. �|�b�v�A�b�v�E�B���h�E�̃T�C�Y���m�F�ł���悤�ɂ��܂����B-------------------------------------------------------------- November 05 2015 Version JT65-HF Image�@Controller Program bug Fixed. 1. In case of One registered URL, "Send" button for QSO mode can't be accessed. Now this troubled fixed. 1.�@URL�o�^����̏ꍇ�Ɂ@�ʏ�QSO�́@�hSend"�@�{�^���������܂���ł����̂ŏC�����܂����B JT65-HF HTML Front 1. Added RX Tab on JT65-HF HTML Front, This function is that select and up loaded 8 pictures �@�@to your server from your received pictures. �@�@If specify his call sign, selected picture is his last 8 one and if not, it is will be received last 8 pictures. �@�@Uploaded file name is YourCall_his1.jpg .................�@YourCall_his8.jpg Please use this picture �@ for your HTML. 1.�@�V����RX�^�u�����܂����B��M�����摜�̒��Ŏw�肳�ꂽ�R�[���̕��̍ŋߎ�M�����摜 �@�@�W�����@CALL_his1.jpg CALL_his2.jpg CALL_his3.jpg CALL_his4.jpg CALL_his5.jpg CALL_his6.jpg �@�@CALL_his7.jpg CALL_his8.jpg CALL�͋M�ǂ̃R�[���Ł@�T�[�o�[�ɃA�b�v���[�h���܂��B �@�@�R�[�������Ȃ���@�ŋ߂̂W�摜�ɂȂ�܂��B�@HTML�ɂ��g�����������B �@�@ -------------------------------------------------------------- November 04 2015 Version JT65-HF Image�@Controller JT65-HF HTML Front In the ever normal QSO base could only HYBRID image, but was modified to use the HTML / MP4 / WMV / MOV / PHOTO image. For example, you can use as an image when you send a CQ JQ1HDR QM00 and XXXXXX JQ1HDR 73. For now to send a CQ JQ1HDR QM00 and XXXXXX JQ1HDR 73 And then to be referred to as a normal QSO. 1. controller after starting, please go to the TX tab. If you check the QSO Mode 2. opens QSO Mode panel. If you can not see it will be visible as extending the bottom of �@�@the controller. �@�@In addition, you will not be image exchange in a normal QSO if QSO mode is unchecked. 3. This shwos a location of HYBRID image to be created. put a check,It will be created at �@�@the HTML Front . �@�@In addition, you can use the image that you created in the controller If you uncheck. 4. Press when using HYBRID image in the normal QSO. 5. Press this when you use an image with a RX image on HYBRID image in the normal QSO. �@�@When you use the controller image of�@Please be pasted RX picture at the controller. 6. Those who use multiple servers when you are using a non HYBRID image �@�@And then you can either use the server that use the HTML / MP4 / WMV / MOV / PHOTO. �@�@It can not be selected in the case of one.�@In addition, those who do not have your own server �@�@will only HYBRID. 7. Please select the type of image to be used in the normal QSO. The selected image controller or �@�@the front�@Please by feeding in advance to the server. 8. Please press the Send buttonat last. �@�@It will be received by the image that has been pushed to the end if that had buttons of �C�D�G is �@�@�@ pressed in the normal QSO above. �ʏ�̂p�r�n�x�[�X�Ł@���܂ł͂g�x�a�q�h�c�摜�����ł������@�g�s�l�k/�l�o�S/�v�l�u/�l�n�u/�o�g�n�s�n �摜���g����悤�ɏC�����܂����B �Ⴆ�A�@�b�p�@�i�p�P�g�c�q�@�p�l�O�O�@��@�w�w�w�w�w�w�@�i�p�P�g�c�q�@�V�R�@�𑗐M�����Ƃ��� �摜�Ƃ��Ďg���܂��B�@�b�p�@�i�p�P�g�c�q�@�p�l�O�O�@��@�w�w�w�w�w�w�@�i�p�P�g�c�q�@�V�R�@�𑗐M���邱�Ƃ� �Ƃ肠�����@�ʏ�p�r�n�Ə̂��邱�Ƃɂ��܂��B 1.�@�R���g���[���[�N����A�@�s�w�^�u�ɍs���Ă��������B�@�p�r�n�@�l�������@�Ƀ`�F�b�N������Ɓ@ 2.�@�p�r�n�@�l�������p�l�����J���܂��B�@�����Ȃ��ꍇ�́@�R���g���[���̉���L���� �@�@������悤�ɂȂ�܂��B�@�@�܂��A�`�F�b�N���O���Ɓ@�ʏ�p�r�n�ł͉摜�������ł��܂���B 3.�@�ʏ�p�r�n�Ŏg�p����@�g�x�a�q�h�c�摜�̍쐬�ꏊ�����Ă����܂��B�@�`�F�b�N������Ɓ@�t�����g�� �@�@�쐬���邱�ƂɂȂ�܂��B�@�܂��A�`�F�b�N���O���ƃR���g���[���ō쐬�����摜���g�p���܂��B 4.�@�ʏ�p�r�n�Ł@�g�x�a�q�h�c�摜���g���Ƃ��ɉ����܂��B 5.�@�ʏ�p�r�n�Ł@�g�x�a�q�h�c�摜�łq�w�摜�������摜���g���Ƃ��ɉ����܂��B�@�R���g���[���̉摜�� �@�@�g���Ƃ��́@�@�R���g���[���łq�w�摜��\�t���Ă��������B 6.�@�g�x�a�q�h�c�摜�ȊO���g�p����Ƃ��@�����̃T�[�o�[�����g�p�̕��́@ �@�@�g�s�l�k/�l�o�S/�v�l�u/�l�n�u/�o�g�n�s�n���g���T�[�o�[���g�����w�肵�܂��B�@ �@�@�P�̏ꍇ�͑I�ׂ܂���B�@�܂��A�������̃T�[�o�[���������łȂ����́@ �@�@�g�x�a�q�h�c�݂̂ƂȂ�܂��B�@ 7.�@�ʏ�p�r�n�Ŏg�p����摜�̎�ނ�I��ł��������B�@�I�ꂽ�摜�̓R���g���[�����邢�� �@�@�t�����g����@���炩���߃T�[�o�[�ɑ��荞��ł��������B 8.�@�Ō�Ɂ@�r�������@�{�^�����@�����Ă��������B�@ �ȏ�Ł@�ʏ�p�r�n�Ł@�C�D�G�̃{�^����������Ă����ꍇ�@�Ō�ɉ����ꂽ�摜����M����܂��B |
|||||||||||||||||||||||||||||||||||
| TOPICS�@30/October/2015 version INSTRUCTION HERE �Z�b�g�A�b�v���� | ||||||||||||||||||||||||||||||||||||
| October 30 2015 Version JT65-HF Image�@Controller JT65-HF HTML Front 1. This morning, my server is suddnly down and Master data can't be red from this server. �@Therefore, will be changed master data server to another server when my server down. 2. Ffixed bugs. 1. �����T�[�o���ˑR�~�܂�܂����B�@���낢��ȃ}�X�^�[�f�[�^�[���ǂ߂Ȃ��Ȃ�܂����̂� �@�@���̂悤�ȏꍇ�ɃT�[�o�[�������I�ɐ�ւ��悤�ɕύX���܂����B 2.�@���̑��̃o�O���C�����܂����B |
||||||||||||||||||||||||||||||||||||
| TOPICS�@26/October/2015 version INSTRUCTION HERE �Z�b�g�A�b�v���� | ||||||||||||||||||||||||||||||||||||
| October 26 2015 Version JT65-HF Image�@Controller JT65-HF HTML Front 1. have occurred from time to time "system error "due to the configuration changes on the server. �@ This trouble to change the server in order to avoid also. Everyone majority of will switch the server �@ when it is upgraded. 2. "QSO Mode" on the RX tab;. You can image exchange was added the check button of the normal QSO, �@�@but the data encoding only normal command If unchecked 3. Ffixed other bugs. 1. �T�[�o�[�̐ݒ�ύX�ɔ������X"�V�X�e���G���[�h�������Ă��܂��B�@���̃g���u�������邽�� �@�@�T�[�o�[��ύX���܂��B�@�F����̑唼���o�[�W�����A�b�v���ꂽ�Ƃ��ɃT�[�o�[���ւ��܂��B 2.�@RX�^�u�ɁhQSO�@Mode"�@�̃`�F�b�N�{�^����lj����܂����B�@�ʏ��QSO�ʼn摜�������ł��܂����A �@�@�`�F�b�N���O���ƒʏ�̃R�}���h�݂̂��f�[�R�[�h���܂��B 3.�@���̑��̃o�O���C�����܂����B |
||||||||||||||||||||||||||||||||||||
| TOPICS�@21/October/2015 version INSTRUCTION HERE �Z�b�g�A�b�v���� | ||||||||||||||||||||||||||||||||||||
| October 21 2015 Version JT65-HF Image�@Controller JT65-HF HTML Front 1. Added function to memorize Height of Controller and Front program when it shutdown. 2. Other bugs fixed. It will change the server after normal users version up. 1. �R���g���[���[�ƃt�����g�v���O�����̏I�����Ɂ@���̍������L�����܂��B 2.�@���̃o�O���C�����܂����B �F���o�[�W�����A�b�v���ꂽ��T�[�o�[��ύX���܂��B |
||||||||||||||||||||||||||||||||||||
| TOPICS�@17/October/2015 version INSTRUCTION HERE �Z�b�g�A�b�v���� | ||||||||||||||||||||||||||||||||||||
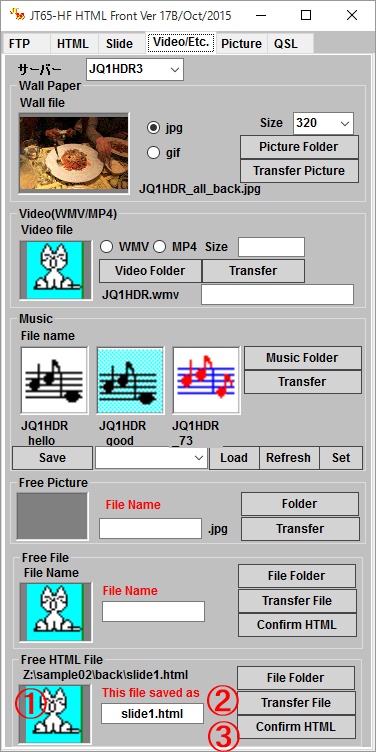 |
October 17 2015 Version JT65-HF Image�@Controller JT65-HF HTML Front 1. Added Free HTML File. you can send any HTML file to you server. �@�@Drag and drop your HTML File onto cat. Then click "Transfer"button. Click "Confirm HTML" �@�@button to see your HTML in server. Macro is also available. 2. Other bugs fixed. Whne Normal users 1. ���R��HTML�t�@�C���𑗂��悤�ɂ��܂����B �@�@�h���b�O�A���h�h���b�v��HTML��L�ɓ���Ă��������B�@�t�@�C���]���{�^���������ā@�t�@�C���j�Ƀ{�^���� �@�@�����ƃT�[�o�[�ɂ���HTML���m�F�ł��܂��B �}�N�����g�p�ł��܂��B 2.�@���̃o�O���C�����܂����B �Ȃ��AHTML�͕\����ʂ��@�Ⴆ�@�X���C�h1�T���l�����N���b�N�����Ƃ��� ���ʂ�\�������肷��Ƃ��Ɏg���܂��B |
|||||||||||||||||||||||||||||||||||
| TOPICS�@14/October/2015 version INSTRUCTION HERE �Z�b�g�A�b�v���� | ||||||||||||||||||||||||||||||||||||
| October 14 2015 Version JT65-HF Image�@Controller JT65-HF HTML Front 1. Some times System Error is indicated on pop up windows, these bugs fixed but this is temporary treatment. 1. ���X�@�V�X�e���G���[�Ƃ����|�b�v�A�b�v���o��悤�ł��̂ŁA�C�����܂����B�ꎞ�I�ȏ����ł��B �@�@Windows10�ł͂܂����낢�날��悤��Windows Update�����s�����Ƌ}�ɋN����o�����悤�ł��B �@�@KC1CS��/Jim�����Windows10 Pro �̃e�X�^�[������Ă���悤�ł����@MP4�̃r�f�I���T�|�[�g �@�@����Ȃ��ƍ����Ă����܂����B�@MS�Ƀ��|�[�g����̂Ł@�����ɉ��P����邾�낤�Ƃ̂��Ƃł��B �@�@�V�X�e���G���[�ɂ��Ă����P�����Ƃ悢�̂ł����A�A�A�A�A |
||||||||||||||||||||||||||||||||||||
| TOPICS�@11/October/2015 version INSTRUCTION HERE �Z�b�g�A�b�v���� | ||||||||||||||||||||||||||||||||||||
| October 11 2015 Version JT65-HF Image�@Controller JT65-HF HTML Front 1. Not big changes and bugs fixed 2. 8 slides image has been modified to ensure that capture 3. Bugs fixed on JT65-HF Image Controller, please use "Delete" button to delete your report. 1. �傫�ȕύX�͂���܂���B�@�o�O���C�����܂����B 2. 8���X���C�h�摜���m���Ɏ�荞�߂�悤�ɂ��܂����B 3. JT65-HF Image Controller�̃o�O���C�����܂����B���|�[�g�������ɂ́hDelete"�{�^���������Ă��������B |
||||||||||||||||||||||||||||||||||||
| TOPICS�@30/September/2015 version INSTRUCTION HERE �Z�b�g�A�b�v���� | ||||||||||||||||||||||||||||||||||||
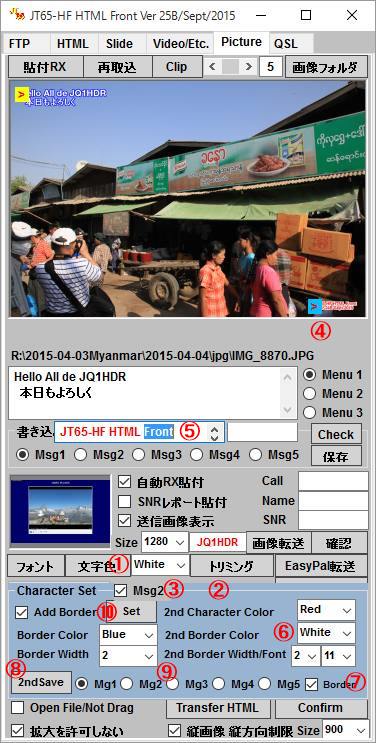 |
September 30 2015 Version JT65-HF Image�@Controller 1. Bugs fixed JT65-HF HTML Front Addition of a second string 1. click the text color button. 2. Setting screen of the first string character edging screen and the second �@string is displayed. 3. Please put the check in Msg2 If you want to make a second string. 4. The light blue of the position will be the position of the second string. �@�@When you move the mouse, you can change the character of the position. 5. It is a place to write the second string. Write column will increase �@�@When you double-click here.�@Again, it becomes smaller when you double-click. 6. text color of the second string, you can set the border color, border width, font, and size. 7. Please check if you put the border to the second string. 8. Please press the 2nd Save button when it is allowed to store the second string �@. String as Mg1,�@Color, border, position, etc. to write is stored.�@ 8. Please choose the case of storing a different sentence 10. setting screen will disappear when you press this button. 11. Font style of the second string was also set to be in the same manner as the first string. 12. Corrected because there was a bug in "Mg5" of the second string. 13. 8 Slide pictures are available 14. Add new Macros for HTML. Please refer to here in deail. JT65-HF HTML Front ��2������̒lj� 1. �����F�{�^�����N���b�N���܂��B 2. ��1������̕���������ʂƑ�2������̐ݒ��ʂ��\������܂��B 3. ��2�������������ꍇ�́@Msg2�Ƀ`�F�b�N�����Ă��������B 4. ���F�̈ʒu����2������̈ʒu�ƂȂ�܂��B�@�}�E�X�œ������ƕ����̈ʒu���ύX�ł��܂��B 5. ��2������������Ƃ���ł��B�@�������_�u���N���b�N����Ə������ݗ����傫���Ȃ�܂��B �@�@�ēx�A�_�u���N���b�N����Ə������Ȃ�܂��B 6. ��2������̕����F�A�����F�A����蕝�A�t�H���g�A�T�C�Y��ݒ�ł��܂��B 7. ��2������ɉ���������ꍇ�Ƀ`�F�b�N���Ă��������B 8. ��2��������L�������Ă����ꍇ��"2nd�@Save"�{�^���������Ă��������B�@Mg1�Ƃ��ā@������A �@�@�F�A�����A�����ʒu�����L������܂��B�@ 9. �ʂȕ��͂��L��������ꍇ�ɑI��ł��������B�@ 10. ���̃{�^���������Ɛݒ��ʂ͏����܂��B 11. ��2������̃t�H���g�X�^�C������1������Ɠ����悤�ɂȂ�悤�ɂ��܂����B 12. ��2�������"Mg5"�Ƀo�O������܂����̂ŏC�����܂����B 13. 8���X���C�h�V���[���ł���悤�ɂ��܂����B 14. HTML�p�̐V�����}�N����lj����܂����B�@���������Ă��������B |
|||||||||||||||||||||||||||||||||||
| TOPICS�@18/September/2015 version INSTRUCTION HERE �Z�b�g�A�b�v���� | ||||||||||||||||||||||||||||||||||||
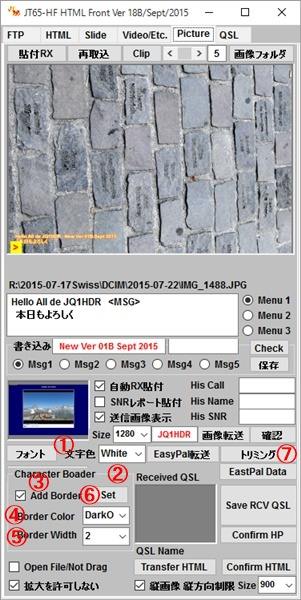 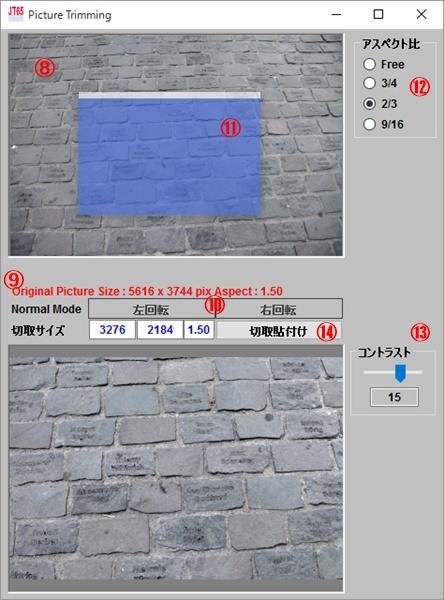 |
September 16 2015 Version JT65-HF HTML Front Additional border of character 1. double-click the text color of the character. 2. character border appearseyes. 3. If you are the character edding Please put the check. 4 .Please choose the color of the characte rborder. 5. character edging width 6.Please press the "set" button. If you write a character you will border character. Trimming 7. Please press if you want to crop the image. 8. original image Specifications 9. down technique becomes image 10. Please change the position in the right rotation o rleft rotation if it is necessary to rotate the images. 11. This is the range in which the trimming. It is cut off when you move the cut window. 12. The aspect ratio of the image. And automatically adjust the vertical on the basis of the width 13. you can change the contrast of the image. 14.Please press the last to cut pasting. JT65-HF HTML Front �����̉����̒lj� 1. �����F�̕������_�u���N���b�N���܂��B 2. ����������ʂ��\������܂��B 3. ��������������ꍇ�̓`�F�b�N�����Ă��������B 4. ���������̐F��I��ł��������B 5. ���������̕� 6. �Z�b�g�������Ă��������B�@�����������Ή���蕶���ɂȂ�܂��B �g���~���O 7. �摜���g���~���O����ꍇ�ɉ����Ă��������B 8. �I���W�i���̉摜 9. �I���W�i���摜�̎d�l 10. �摜����]������K�v������ꍇ�@�E��]���邢�͍���]�ňʒu��ς��Ă��������B 11. �g���~���O������͈͂ł��B�@���̘g�������Ƃ��ɐ����܂��B 12. �摜�̏c����ł��B��������ɂ��ďc�������������܂��B 13. �摜�̃R���g���X�g��ύX�ł��܂��B 14. �Ō�ɐ؎�\�t���������Ă��������B |
|||||||||||||||||||||||||||||||||||
| TOPICS�@16/September/2015 version INSTRUCTION HERE �Z�b�g�A�b�v���� | ||||||||||||||||||||||||||||||||||||
| September 16 2015 Version JT65-HF Image�@Controller 1. If the LAN connection speed is slow, there is the image display is delayed when receives a HTML. �@�@�@Added time adjustment so that it can be displayed well in "Disp Time" in JT65-HF tab for making �@�@�@the adjustment 2. Bugs on PSK mode fixed. JT65-HF HTML Front 1. If you want to create an imagein the Picture tab, you have to be able to adjust the font size and font of �@�@writing alone. Settings are saved. 2. Image data received in EasyPal was to capture the call and signal strength. It can capture data at �@ "EasyPalData" button. However, only when the EasyPal Post Processor has been started 3. As for EasyPal Post Processor, please start so because it is created icon. How to set "Note"; please do �@�@the necessary settings to see the tab. 4. Added a trimming function. Since�@an other�@window�@by pressing the�@"Trimming"�@button in the �@�@Picture�@tab�@will start�@by changing�@the�@size to cut the light blue�@of the�@frame�@can be used �@�@as�@is�@and�@send�@the image�@press the�@"Cut and Paste"�@button 5. Although image that has been read in Picture tab if it is smaller than the width �@to be specified had to to expand and are provided "Maginifying Not Allowed" �@check box. In addition, the slide in the other it does not apply. �@It becomes effective for trimming. 6. Fixed so there was abug if you want to trim the imageof the portrait. �@�@In addition, the image is off the screen because when trimming vertically long image is set �@�@ to send image in width criteria. In the case of portrait images it is now possible to limit the image height. EasyPal�@Post�@Processor 1. EasyPal Post Processor is a program that performs a variety of processing after receiving in EasyPal. �@�@It should be noted that this program does not work if there is no JT65-HF Image Controller JT65-HF Image�@Controller 1. LAN�ڑ��X�s�[�h���x���ꍇ�A�@HTML����M�����Ƃ��ɉ摜�\�����x��邱�Ƃ�����܂��B�@ �@�@���̒������s�����߁@JT65-HF�^�u�Ɂ@�hDisp�@Time�h�@�ł��܂��\���ł���悤���Ԓ�����lj����܂����B 2. PSK���[�h�̃o�O���C�����܂����B JT65-HF HTML Front 1. Picture�^�u�ʼn摜���쐬����ꍇ�A�P�Ƃŏ������ޕ����̑傫���ƃt�H���g���ł���悤�ɂ��܂����B �@�@�ݒ�͕ۑ�����܂��B 2. EasyPal�Ŏ�M�����摜�̃f�[�^�[�A�R�[���ƐM�����x����荞�߂�悤�ɂ��܂����B"EasyPalData" �{�^���� �@�@�f�[�^�͎�荞�߂܂��B�������A�@EasyPal�@Post�@Processor���N������Ă���Ƃ��݂̂ł��B 3. EasyPal�@Post�@Processor�̓A�C�R�����쐬����܂��̂Ł@����ŋN�����Ă��������B�@ �@�@�ݒ���@��"Note"�^�u�������ɂȂ�@�K�v�Ȑݒ���s���Ă��������B 4. �g���~���O�@�\��lj����܂����B�@Picture�^�u�Ł@"�g���~���O�h�{�^���������Ɓ@�ʑ����N�����܂��̂� �@�@���F�̘g�����傫���ɕύX���ā@�h�؎�\�t���h�{�^���������Ɓ@���M�摜�Ƃ��Ďg�p�ł��܂��B 5. Picture�^�u�ɂ����ā@�ǂݍ��܂ꂽ�摜���w�肷�鉡�������������ꍇ�͊g�傷��悤�ɂ��Ă��܂����� �@�@"�g��s����" �`�F�b�N�{�b�N�X��݂��Ă���܂��B�@����Ƀ`�F�b�N����Ɗg��͂��܂���B�@ �@�@�Ȃ��A�X���C�h���̑��ɂ͓K�p���܂���B�@�g���~���O�ɑ��Ă͗L���ƂȂ�܂��B 6. �c���̉摜���g���~���O����ꍇ�Ƀo�O������܂����̂ŏC�����܂����B �@�@�܂��A�c�ɒ����摜�Ƀg���~���O����ƕ���ő��M�摜���Z�b�g����̂ʼn摜����ʂ���͂ݏo���܂��B �@�@�c���摜�̏ꍇ�͉摜�����𐧌��ł���悤�ɂ��܂����B EasyPal�@Post�@Processor 1. EasyPal�@Post�@Processor��EasyPal�Ŏ�M������Ɏ�X�̏������s���v���O�����ł��B�@ �@�@�Ȃ��A���̃v���O������JT65-HF Image Controller�������Ȃ��Ɠ����܂���B |
||||||||||||||||||||||||||||||||||||
| TOPICS�@04/September/2015 version INSTRUCTION HERE �Z�b�g�A�b�v���� | ||||||||||||||||||||||||||||||||||||
| September 01 2015 Version JT65-HF Image�@Controller 1. Since the security of some server has become very strict we changed the upload method to Degi-Site. JT65-HF HTML Front 1. It was so as to transfer the image and HTML directly EasyPal fromJT65-HF HTML Front. �@There is a button calle dEasyPal at the HTML tab and the Picturetab of JT65-HF HTML Front. �@When you press the EasyPal button imagea nd HTM Lis transferred to the EasyPal. �@Please specifyYOUR CAll.html in the folde rEasyPal ofJT65-HF Image Controller becausein the case of �@ HTML opens Load Any. It does not need from the second time. 2. Bug fixed 3. When EasyPal receives picture with HYBRID Mode, Title of EasyPal will be changed. �@�@Then any title will be OK for transferring from JT65-HF HTML Front JT65-HF Image�@Controller 1. �Q���T�[�o�[�̃Z�L�����e�B�[���ύX���ꂽ�̂Ł@�A�b�v���[�h������ύX���܂����B. JT65-HF HTML Front 1. JT65-HF HTML Front�̂g�s�l�k�^�u�Ƃo�������������^�u�̂Ƃ���ɂd�������o�����Ƃ����{�^��������܂��B �@�@�d�������o�����{�^���������Ɖ摜�Ƃg�s�l�k���d�������o�����ɓ]������܂��B�@�g�s�l�k�̏ꍇ�͂k�������@ �@�@�`�������J���܂��̂Ł@�@�i�s65-�g�e�@�h���������@�b�������������������̃t�H���_�[�d�������o�����̒��̂x�n�t�q�@�b�`����.���������� �@�@�w�肵�Ă��������B�@�Q�x�ڂ���͕K�v����܂���B�@���܂������Ȃ���������悤�ł��B 2. �o�O���C�����܂��� 3. �d�������o�������g�x�a�q�h�c���[�h�Ŏ�M�����Ƃ��Ƀ^�C�g�����ς��悤�ł��B �@�@�ς���Ă��]�����ł���悤�ɂ��܂����B |
||||||||||||||||||||||||||||||||||||
| TOPICS�@29/August/2015 version INSTRUCTION HERE �Z�b�g�A�b�v���� | ||||||||||||||||||||||||||||||||||||
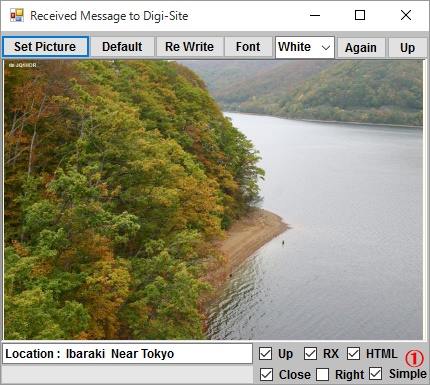 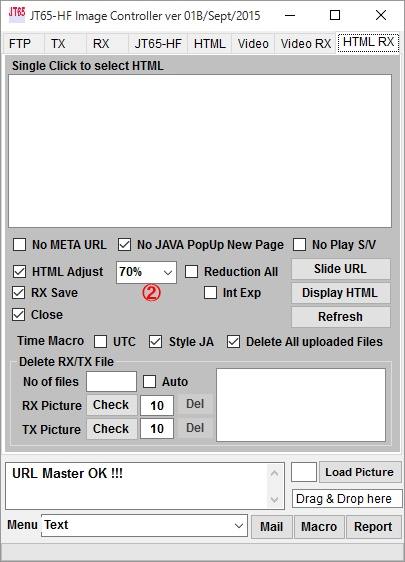 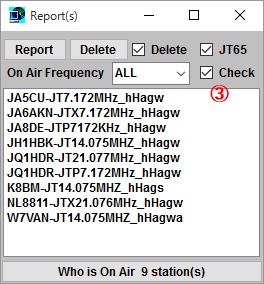 |
August 29 2015 VersionJT65-HF Image�@Controller 1. Go to JT65-HF Tab, then Click "Picture Setting" button. �@�@If checked "Simple", report is very simple only "de Your Call�@HTML/Video". If unchecked, full report �@�@will be added on received picture. 2. Go to HTML RX tab, HTML display will be changed by every 5%, default is 75%. 3. If checked, Who is On Air will be refreshed every 5 minutes. Or Go to JT65-HF tab, if checked "Delete �@�@report Check on air every 5 minutes", same function will be applied. 4. Digi-Site maintenance window is modified. "Delete" button added. JT65-HF HTML Front 1. Added Macro for greetings Macro is <GM> �@�@Go to HTML tab, there are "Greeting Macro". Macro is <GM> and the following �@�@greeting will be added on �@�@picture or HTML. When JT65-HF HTML Front is working in English mode, �@�@greeting will be in English. If not �@�@greeting will be in Japanse. �@�@�@GM : Good morning �@�@�@GA : Good afternoon �@�@�@GE : Good evening �@�@�@GN : Good nicght�@�@ �@�@�@GA, GA�@,division�@of�@GE, will�@automatically set�@by�@time zone. when you �@�@�@start the HTML Front, After �@�@�@that, if checked Auto, it will be changed automatically but not checked, �@�@�@please change by hand 2. In QSL tab, you can capture the transmission image of the Picturetab �@�@�@When you click the image display screen JT65-HF Image�@Controller 1. JT65-HF �^�u�� "Picture Setting" �{�^�����N���b�N���Ă��������B. �@�@�@"Simple"�ƌ����`�F�b�N�{�b�N�X�Ƀ��_������ƁA�@��M�����摜�ɏ�����郌�|�[�g�́@de �R�[�� �@ �@�@HTML/Video�@�� �ȒP�ȕ\���ɂȂ�܂��B�@����Ȃ���Ώ]���ʂ�̃t�����|�[�g�ƂȂ�܂��B 2. HTML RX �^�u�ŁA��M����, HTML �\���̏k����������܂����@5�����݂Œ����ł���悤�ɂ��܂����B 3. �`�F�b�N������Ɓ@Who is On Air��5�����ƂɃ��t���b�V������܂��B �܂��́@JT65-HF�^�u�ɂ� �@�@"Delete report Check on air every 5 minutes" �Ƀ`�F�b�N�����Ă���������ƂȂ�܂��B 4. �f�W�T�C�g�̃����e�i���X���C�����܂����B�@�f�W�T�C�g�̉摜�����{�^����lj����܂����B JT65-HF HTML Front 1. ���A�p�̃}�N���@<GM>�@��lj����܂����B �@�@HTML �^�u�Ɉ��A�}�N��������敪������܂��B�@�������ރ}�N���� <GM> �ł����@�`�F�b�N�ɂ�� �@�@���L�̈��A���摜�܂���HTML�ɒlj����܂��B�@<GM>�@���g�����ꍇ�Ł@HTML�@Front�@�����{�ꃂ�[�h�� �@�@�������Ă���@���{�ꂪ�}������܂��B�@�p�ꃂ�[�h�̏ꍇ�͉p��ɂȂ�܂��B �@�@�@GM : Good morning�@/�@�������������܂� �@�@�@GA : Good afternoon�@/�@����ɂ��� �@�@�@GE : Good evening�@/�@������ �@�@�@GN : Good nicgh���@/�@���₷�݂Ȃ����@ �@�@�@�܂��A<GMJ>���g���@�p�ꃂ�[�h�ł����{��ɂȂ�܂��B �@�@�@�@GA,�@GA,�@GE�@�̋敪�́@HTML�@Front���N�������Ƃ��̎��ԑтɂ�莩���ݒ肵�܁B�@���̌�@�`�������� �@�@�@�@���_�������Ă���Ύ����I�Ɏ��ԑтɂ��C�����܂����@���_�Ȃ��̏ꍇ�͎蓹�ŕύX���Ă��������B 2. QSL�^�u�ŁA�摜�\����ʂ��N���b�N����Ɓ@Picture�^�u�̑��M�摜����荞�ނ��Ƃ��o���܂��B �@�@�@���M�����摜��QSL�J�[�h�Ɏg�p����ꍇ�ɗ��p���������B |
|||||||||||||||||||||||||||||||||||
| TOPICS�@15/Aug/2015 version INSTRUCTION HERE �Z�b�g�A�b�v���� | ||||||||||||||||||||||||||||||||||||
 |
1 August 2015 Version JT65-HF Image�@Controller 1. Prevent duplicate picture from up loading Digi-SIte. �@�@On the HYBRID or Normal QSO mode, if picture is same as received before, it will not be trnafered to �@�@Digi-Site. But show receiving on RX Tab and send report to Who is On Air.. Digi-Site. But show receiving �@�@on RX Tab and send report to Who is On Air.. �@�@�@ If unchecked, all received picture will be up looaded to Digi-Site., 1. �����摜�̃f�W�T�C�g�A�b�v���[�h��h�~���܂����B �@�@HYBRID�@��@�ʏ�QSO���[�h�Ł@��M�摜���O�Ɏ�M�������̂Ɠ����ł���@�f�W�T�C�g�ɂ͓]�����܂���B �@�@�������A�@��M�摜��RX�^�u�ɕ\������@���|�[�g�����M����܂��B �@�@�@�̃`�F�b�N���O���@���ׂĎ�M�����摜���f�W�T�C�g�ɃA�b�v����܂��B �@�@����ŘA��CQ���\�Ǝv���܂��B�@ |
|||||||||||||||||||||||||||||||||||
| TOPICS�@10/Aug/2015 version INSTRUCTION HERE �Z�b�g�A�b�v���� | ||||||||||||||||||||||||||||||||||||
 |
10 August 2015 Version JT65-HF Image�@Controller 1. Bugs fixed �@�@For normal QSO with picture, only 3 word command like CQ JQ1HDR QM05 will be decoded. 1. �o�O���C�����܂����B �@�@�ʏ��QSO�ʼn摜����������ꍇ�́@CQ JQ1HDR QM05�@�́@�悤�ȁ@�R���[�h�݂̂���M���܂��B ----------------------------------------------------------------- 01 August 2015 Version JT65-HF Image�@Controller 1. Added Hybrid Transfer Button "Hybrid" and "Hybrid/RX" from JT65-HF HTML Front. �@�@�@�@Hybrid button : Transfer Picture from JT65-HF HTML Front without RX picture to HYBDRID Server. �@�@�A�@Hybrid/RX button : Transfer Picture from JT65-HF HTML Front with RX picture to HYBDRID Server. 2. Memorized the following check box when program shutdwon. �@�@TX Tab : Image size �@Video RX Tab : Auto Play JT65-HF HTML�@Front 1. Memorized the following check box when program shutdwon. �@�@Picture Tab : Image size 01 August 2015 Version JT65-HF Image�@Controller 1. "Hybrid" and "Hybrid/RX" �{�^����lj����܂����B �@�@Hybrid button : JT65-HF HTML Front ��Picture�^�u�ō��ꂽ�摜����M�摜�\�t���Ȃ��� �@�@�@�@�@�n�C�u���b�h�T�[�o�[�ɓ]�����܂��B �A�@Hybrid button : JT65-HF HTML Front ��Picture�^�u�ō��ꂽ�摜����M�摜�\�t���� �@�@�@�@�@�n�C�u���b�h�T�[�o�[�ɓ]�����܂��B 2. ���L�̏�Ԃ��L������悤�ɂ��܂����B. �@�@TX Tab : Image size �@Video RX Tab : Auto Play JT65-HF HTML�@Front 1. ���L�̏�Ԃ��L������悤�ɂ��܂����B �@�@Picture Tab : Image size |
|||||||||||||||||||||||||||||||||||
| TOPICS�@27/July/2015 version INSTRUCTION HERE �Z�b�g�A�b�v���� | ||||||||||||||||||||||||||||||||||||
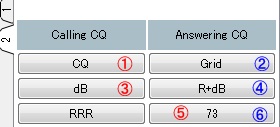
How to QSO with normal mode with Picture Red : Calling CQ Station Blue : Answering Station
Of cource you may use original command like CALL/HTML, CALL/WMV and etc., instead of �A,�B,�C,�D or �E |
27 July 2015 Version JT65-HF Image�@Controller 1. Added JT65 Normal QSO with exchanging picture on the JT65-HF and WSJT-X program not for WSJT10. �@�@This mode is using HYBRID Picture for sending and receiving like below. �@�@> CQ JQ1HDR QM05BU --------.> Hybrid picture sending �@�@�@< JQ1HDR XX1XXX QM05BU ----.> Calling JQ1HDR with Hybrid picture sending �@�@�@> XX1XXX JQ1HDR -11 --------.> Reporting with Hybrid picture sending �@�@�@< JQ1HDR XX1XXX R-11-------.> Reporting to JQ1HDR with Hybrid picture sending �@�@�@> XX1XXX JQ1HDR 73 --------.> 73 with Hybrid picture sending �@�@�@< JQ1HDR XX1XXX 73 --------.>73 with Hybrid picture sending �@�@All picture should be HYBRID one, also you can send privious command like JQ1HDR/PHOTO, �@�@JQ1HDR/HTML, and etc. Note that you must check "Who is On Air" 2. Memorized the following check box when program shutdwon. �@�@FTP Tab : TX Image pop up �@Video RX Tab : DL(Down load video) �@�@HTML RX Tab : TNo Play S/V (Sound and Video) JT65-HF HTML�@Front 1. Character on Picture at FTP Tab, If checked "Yes", Character will be added on the picture.. �@2.Date/Time bugs fixed. 3. Sending picture at HTML tab will be loaded when program is started. 27 July 2015 Version JT65-HF Image�@Controller 1. JT65�ł̒ʏ�QSO�ł��摜�������o����悤�ɂ��܂����B�@�摜�͂��ׂăn�C�u���b�h���g���܂��� �@�@�r���ō��܂ł̃R�}���h���g���Ă��\���܂���B�@�����I�Ɏ�M�ł���悤�ɂ��Ă���܂��B �@�@�������A�@�K���@Who is on air�@�ɕ\������Ă���ǂ݂̂ƂȂ�܂��B �@�@QSO�̂����͏�̋L�q���Q�l�ɂ��Ă��������B�@�]��@�ł��l�����Ɏg���������̂ݎg���ĉ������B �@�@DX������Ă�����ɂ͕֗����Ǝv���܂��B 2. ���L�̐ݒ��Ԃ��L������悤�ɂ��܂����B �@�@FTP Tab : TX Image pop up �@Video RX Tab : DL(Down load video) �@�@HTML RX Tab : TNo Play S/V (Sound and Video) JT65-HF HTML�@Front 1. FTP�^�u�ʼn摜�ɏ������ޕ����Ł@�����݁@�Ƀ`�F�b�N������Ɖ摜�ɕ������������ނ悤�ɂ��܂����B �@2.Date/Time �̃o�O���C�����܂����B. 3. HTML�^�u�̂Ƃ���̑��M�摜���N�����ɕ\������悤�ɂ��܂����B |
|||||||||||||||||||||||||||||||||||
| TOPICS�@13B/Jul/2015 INSTRUCTION HERE �Z�b�g�A�b�v���� | ||||||||||||||||||||||||||||||||||||
------------------------------------- 28 June 2015 HTML�ɂ��Ă̒NjL �@�@�@�t���X�N���[���X���C�h�V���[�����g���̕��́@HTML�̕ύX���K�v�ł��B�@���L���Sample02���@ �@�@�@�@�@�@�@�@�X���C�h�V���[�A���̑���HTML �@�@�@�_�E���[�h���ē���ւ��Ă��������B ------------------------------------- 22 June 2015 HTML�ɂ��Ă̒NjL �@�@�@�t���X�N���[���X���C�h�V���[�����g���̕��́@HTML�̕ύX���K�v�ł��B�@���L���Sample02���@ �@�@�@�@�@�@�@�@�X���C�h�V���[�A���̑���HTML �@�@�@�_�E���[�h���ē���ւ��Ă��������B �@�@�@�t���X�N���[����������g���̕��́@JT65-HF HTML Front��FTP�^�O�̂�Query�̋L�q�̏C�����K�v�ł��B�@ �@�@�@�f�W�T�C�g�Ƀf�B���N�g�������邩�ǂ����ŏC�����@���قȂ�܂��B ���L�̗l�ɏC�����Ă��������B �@�@�@�@�f�B���N�g���[���Ȃ��ꍇ �@�@�@�@�@�@�@�@����@�@�@�@�@�@�@�@�@�@�@�@�@�@�@�@�@�C���� �@�@�@�@�@�@�@sample/�@�@�@�@�@�@�@�@�@�@�@�@�@�@�@../sample/ �@�@�@�@�f�B���N�g���[������ꍇ �@�@�@�@�@�@../sample/ �@�@�@�@�@�@�@�@�@�@�@�@�@../../sample/ �@�@�@�@�@�@�Ƃ��Ă��������B�@�@../�@�́@�D�D/�@�ł��i�_�_�X���b�V��)�B�@����œ����Ǝv���܂����@�����Ȃ��ꍇ�� �@�@�@�@�@�@���q�˂��������B  |
13 July 2015 Version JT65-HF Image�@Controller 1. TX Folder name is increased and Other Bugs fixed. JT65-HF HTML�@Front 1. Color is memorized. 13 July 2015 Version JT65-HF Image�@Controller 1. TX�t�H���_�[���̂𑝂₵�܂����B�@�܂��A���̃o�O���C�����܂����B JT65-HF HTML�@Front 1. HTML�̕����̎d��F���L������悤�ɂ��܂����B -------------------------------------------------------------- 01 July 2015 Version JT65-HF Image�@Controller 1. Bugs on receiving video and gif fixed. JT65-HF HTML�@Front 1. Go to Picture tab, Check "Open file/Not Drag" check box, then "Picture" button can read picture file not drag & drop.. of course even checked this box, drag & drop is OK. 01 July 2015 Version JT65-HF Image�@Controller 1. �����f�h�e�t�@�C����M�Ƀo�O������܂����̂ŏC�����܂����B JT65-HF HTML�@Front 1. �o�������������^�u�̂Ƃ���Ł@���� "Open file/Not Drag" �@�ƌ����`�F�b�N�{�b�N�X������܂��B�@�`�F�b�N������� �@�@�h���b�O���h���b�v�ł͂Ȃ��@�t�@�C���ړǂނ��Ƃ��o���܂��B�@�`�F�b�N������Ԃł��h���b�O&�h���b�v�� �@�@�L���ł��B -------------------------------------------------------------- 28 June 2015 Version JT65-HF Image�@Controller 1. Added On Air Frequency Editor, Click "Edit" button on FTP tab, edit it what you want. 2. Memorized used color on cahracters on picture. Now default is White, but it will be last color that you used. 3. Fixed bugs on dobule click RX "Size" text box to save received picture as received.jpg into server. 4. Fixed bugs on sample02 for Full-Screen Slide Show, please down load "sample02" again, there are 4 files in the folder "sample02b" and copy them onto old file. JT65-HF HTML�@Front 1. Save as the above item 4. 28 June 2015 Version JT65-HF Image�@Controller 1. �^�p���g����ҏW�ł���悤�ɂ��܂����B�@�e�s�o�^�u�́h�d�������h�{�^���Ŏ��ǂ̗p�r�ɍ��킹�ĕҏW���Ă��������B 2. �摜�ɏ������ޕ����̐F���L������悤�ɂ��܂����B 3. �q�w�^�u�̎�M�摜�̑傫���������e�L�X�g�{�b�N�X���_�u���N���b�N����Ɓ@�T�[�o�[�Ɏ�M�摜��received.jpg �@�@�ƌ������O�ŕۑ�����܂����A�o�O������܂����̂ŏC�����܂����B 4. �t���X�N���[���X���C�h�V���[�@sample02 �ɃG���[������܂����̂Ł@�C�����܂����B�@�ēxsample02 �� �@�@�_�E���[�h���Ă��������B�@���Ɂ@sample02b �t�H���_�[�̂S�̃t�@�C�����Â��t�@�C���ɏ㏑���ۑ����� �@�@�������B JT65-HF HTML�@Front 1. ��L�A�C�e���S�Ɠ������e�ł��B ------------------------------------------------------------- 22 June 2015 Version JT65-HF Image�@Controller 1. The default of check boxes are changed �@ No GIF ---> unchecked No META URL---> unchecked No JAVA PopUp New Page ---> checked All unchecked ot checked will be memorized for next start. 2. In order to easy facilitate the maintenance of your server, sending images and other data was decided to management in its own folder in the server. For a while will operate as is, but the setting will be changed at the time that your version up. 3. There are Check Box on HTML RX tab, Please check it when you want to delete all up loaded files. 4. Folder name program automatically determines JT65-HF HTML�@Front 1. Upload of video files will take time for its size is large. Therefore, we have to be able to save it freely named. 2. There are Check Box on HTML tab, Please check it when you want to delete all up loaded files in case of using user's server folder.. 3. Folder name program automatically determines 22 June 2015 Version JT65-HF Image�@Controller 1. ���̃`�F�b�N�{�b�N�̃f�t�H���g�l��ύX���܂����B �@ No GIF ---> �`�F�b�N�Ȃ� No META URL---> �`�F�b�N�Ȃ� No JAVA PopUp New Page ---> �`�F�b�N���� �����̃`�F�b�N�͏I�����ɋL������@���̋N���ɍČ����܂��B. 2. ���ǂ̃T�[�o�[�̃��C���e�i���X��e�Ղɂ��邽�߂Ɂ@���M����摜��f�[�^�̓f�W�T�C�g�Ƃ͐藣���� �@�@�@�Ǘ�������̂Ƃ��܂����B�@���炭�́@����̂܂܉^�p���܂����A�@�F���o�[�W�����A�b�v���ꂽ���_�� �@�@�@��ւ��܂��B. 3. HTML�@RX�^�u�Ɂ@�I�����A�b�v���[�h�����t�@�C�����폜����`�F�b�N������܂��B�@ �@�@�`�F�b�N������Ɓ@���ǂ̃T�[�o�[�Ł@�@�Ǝ��̃t�H���_�[���g�p�̏ꍇ�͏������܂��B �@�@���擙�̑傫�ȃt�@�C���̓A�b�v���[�h�Ɏ��Ԃ��@�@�|����܂��̂Ł@�����̃t�@�C�������̂܂܂� �@�@����ꍇ�́@�`�F�b�N���O���ĉ������B 3. �t�H���_�[�̖��̂̓v���O�����������I�Ɍ��肵�܂��B JT65-HF HTML�@Front 1. ���擙�̑傫�ȃt�@�C���� �@�@�A�b�v���[�h�Ɏ��Ԃ��|����܂��̂Ł@�ۑ����邽�߂Ɏ��R���O�ŃA�b�v���[�h�ł���悤�ɂ��܂����B �@�@HTML�Ŏg�p����ꍇ��HTML�̃����N���ύX���Ă��K�v������܂��B 2. HTML�@�^�u�Ɂ@�I�����A�b�v���[�h�����t�@�C�����폜����`�F�b�N������܂��B�@ �@�@�`�F�b�N������Ɓ@���ǂ̃T�[�o�[�Ł@�@�Ǝ��̃t�H���_�[���g�p�̏ꍇ�͏������܂��B �@�@���擙�̑傫�ȃt�@�C���̓A�b�v���[�h�Ɏ��Ԃ��@�@�|����܂��̂Ł@�����̃t�@�C�������̂܂܂� �@�@����ꍇ�́@�`�F�b�N���O���ĉ������B ------------------------------------------------------------- 11 June 2015 Version JT65-HF Image�@Controller 1. The receiver can select to pop up or receive GIF file or new window for videro or etc. Go to FTP tab, if "NO GIF" is checked, the controller will do nothing, if checked, GIF file will be decoded and diplayed. Go to HTML RX, if "No JAVA Popup New Page", when received HTML has JNew Window pop up script, the controller will delete these script and no new pop up page is displayed. Of course, you can enjoy popup HTML manually, select received HTML, uncheck "No JAVA Popup New Page" , then hit "Display HTML" button. 11 June 2015 Version JT65-HF Image�@Controller 1. ��M�҂�GIF�̕\����HTML�ŐV�����y�[�W���|�b�v�A�b�v�w���邩�ǂ����I���ł���悤�ɂ��܂����B �@�@FTP�^�u�Ł@"NO GIF" �Ƀ`�F�b�N�������Ă��邨GIF�t�@�C���͎�M���܂���B �@�@HTML�@RX�^�u�Ł@�hNo JAVA Popup NewPage"�Ƀ`�F�b�N�������Ă���Ɓ@JAVA�X�N���v�g�� �@�@�V�����y�[�W�\���������Ă����y�[�W�͍��܂���B �@�@�������A�@��M����HTML���@�`�F�b�N���O���ā@�hDisplay�@HTML"�{�^���������@�|�b�v�A�b�v���Đ��\�ł��B ------------------------------------------------------------- 03 June 2015 Version JT65-HF Image�@Controller 1. When JT�U�T-HF HTMLFront is using, JT65-HF Image controller is used for only receiving. the window can be minimized. but report is required to open sometimes, so New Report button is added on the top and right side. 2. Bug fixed when server is changed. . JT65-HF HTML�@Front 1. At present time, JT65-HF HTML front is not stand alone program. this version is revised to stand alone program. After update program "HTML Front" short cut will be appeared on desktop. please clisk it to start program. This can be used for EasyPal. Picture and HTML files will be created on the folder EasyPal in JT65-HF_image folder when you transferred to your server. 2. 2nd picture on seding picture can be added on Picture Tab, drag and drop is also available to get picture. When recieved undislayed HTML, upload picture will be default or user setting picture. bug fixed on photo command. 0�R�@June 2015 Version JT65-HF Image�@Controller 1. HTML Front�����g���̏ꍇ�́@�R���g���[���[�͎�M��p�ɂȂ�܂��̂Ł@RX�̎�M��ʂ���������x�� �@�@���������Ă������Ƃ��o���܂��B�@���̎��A���|�[�g�����邱�Ƃ�����̂Ł@�E��Ƀ{�^����lj����܂����B 2. HTML�̂Ƃ���ŃT�[�o�[��ւ��̃o�O������܂����̂ŏC�����܂����B . JT65-HF HTML�@Front 1. ���܂ł�JT65-HF�@Image�@Controller����݂̂̋N���ł������A�P�ƂŎg����l�ɂ��܂����B �@�@�@�o�[�W�����A�b�v������HTML�@Front�ƌ����V���[�g�J�b�g�������I�ɍ쐬����܂��̂Ł@ �@�@�@����ŋN�����Ă��������B�@�Ȃ��A�P�Ƃł͓����Ȃ��ꍇ������܂��̂ł��e�͉������B �@�@�@�Ȃ��AQSL�V�X�e����HTML���@EasyPal�ɂ��g�p�ł���Ǝv���܂��B 2. Picture�^�u�̂Q���ڂ̎�M�摜�ł����@�h���b�O�A���h�h���b�v�Ŏ��R�ȉ摜��������悤�ɂ��܂����B �@�@�ŋ߂�HTML�ʼn������̉摜�Ŋy���ނ��Ƃ������̂ł����@�Î~��ł���M�摜�Ƌ��Ɏ��R�ȉ摜�� �@�@������܂��̂ł��y���݉������B�B �@ �\���ł��Ȃ�HTML����M�����Ƃ��́@�f�t�H���g�܂��̓��[�U�[�ݒ�̉摜�ŃA�b�v���[�h�����悤�� �@�@�C�����܂����B �@�@PHOTO�R�}���h�̃o�O�������܂����B �@�@JT65-HF�@HTML Front��HTML���쐬�����ꍇ�A�C���X�g�[������Ă���t�H���_�[�Ɂ@EasyPal�� �@�@�����t�H���_�[���쐬���܂��B�@���̒��Ɂ@CALL.���������@���쐬�����̂Ł@�����EasyPal�� �@�@�����čs���ΊȒP��EasyPal��HTML�������悤�ɂȂ�܂��B�@�e���v���[�g�⎩��̕��� �@�@�摜�A�ǎ��A����A���y���K�v�ȃt�@�C���͎����ő���܂��̂ŕ֗����Ǝv���܂��B ------------------------------------------------------------- 25 May 2015 Version HTML bug fixed when real time server changed. New function for sending any files except exe one is added. Go to Video/Etc Tab on JT65-HF HTML Front, 1. Open file folder 2. Drag and drop any hile here. 3. Saved file name in the server. 4. Making HTML to see file automatically and transfer file and HTML into server. 5. Confirm HTML in sereve. sending command is "CALL/HTML". Remarks: When you receive this command, please open HTML when sender is trusted station because sended file may be dangerous. Bugs on JT65-HF Image Controller fixed. 25 May 2015 Version �@ ���A���^�C���ŃT�[�o�[��ւ������@HTML�������ɂȂ�o�O���C�����܂����B �@�t�@�C����HTML�ő���@�\��lj����܂����B�@�������Aexe �t�@�C���������܂��B JT65-HF HTML Front�@�́@Video?etc�^�u�ɍs���ĉ������B, 1. �t�@�C���t�H���_�[���J���Ă��������B 2. �t�@�C�����h���b�O�A���h�h���b�v�V�e���������B 3. �]������t�@�C�����ƂȂ�܂��B. 4. HTML�������쐬����@�]���t�@�C���Ƌ��ɃT�[�o�[�ɓ]�����܂��B�R�}���h�́@�R�[��/HTML �ł��B. 5. �T�[�o�[�̒���HTML���m�F���܂��B. ���Le: ���̃R�}���h����M�����Ƃ��́A�M���ł���ǂ�����ꂽ���Ɂ@HTML���J���Ă��������B ����͑���ꂽ�t�@�C�����댯�ȏꍇ�����邽�߂ł��B �@JT65-HF Image Controller�̃o�O���C�����܂����B. �ǐL�A�Ȃ��A ���t���ꂽ�t�@�C�����J������A�������肷��͎̂�M�҂�PC�̃v���O�����Ɉˑ����܂��B ���Ƃ��AXLS�G�N�Z���t�@�C���Ȃǂ�EXCEL���Ȃ��ƌ����܂���B���낢��ȓ���t�@�C�������l�� Window�@Media�@Player�ł͍Đ��ł��Ȃ����̂�����܂��B�@���ꂼ��K�v�ȃ\�t�g���C���X�g�[�����Ă��������B ------------------------------------------------------------- |
|||||||||||||||||||||||||||||||||||
| TOPICS�@23B/Mar/2015 INSTRUCTION HERE �Z�b�g�A�b�v���� | ||||||||||||||||||||||||||||||||||||
  |
23 May 2015 Version Added real time server change function. After all station have been version upped, this function will be active. Bugs on JT65-HF HTML Front fixed. 23 May 2015 Version �@ ���A���^�C���ŃT�[�o�[��ւ����o����悤�ɋ@�\��lj����܂����B�F���o�[�W�����A�b�v���ꂽ�� �@�v���鎞���Ɂ@���̋@�\��L��t���܂��B �@�o�O���C�����܂����B�@ ------------------------------------------------------------- 18 May 2015 Version Bugs on JT65-HF HTML Front fixed. 18 May 2015 Version �@ �o�O���C�����܂����B�@QSL�J�[�h�̃T���l��������悤�ɂ��܂����B�@QSL�^�u��Server�{�^����QSL �@Server Maintenance���N�����@Past�@RCV�������`�F�b�N�����ā@���e���\�����ꂽ��@Create HTML�{�^���� �@�����Ă��������B�@�Ō�Ɂ@Transfer HTML�{�^���������Ɓ@�T���l���\���p��HTML��QSL�T�[�o�[�� �@�]������܂��B�@�T�[�o�[�́@index.html�@�́@http://www.qsl.net/jq1hdr/QSL/index.html�@���Q�l�� �@�C�����ĉ������B�@Display List�̓T���l���ŕ\������摜�̐��ł��B�@�ŐV�̕�����\������܂��B ------------------------------------------------------------- 11 May 2015 Version Bugs on JT65-HF HTML Front fixed. 11 May 2015 Version �@ �o�O���C�����܂����B�@ ------------------------------------------------------------- 08 May 2015 Version Bugs on JT65-HF HTML Front fixed. index.html for QSL server changed, filelistc.cgi added, so please tranfer them to you server. These index.html and filelistc.cgi are in jt65-front/qsl folder. if you are QSL.net user, please read Manual adn down load below file. Down Load QSLnet.zip for QSL.net user Manual is here , This was translated in Gogole I am also QSL.net user, so please refer to my web site 08 May 2015 Version �@ �o�O���C�����܂����B�@�܂��A�@QSL�T�[�o�[�p��index.html���C�����܂����B�@���e���C���̂����@ �@�T�[�o�[�ɓ]�����Ă��������B�@��M����QSL�p��CGI�@filelistc.cgi ��lj����܂����B�@������T�[�o�[�� �@�]�����Ă��������B�@�����̏C���́@jt65-front/qsl �t�H���_�[�ɓ����Ă��܂��B �}�j���A�������܂����̂œǂ�ł��������B ------------------------------------------------------------- 06 May 2015 Version This version has been added QSL Server that saves Recent Contact QSL and Past QSO QSL Card in your server, if any. If you are QSL.net user, CGI Program doesn't work on the QSL.Net. Please down load QSLNet.zip for QSL Server and read below instruction and set configuaration as manual. 03 May 2015 Version ���̃o�[�W�����͍ŐVQSO��ߋ���QSO��QSL�J�[�h�����[�U�[�̃T�[�o�[�ɕۊǂł���悤�� �������̂ł��B�@���M�����摜��QSL�J�[�h�̉摜���L������悤�ɂ��܂����B�@���̑��@�o�O���C�� ���܂����B QSL.net ���U�[�̕��́@�l�I�ɍ쐬����CGI�v���O�����̎��s���o���܂���B�@�]���āA QSLnet.zip ���@�_�E���[�h���ā@�p��̃}�j���A�������ǂ݂̏�@�ݒ�����肢���܂��B�܂��A�V�KQSL�� NEW�t�H���_�[�ɕύX�ɂȂ�܂����̂Ł@filelist.cgi�@���@����ւ��Ă��������B ------------------------------------------------------------- 03 May 2015 Version This version has been added QSL Server that saves Recent Contact QSL and Past QSO QSL Card in your server, if any. Memorized last Sending and QSL picture and fixed bugs. It seemes that QSL.net doesn't allow to run personal CGI. 03 May 2015 Version ���̃o�[�W�����͍ŐVQSO��ߋ���QSO��QSL�J�[�h�����[�U�[�̃T�[�o�[�ɕۊǂł���悤�� �������̂ł��B�@���M�����摜��QSL�J�[�h�̉摜���L������悤�ɂ��܂����B�@���̑��@�o�O���C�� ���܂����B ------------------------------------------------------------- 27 Apr 2015 Version This version has been added QSL Server that saves Recent Contact QSL and Past QSO QSL Card in your server, if any. Very sorry taht no English instruction now, please wait. 27 Apr 2015 Version ���̃o�[�W�����͍ŐVQSO��ߋ���QSO��QSL�J�[�h�����[�U�[�̃T�[�o�[�ɕۊǂł���悤�� �������̂ł��B�@�p��̐������͂���܂��@���{��͉��L���Q�Ƃ��������B ------------------------------------------------------------- 15 Apr 2015 Version This version uses a normal image, automatically writes letters of QSL 1. If checked on the QSL Check box, you need to prepare the image for the QSL as of until now. Please uncheck and spread the window downward, data such as call sign and QTH appears to be written 2. Press "Picture" button, folder is displayed so please drag and drop the image. 3. This is the call sign to be written to the card. 4. The data such as QTH and etc. 5. Specify the color of the character. 6. Font also can change. Press "To Picture"or "Transfer" button, then characters are written in the upper left. 15 Apr 2015 Version ���̃o�[�W�����͒ʏ�̉摜���g���A�p�r�k�̕����������I�ɏ������ނ悤�ɂ������̂ł��B 1. �p�r�k�Ƀ`�F�b�N���t���Ă���Ɓ@���܂ł̗l�Ɂ@�p�r�k�p�̉摜����������K�v������܂��B �`�F�b�N���O���Ɖ�ʂ��L����A�������ރR�[���T�C���Ƃp�s�g���̃f�[�^�[���\������܂��B 2. �摜�̃t�H���_�[���\������܂��̂Ł@�摜���h���b�O�A���h�h���b�v���Ă��������B 3. �J�[�h�ɏ������ށ@�R�[���T�C���ł��B�@�ړ��p�@/�P�@��������Ă��������B 4. �p�s�g���̃f�[�^�ł��B 5. �������ޕ����̐F���w�肵�܂��B 6. �t�H���g���ς��邱�Ƃ��o���܂��B �h�s���@�o�������������h�@�܂��́@�h�s���������������h�{�^���������@����Ɂ@������������ā@�p�r�k�͊������܂� |
|||||||||||||||||||||||||||||||||||
 |
14 Apr 2015 Version This version was to be able to create the Image of QSL. When you upgrade of 14 Apr 2015 jt65-front folder called qsl in the folde rwill be created. Sample of QSL say sample.jpg Containsin it. Please save this by creating a QSL card of your own reference in the image software. The sample.jpg was created using PhotoScape. Please paste various logo if necessary 1. Read the image that you created. 2. Press "Get Data" button, if RX picture is pasted on the HTML Front, 3. QSO data is captured. Please be inpu tas long it is missing, etc. Please choose the band data and mode 4. Since the report column will appear on top of the image, you can change the position by dragging the left edge with the mouse 5. Please choose a small numbe rif you want to reduce the report column 6. The color of report can be changed, it is a white or black. 7. You can be a transparent background of the report column. 0 transparent, 1.0 will b eopaque 8. Re-drawing in case you make a change 9. Transfer the image to the server. 10. Check the image that was sent to the server. 11. Image will pop up at the time of transfer if you stick the check. 13. You can handle in the normal transmission image the same way. Please variously added because it is sent to the Picture tab. 14 Apr 2015 Version QSL��Image���쐬�ł���悤�ɂ��܂����B�@14�@Apr 2015�@�Ƀo�[�W�����A�b�v����Ɓ@jt65-front�t�H���_�[�� ����qsl�ƌ����t�H���_�[���쐬����܂��B�@���̒��� sample.jpg �ƌ����@QSL�̃T���v���������Ă��܂��B ������Q�l�ɂ����g��QSL�J�[�h���摜�\�t�g�ō쐬���ĕۑ����Ă��������B�@�T���v���摜�� PhotoScape���g���� �쐬���܂����B�@�K�v��������낢��ȃ��S������Ă���܂��̂œ\��t���Ă��������B 1. �쐬�����摜��ǂݍ���ł��������B 2. ��M�����摜����荞�܂�Ă���@�hQSO�捞�h�{�^���������Ă��������B 3. QSO�f�[�^����荞�܂�܂��B�@������������C���v�b�g���Ă��������B �o���h�f�[�^�ƃ��[�h�͑I��ł��������B 4. ���|�[�g�����摜�̏�Ɍ���܂��̂ŁA���[���}�E�X�Ńh���b�O����ƈʒu��ύX�ł��܂��B 5. ���|�[�g�����������������ꍇ�́@�����Ȑ�����I��ł��������B 6. ���|�[�g�̐F��ς����܂��B�@�������̓��ނł��B 7. ���|�[�g���̔w�i���ɂ��邱�Ƃ��o���܂��B�@�O�͓����A�@�P�D�O�͕s�����ɂȂ�܂��B 8. �ύX���������ꍇ�ɍĕ`�悵�܂��B 9. �摜���T�[�o�[�ɓ]�����܂��B 10. �T�[�o�[�ɑ���ꂽ�摜���m�F���܂��B 11. �`�F�b�N��t����Γ]�����ɉ摜���|�b�v�A�b�v���܂��B 13. �ʏ�̑��M�摜�Ɠ����悤�Ɉ�����悤�ɂ��܂��B�@Picture�^�u�ɑ����܂��̂Ł@���낢��lj����Ă��������B |
|||||||||||||||||||||||||||||||||||
| TOPICS�@12B/Mar/2015 INSTRUCTION HERE �Z�b�g�A�b�v���� | ||||||||||||||||||||||||||||||||||||
| 12B/Apr/2015�@JT65-HF Image Controller for W7/8 1. <DATE> format changed to 24H hours 2. Other Bug fixed. 12B/Apr/2015 JT65-HF Image Controller for W7/8 1. <DATE>�t�H�[�}�b�g���Q�S���ԂƂ��܂����B 2. �o�O���C�����܂����B ------------------------------------------------------------------ 11B/Apr/2015�@JT65-HF Image Controller for W7/8 1. <DATE> command bug is fixed. 2. Other Bug fixed. 11B/Apr/2015 JT65-HF Image Controller for W7/8 1. <DATE>�R�}���h�Ƀo�O������܂����̂ŏC�����܂����B 2. �o�O���C�����܂����B ------------------------------------------------------------------ 10B/Apr/2015�@JT65-HF Image Controller for W7/8 1. In accordance with USER's request, added Macr <DATE> for picture wrintting and HTML Go to HTML RX tab, select time style, UTC time or local time, alseo select Time style Japanese or english style. Inserted Date and time is as follows: Friday, April 10, 2015 11:00:00 AM UTC or Friday, April 10, 2015 11:00:00 AM 2. Bug fixed. 10B/Apr/2015 JT65-HF Image Controller for W7/8 1. ���[�U�̃��N�G�X�g�ɂ��<DATE>�}�N�����摜�������݂����HTML�ɒlj����܂����B �@�@�@HTML�@RX�^�u�Ł@UTC���Ԃ����[�J�����Ԃ�I��ł��������B�@�܂��A�X�^�C����I��ł��������B �@�@�@�������ރX�^�C���� �@�@�@2015�N�S���P�O���@11:00:00 UTC �܂��́@2015�N�S���P�O���@11:00:00�@�ɂȂ�܂��B 2. �o�O���C�����܂����B As for JT65-HF HTML Front, go to FTP tab, then select UTC and style. <DATE> macro can be used for picture writtinga and HTML. ------------------------------------------------------------------ 09B/Apr/2015�@JT65-HF HTML for W7/8 1. Press "My Mail" Button so that your maill will be received 2. Bug fixed. 09B/Apr/2015 JT65-HF HTML Controller for W7/8 1. My�@Mail�{�^�����������[������M����l�ɂ��܂����B 2. �o�O���C�����܂����B ------------------------------------------------------------------ 29B/Mar/2015�@JT65-HF HTML for W7/8 1. Added server manage, click "M" button on HTML Setting Tag 2. <MSG> macro added for HTML. 3. Bug fixed. 29B/Mar/2015 JT65-HF HTML Controller for W7/8 1. �T�[�o�[�Ǘ���lj����܂����B�@HTML�ݒ�^�O�� �hM"�@�{�^���������Ă��������B 2. <MSG> �}�N����HTML�p�Ƃ��Ēlj����܂����B 2. �o�O���C�����܂����B 29B/Mar/2015�@JT65-HF Image Controller for W7/8 1. Added check bottun to allow or not for New Connection with <META> Tag. Go to HTML RX tag. default is not allow, uncheck to allow if you want. 2. Bug fixed. 29B/Mar/2015JT65-HF Image Controller for W7/8 1. <META>�^�O�ɂ��V����HTML�ւ̐ڑ��������邩�ǂ����̃`�F�b�N�{�^����lj����܂����B �@�@�@HTML RX�^�O�̂Ƃ���Ł@�f�t�H���g�͋����Ȃ��ł��B�@�����@�ڑ���������Ȃ� �@�@�@�`�F�b�N���O���Ă��������B 2. �o�O���C�����܂����B ------------------------------------------------------------------ 28B/Mar/2015�@JT65-HF HTML for W7/8 1. Added 75% Reducing buttonr, 2. Bug fixed. 28B/Mar/2015 JT65-HF HTML Controller for W7/8 1. 75%�k���{�^����lj����܂����Be 2. �o�O���C�����܂����B 28B/Mar/2015�@JT65-HF Image Controller for W7/8 1. HTML Windows Controll added. Go to HTML RX tag, Check box Checked, Window will be closed. Check box un checked and Select box will be displayed. 0 means no close, others are close after xx min. 2. Bug fixed. 28B/Mar/2015JT65-HF Image Controller for W7/8 1. HTML �E�B���h�E�̐����lj����܂����B�@HTMLRX�̃^�O�Ł@Close�@�Ƀ`�F�b�N��t����� �@�@�@��M�㎩���ŕ܂�܂��B�@�`�F�b�N���O���Ɓ@�ʂȐݒ肪����@�T����ɕ܂�ݒ�ɂȂ�܂��B �@�@�@�O�͕��Ȃ��Ƃ����Ӗ��ł��B 2. �o�O���C�����܂����B ------------------------------------------------------------------ 27B/Mar/2015�@JT65-HF HTML for W7/8 1. HTMLTemplate for Text File sending added. Open new_html forlder in jt65_front folder, copy Message.html in your using template folder. Go to HTML Setting Tag on JT65-HF HTML Front, Click "Text" ,button, then write your message and transfer to server. Transfer Message.html send command. 2. Bug fixed. ------------------------------------------------------------------ 20B/Mar/2015 JT65-HF HTML Controller for W7/8 1. �e�L�X�g�𑗂�HTML��lj����܂����B�@����65-Front�̃t�H���_�[���ɂ���new_html�t�H���_�[�� �@�@�@Message.html ������܂��̂Ł@�g���Ă�����e���v���[�g�t�H���_�[�ɃR�s�[���Ă��������B �@�@�@�t�����g��HTML�ݒ�ɂ���"�e�L�X�g�{�^���������@���b�Z�[�W����������œ]�����Ă��������B �@�@�@HTML�Ł@message.html ��]�����ăR�}���h�𑗐M�����OK�ł��B 2. �o�O���C�����܂����B ------------------------------------------------------------------ 24B/Mar/2015�@JT65-HF Image Controller and JT65-HF HTML Front for W7/8 1. Excluded CQ100 Controller LOG IN button. For CQ100, please use CQ100 Controller. 2. Modified Front on Music Type Radio Button. 3. HTML Slide Tag on Front, Mid and Mp3 Music can be drag and dropped.. 24B/Mar/2015JT65-HF Image Controller and JT65-HF HTML Front for W7/8 1. CQ100�p�̃��O�C���{�^���͏����܂����B�@CQ100�p�̃R���g���[���[�����g�����������B 2. �t�����g�̉��y�ݒ�{�^������₷�����܂����B 3. �t�����g��HTML�@Slide�^�O�̉��y�捞��Mid �����MP3���h���b�O�A���h�h���b�v�o���܂��B ------------------------------------------------------------------ 20B/Mar/2015�@JT65-HF Image Controller for W7/8 1. Version up procedure changed. It is same as first installation. 2. HTMX command is deleted. Full Screen Video HTML can be sent with Normal HTML. 3. JT65-HF HTML Front will be updated automatically at the same time.. 20B/Mar/2015JT65-HF Image Controller for W7/8 1. �o�[�W�����A�b�v�̕��@��ς��܂����B�@�ŏ��̃v���O���������Ɠ����ɂ��܂����B 2. HTMX�R�}���h�͏����܂����B�@�t���X�N���[���r�f�I�͒ʏ��HTML�����ő���܂��B �@�@�@�ڍׂ͂��q�˂��������B 3. ������JT65-HF HTML Front ���A�b�v�f�[�g����悤�ɂ��Ă��܂��B ------------------------------------------------------------------ 12BB/Mar/2015�@JT65-HF HTML Front for W7/8 1. Bugs on MP3 . 2. Hang trouble fixed 12BB/Mar/2015JT65-HF HTML Front for W7/8 1. MP3 �̃o�O���C�����܂����B 2. �n���O����g���u�����C�����܂����B ------------------------------------------------------------------ 12B/Mar/2015�@JT65-HF Image Controller for W7/8 1. Method is changed on PSK received picture up loading Digi-Site. 2. Server will be changed so that Security is to be more tight, After changing server, Old version before 12B is not compatible to this new. 12B/Mar/2015JT65-HF Image Controller for W7/8 1. PSK��M�摜�̃f�W�T�C�g�A�b�v���[�h�̕��@���C�����܂����B 2. �Z�L�����e�B�[����̂��߃T�[�o��ύX���܂��B �T�[�o�[��ւ���� �@�@�@12B�ȑO�̃o�[�W�����͎g���܂���̂ł����ӂ��������B |
||||||||||||||||||||||||||||||||||||
| TOPICS�@10B/Mar/2015 INSTRUCTION HERE �Z�b�g�A�b�v���� | ||||||||||||||||||||||||||||||||||||
  |
10B/Mar/2015�@JT65-HF Image Controller for W7/8 1. Bug fixed. 2. Compatible to CQ100 Controller Program. 10B/Mar/2015JT65-HF Image Controller for W7/8 1. �o�O���C�����܂����B 2. CQ100�@Controller�ɂ��g����l�ɂ��܂����B 03B/Mar/2015�@JT65-HF Image Controller for W7/8 1. HTML frame removed for up loading Digi-Site 03B/Mar/2015JT65-HF Image Controller for W7/8 1. �f�W�T�C�g�A�b�v���[�h����HTML�̃t���[�����������܂����B 27�a/Feb/2015�@JT65-HF Image Controller for W7/8 1. Bug on WSJT-X fixed. Displayed JT65 and JT9 Traffic 27�a/Feb/2015JT65-HF Image Controller for W7/8 1. WSJT-X�̃o�O���C�����܂����B��M�f�[�^���\���ł���悤�ɖ߂��܂����B 26�a/Feb/2015�@JT65-HF Image Controller for W7/8 1. Bug on WSJT-X fixed. 26�a/Feb/2015JT65-HF Image Controller for W7/8 1. WSJT-X�̃o�O���C�����܂����B 24�a/Feb/2015�@JT65-HF Image Controller for W7/8 1. Only re-compiled and changed version name. 24�a/Feb/2015JT65-HF Image Controller for W7/8 1. �ăR���p�C���ƃo�[�W������ς��������ł��B 19�a/Feb/2015�@JT65-HF Image Controller for W7/8 1. Bug fixed on Video receiving report 2. Added HTMX command for WSJT-X 19�a/Feb/2015JT65-HF Image Controller for W7/8 1. �r�f�I��M���|�[�g�̃o�O���C�����܂����B 2. WSJT-X��HTMX�R�}���h��lj����܂����B 16�a/Feb/2015�@JT65-HF Image Controller for W7/8 1. Bug fixed on Video receiving report 16�a/Feb/2015�@JT65-HF Image Controller for W7/8 1. �r�f�I��M���|�[�g�̃o�O���C�����܂����B 14�a/Feb/2015�@JT65-HF Image Controller for W7/8 1. Added HTML Front program 14�a/Feb/2015�@JT65-HF Image Controller for W7/8 1. HTML Front �v���O������lj����܂����B 06�a/Feb/2015�@JT65-HF Image Controller for W7/8 1. Double ckick Size displayed textbox, selected RX picture will be transfered to slected server as recieved.jpg. 2. To save dipsplay area, displayed Window will be reduced.. 3. Reducing ratio %. 4. All HTML windows will be reduced. 5. Added macro as below: <CHANGE_URL> ----> your URL "http://xxxx.xxxx.xxxx/yyy./" will be added instead of this macro. <CHANGE_CALL> ----> your URL and call "http://xxxx.xxxx.xxxx/yyy./your call" will be added instead of this macro. <SNR> --------------> "SNR -xx dB" will be added instead of this macro. <SLIDE> -------------> Your URL Digi-Site "http://xxxx.xxxx.xxxx/yyy./" will be added instead of this macro. /* W=aaa ------------> aaa is pop up window width in pix. /* H=aaa ------------> aaa is pop up window height in pix. 06�a/Feb/2015�@JT65-HF Image Controller for W7/8 1. �_�u���N���b�N����ƑI��Ă���T�[�o�[�Ɏ�M�摜�� rceived.jog �ƌ������O�œ]�����܂��B 2. �f�B�X�v���C�̉�ʃX�y�[�X�m�ۂ̂��߁AHTML�̃E�B���h�E�\���X�y�[�X���k�����܂��B. 3. �k�����ł��B. 4. ��ʂ̑傫���w�肪�����Ă��k�����܂��B 5. ���L�̃}�N�������p�ł��܂��B <CHANGE_URL> ----> URL "http://xxxx.xxxx.xxxx/yyy./" �ɒu�������܂��B. <CHANGE_CALL> ----> URL and call "http://xxxx.xxxx.xxxx/yyy./your call" �ɒu�������܂��Bd <SNR> --------------> "SNR -xx dB" �ɒu�������܂��B <SLIDE> -------------> �f�W�T�C�g��URL "http://xxxx.xxxx.xxxx/yyy./" ���}������܂��B /* W=aaa ------------> aaa �|�b�v�A�b�v������HTML�̕� �@pix. /* H=bbb ------------> bbb �|�b�v�A�b�v������HTML�̍��� �@pix. �@�@�@�@�@�Ȃ��A�k����L���ɂ����ꍇ�̒������@�́A�@HTML�@RX�Ŏ�M����HTML��\��������� �@�@�@�@�@�w�i�����������o�ė��Ă���ꍇ�Ɂ@�ꖇ�Ɏ��܂�悤�ɑ傫�������ĕ��Ă��������B �@�@�@�@�@������@���܂��\�������Ǝv���܂��B �@�@�@�@�@�@�@�@�@�@�ׂ����}�N���Ɖ摜�̊W�́@�������������������B �@�@�@�@�ȒP�ȃ}�N��������Ă��܂����B�@ �@�@�@�@�_�E���[�h�̂��Ɖ𓀂����3�̃z���_�[������܂��̂Ł@ �@�@�@�@�t�H���_�[���Ɓ@�R���g���[���[��HTML�t�H���_�[�� �@�@�@�@����Ă��������B�@HTML�̋L�q���ȒP�ɂȂ�܂��B<OM>�R�}���h�� �@�@�@�@�R���g���[���ł͖������܂��̂ł������炸�B |
|||||||||||||||||||||||||||||||||||
| TOPICS�@03B/�i����/2015 INSTRUCTION HERE �Z�b�g�A�b�v���� | ||||||||||||||||||||||||||||||||||||
  |
03B/Feb/2015�@JT65-HF Image Controller for W7/8 1. Descrived HTML size command is displayed on HTML, so bug dixed. 2. No request size change from sender, HTML size will be user stting size. 03B/Feb/2015�@JT65-HF Image Controller for W7/8 1. HTML�̑傫�����w�肷��R�}���h���\�������o�O���܂����B 2. HTML�̑傫���w�肪�Ȃ����͎�M�҂̐ݒ�̉摜�̑傫���ɂȂ�܂��B 02�aB/Feb/2015�@JT65-HF Image Controller for W7/8 Added HTML Size Command for window 1. To size received HTML Window, add command onto HTML at last line as below: /* W=xxxx /* H=xxxx xxx is width or height in Pix/ 2. Bug dixed. 02�aB/Feb/2015�@JT65-HF Image Controller for W7/8 �g�s�l�k�E�C���h�E�̑傫�����w�肷r�R�}���h�lj����܂����B 1. HTML�E�B���h�E�̑傫�������Ă���ɂ́@�쐬���ꂽHTML�̍Ō�ɉ��L�̃R�}���h����Ă��������B �@�@�@/* W=xxx �@�@�@/* H=xxx �@�@�@xxx�͕\������E�C���h�E�̕��ƍ�����Pix�ł��B 2. �o�O���܂����B 14�a/�i����/2015�@JT65-HF Image Controller for W7/8 Added size selection for one picture Backgroud Wall function. 1. Adj(Adujust) is checked and select size, slected picture will be one piece wall paper. 2. Up loaded file name is yourcall_wall.gif, even if it is jpg file. state as below on your HTML as <BODY background="http://xxxx.xxxxx.com/YourCall_wall.gif"> 3. When Macro window are used +to add sentence on picture, <REPORT> will be OK for Macro. <REPORT> will add report on picture as below HisCall Name de Mycall Good copy Date / Time : 14/01/2015 00:00:00 Data Type : Hiscall.jpg Report : SNR -5dB 14�a/�i����/2015�@JT65-HF Image Controller for W7/8 �g�s�l�k�p�̕ǎ����ꖇ�̉摜�̑傫�����w��o����悤�ɂ��܂����B 1. Adj�iAdjust)�Ƀ`�F�b�N������đ傫����I�ԂƂ��̑傫���̈ꖇ�̕ǎ��ƂȂ�܂��B 2. �A�b�v���[�h�����摜�̖��O��GIF�t�@�C���ɕϊ�����܂��̂ŃR�[���Q.gif �ɂȂ�܂��B. �g�s�l�k�ɉ��L���������߂Εǎ��ƂȂ�܂��B <BODY background="http://xxxx.xxxxx.com/YourCall_wall.gif"> 3. �摜�ɕ������������ނƂ��Ɂ@MACRO��ʂ��g�p�����ꍇ�A�@<REPORT> �}�N�����g���܂��B �@�@�@������g�p����Ɖ摜�ɉ��L���������܂�܂��B HisCall Name de Mycall Good copy Date / Time : 14/01/2015 00:00:00 Data Type : Hiscall.jpg Report : SNR -5dB 07�a/�i����/2015�@JT65-HF Image Controller for W7/8 Added one picture Backgroud Wall function. 1. Adj(Adujust) is checked, slected picture will be one piece wall paper. 2. Wall paper width will be adjusted equal to HTML width 3. Up loaded file name is yourcall_wall.gif, even if it is jpg file. state as below on your HTML as <BODY background="http://xxxx.xxxxx.com/YourCall_wall.gif"> 07�a/�i����/2015�@JT65-HF Image Controller for W7/8 �g�s�l�k�p�̕ǎ����ꖇ�̉摜�ŏo����悤�ɂ��܂����B 1. Adj�iAdjust)�Ƀ`�F�b�N������Ɓ@�ꖇ�̕ǎ��ƂȂ�܂��B 2. �ǎ��̕��́A���ǂ�HTML�̕��Ɏ�����������܂��B 3. �A�b�v���[�h�����摜�̖��O��GIF�t�@�C���ɕϊ�����܂��̂ŃR�[���Q.gif �ɂȂ�܂��B. �g�s�l�k�ɉ��L���������߂Εǎ��ƂȂ�܂��B <BODY background="http://xxxx.xxxxx.com/YourCall_wall.gif"> 05�a/�i����/2015�@JT65-HF Image Controller for W7/8 Added Backgroud Wall folder for HTML. 1. Music Folder 2. Backgroud wall folder. 3. Refresh folder. 4. When selected Backgroud wall folder, select wall gif what you wat to set on your HTML for wall paper. your gif file will be displyed. 5. Press Transfer Button, Selected Gif file will be up loaded as YourCALL_wall.gif and state as below <BODY background="http://xxxx.xxxxx.com/YourCall_wall.gif"> 05�a/�i����/2015�@JT65-HF Image Controller for W7/8 �g�s�l�k�p�̕ǎ��̃t�H���_�[��lj����܂����B 1. ���y�t�H���_�[ 2. �ǎ��p�̃t�H���_�[. 3. ���t���b�V���{�^��. 4. �ǎ��t�H���_�[��I���A�\������Ă���ǎ��p�̂f�h�e��I��ł��������B �I�ꂽ�f�h�e�摜���\������܂��B 5. �h�s���������������h�{�^���������Ă��������B�@�I�ꂽ�f�h�e�t�@�C���́@�R�[���Q���������D�������ƌ����t�@�C������ �@�@�@�A�b�v���[�h����܂��B�g�s�l�k�ɉ��L���������߂Εǎ��ƂȂ�܂��B <BODY background="http://xxxx.xxxxx.com/YourCall_wall.gif"> 01�a/�i����/2015�@JT65-HF Image Controller for W7/8 1. Japanese New Band Plan is added. 2. Other bugs fixed. 01�a/�i����/2015�@JT65-HF Image Controller for W7/8 1. Japanese New Band Plan is added. 2. Other bugs fixed. 01�a/�i����/2015�@JT65-HF Image Controller for W7/8 1. �V�o���h�v�������g����\���o����悤�ɂ��܂����B 2. �o�O�C�����܂����B |
|||||||||||||||||||||||||||||||||||
| TOPICS�@2�TB/Dec/2014 INSTRUCTION HERE �Z�b�g�A�b�v���� | ||||||||||||||||||||||||||||||||||||
 |
25B JT65-HF Image Controller for W7/8 1. HTML Default Display Changed. 2. Music folder added, Music and Video folder will be memorized. 3. Other bugs fixed. 25B JT65-HF Image Controller for W7/8 1. HTML�f�t�H���g�\����ύX���܂����B 2. �V���Ɂ@���y�t�H���_�O��lj����A�@�r�f�I�Ɖ��y�t�H���_�[�͋L�����Ă����悤�ɂ��܂����B 3. �o�O���C�����܂����B 23B JT65-HF Image Controller for W7/8 1. Bugs on WSJT-X report 2. Changed FTP.cfg folder so that you can re-install setup disk. 3. If HTML pop up window is settled at minimized, default window will be opened. 4. Other bugs fixed. 23B JT65-HF Image Controller for W7/8 1. WSJT-X�̃��|�[�g�ɃG���[������܂����̂ŏC�����܂����B 2. �e�s�o�D�������̃t�H���_�[�����ύX���܂����B����ɂ��C���X�g�[���f�B�X�N�ł̍X�V�����Ă� �@�@�@�e�s�o�ݒ�͂��̂܂ܗ��p�ł��܂��B 3. �g�s�l�k�|�b�v�A�b�v��ʂ��ŏ�������Ă����Ƃ��ɂ̓f�t�H���g�̉�ʂŕ\������悤�ɂ��܂����B 4. �o�O���C�����܂����B |
|||||||||||||||||||||||||||||||||||
| TOPICS�@21B/Dec/2014 INSTRUCTION HERE �Z�b�g�A�b�v���� | ||||||||||||||||||||||||||||||||||||
  |
18B JT65-HF Image Controller for W7/8 1. Added Splash Window to prevent duplicate start 2. Fixed bugs 18B JT65-HF Image Controller for W7/8 1. 2�d�N���̖h�~�̂��߁@�X�ɉ�ʂ�lj����܂����B 2. �o�O���C�����܂����B 16B JT65-HF Image Controller for W7/8 1. Added Starting Dialogue and Prevet Duplicate Start 2. Added GIF Player for up loading report. 3. Fixed bugs 16B JT65-HF Image Controller for W7/8 1. �X�^�[�g���̃_�C�A���O��\�����A2�d�N���̖h�~�����܂����B 2. ��M���|�[�g�ɂ����āA�f�h�e�R�}���h�̐�p�E�C���h�E��lj����܂����B 3. �o�O���C�����܂����B 09B JT65-HF Image Controller for W7/8 1. Start time shortened. 2. Eliminated commercial display on HTML 3. Received HTML saved as JPG file in RX folder. 09B JT65-HF Image Controller for W7/8 1. �X�^�[�g���Ԃ�Z�����܂����B 2. HTML��M���̃R�}�[�V�����\�����Ȃ����܂����B 3. ��M����HTML��JPG�摜�Ƃ���RX�t�H���_�[�ɕۑ����܂��B 08B JT65-HF Image Controller for W7/8 1. Some bugs fixed 08B JT65-HF Image Controller for W7/8 1. �o�O������܂����̂Œ����܂����B 06BB JT65-HF Image Controller for W7/8 1. Fixed Bug o prevent minimum HTML on up load HTML report. 2. XP version is not so good security. Will stop to update . 06BB JT65-HF Image Controller for W7/8 1. HTML���|�[�g�̍ŏ�����h�~���܂����B 2. XP�o�[�W�����̊J�����I�����܂��B Controller for W7/8 1. Fixed Bug on up load Hybrid Picture 2. Fixed Bug on Lon in Security. 03B JT65-HF Image Controller for W7/8 1. �n�C�u���b�h�摜�̃A�b�v�̃o�O���C�����܂����B 2. ���O�C�����̃Z�L�����e�B�[�W�o�O����菜���܂����B 02BB JT65-HF Image Controller for W7/8 1. Fixed Bug on up load Digi-Site of HTML 2. Fixed Bug on Blank Window 02BB JT65-HF Image Controller for W7/8 1. HTML�̃f�W�T�C�g�A�b�v���o����悤�ɏC�����܂����B 2. �u�����N�y�[�W���\�������o�O�����܂����B 02B JT65-HF Image Controller for W7/8 1. Fixed Bug on up load Digi-Site of HTMLand Video receiving at same time. 2. Added security function. 02B JT65-HF Image Controller for W7/8 1. HTML�Ɠ������M�����Ƃ��̃f�W�T�C�g�A�b�v�̃o�O���C�����܂����B 2. �Z�L�����e�B�[�@�\���A�b�v���܂����B 30B JT65-HF Image Controller for W7/8 1. Fixed Bug on HTMLand Video receiving at same time. 2. Hybrid serever will be changed to new one. Old version will not be compatible. When XP version is released, Server will be changed. 30B JT65-HF Image Controller for W7/8 1. HTML�Ɠ������M�����Ƃ��̃o�O���C�����܂����B 2. �n�C�u���h�T�[�o�[��ύX���܂��B�@�Â��o�[�W�����͎g���Ȃ��Ȃ�܂��B XP�o�[�W�������C���������[�X������ɐ�ւ��܂��B 28B JT65-HF Image Controller for W7/8 1. Fixed Bug on HTML receiving when sending picture is nothing . 28B JT65-HF Image Controller for W7/8 1. HTML��M���ɉ摜���Ȃ������ꍇ�̃o�O���C�����܂����B 22B JT65-HF Image Controller for W7/8 1. Added "Clear Paste" button on TX Tag when RX picture is pasted on TX picture. 2. Added Mid file transfer function on Video Tag, this mid file will be used for when you send HTML with still picture. Mid File name is your call.mid so that you could embed Music on your HTML. 3. Added "MOV" decoding function for JT65 mode, also added "MP3"and "MP4" for PSK mode. 4. Bugs fixed. 22B JT65-HF Image Controller for W7/8 1. ���M�摜�Ɏ�M������\��t���鎞�ɁA�\��t�������𒆎~����"Clear Paste"�{�^����lj������B 2. HTML�̉��y�p�Ƃ��āhMid�@File"�@��]���ł���悤�ɂ��܂����B�@ 3. �hMOV"�t�@�C����JT65���[�h�Ńf�R�[�h�o����悤�ɂ��܂����B�hMP3�h�A�hMP4"�t�@�C���� PSK���[�h�o�g�p�ł���悤�ɂ����B 4. �o�O������܂����̂ŏC�����܂����B |
|||||||||||||||||||||||||||||||||||
| TOPICS�@20B/Nov/2014 INSTRUCTION HERE �Z�b�g�A�b�v���� | ||||||||||||||||||||||||||||||||||||
| 20B JT65-HF Image Controller for W7/8 1. Added "MTS" video format. Command is Call sign/MTS. 2. Bugs fixed. 18B JT65-HF Image Controller for W7/8 Several function are added. 1. "CP" button on TX Tag, paste Image in Clicp Boad on TX Picture. 2. Max Image size is 300KB for Hybrid and Photo command. 3. Check box "HTML" on "Received Message to Degi-Site" window, Capture of received HTML or Video will be sent to Degi-Site with report instead of back ground picture. 4. Check box "SV" on "Video RX", received video file will be saved in Video folder. 5. Added MP4 on "My Server Maintenance" Window 6. Bugs are fixed. |
20B JT65-HF Image Controller for W7/8 1. "MTS" �r�f�I�t�H�[�}�b�g��lj����܂����B�@�R�}���h�̓R�[���T�C��/MTS�ł��B 2. �o�O������܂����̂ŏC�����܂����B 18B JT65-HF Image Controller for W7/8 ����̋@�\���lj�����܂����B 1. TX�^�O��"CP"�{�^���́@�N���b�v�{�[�h�ɂ���摜�𑗐M�摜��RX�摜�Ƃ��ē\��t���邱�Ƃ��o���܂��B 2. HYBRID��PHOTO�R�}���h�ő����ő�͂R�O�OKB�ɂ��܂����B 3. Received Message to Degi-Site" �E�B���h�E�́hHTML"�`�F�b�N�͕\�����ꂽHTML�⓮�惓��ʂ� �L���v�`���[���ă��|�[�g��t���ăf�W�T�C�g�ɑ���܂��B�@�o�b�N�O�����h�摜�͎g���܂���B 4. Video RX�^�O�� "SV"�`�F�b�N�{�b�N�X�́@��M��������� video�t�H���_�[�ɕۊǂ��܂��B. 5. "My Server Maintenance" ��MP4�̕\���m�F�ł���悤�ɂ��܂����B 6. ����̃o�O����菜���܂����B |
|||||||||||||||||||||||||||||||||||
| TOPICS�@28B/Oct/2014 INSTRUCTION HERE �Z�b�g�A�b�v���� | ||||||||||||||||||||||||||||||||||||
   |
28B JT65-HF Image Controller for W7/8 Gabled Picture fixed for Up Loaded to Hybrid and Digi-Site. Digi-Site Maintenance form added. Click "Digi Site" bottun on RX Tag, Digi-Site Maitenance Windows displayed 1. Confirm your Digi-Site URL, correct your URL, if necessary. 2. RX Shows only received Picture and HTML,. 3. Select received Picture ot HTML. image1, image2.... is received picture and message.jpg is HTML. 4. In case of RX, only image1 in Digi-Site will be replaced with selected Picture �B. 5. In case of Any, you can use any picture. 6. Select image in Digi-Site 7. Click "File" button and read your picture. 8. You can replace Picture �E with Pictrue �F. 28B JT65-HF Image Controller for W7/8 �f�W�T�C�g���摜��������̂��C�����܂��� �f�W�T�C�g�B���C���e�i���X�p�̃v����������lj����܂����B �q�w�^�O��"Digi Site"�{�^�����N���b�N�����, Digi-Site Maitenance Windows�@���\������܂��B 1. �f�W�T�C�g�̂t�q�k�ł��B�@�v����ΏC�����Ă��������B. 2. �q�w�͎�M�����摜��g�s�l�k��\�����܂��B. 3. ��M�����摜�A����������1, image2....�C��M�����g�s�l�k�� message.jpg �ł��B 4. �q�w�̏ꍇ�́@�f�W�T�C�g�� image1�@�̉摜�� �B�@�őI�摜�ɒu�������邱�Ƃ��o���܂��B. 5. Any�̏ꍇ��, �C�ӂ̉摜���g�����Ƃ��o���܂��B 6. �f�W�T�C�g�̂h�����������I�Ԃƕ\������܂��B 7. "File"�{�^���������ā@�摜��ǂݍ���ł��������B 8. �E�̉摜���F�őI�摜�ɒu�������邱�Ƃ��o���܂��B 24B JT65-HF Image Controller for W7/8 1. All traffic displayed for WSJT-X/WSJT10 on JT65-HF Tag 2. Timming to catch ALL.txt changed for WSJT-X/WSJT10 3. As you know well, ALL.txt data will become very large file, so it sholud be better to clear up so that it will be speed up for processing for WSJT-X/WSJT10, if possible. 24B JT65-HF Image Controller for W7/8 1. WSJT-X�Ƃv�r�i�s10�̎g�p���i�s�U�T-�g�e�^�O�ɂ��ׂĂ̎�M�f�[�^�[��\������悤�ɂ��܂����B 2. WSJT-X�Ƃv�r�i�s10���g�p���̎�M�^�C�~���O�������ς��܂����B 3. �����m�̂悤�Ɂ@�`�k�k�D�������t�@�C���͂��ׂĂ̎�M/���M�f�[�^�ł��̂Ł@�傫���Ȃ�܂��B �@�@�@�\�ł���@���g���폜���ď���������悤�����߂��܂��B�@�������x�̌���ɂȂ���܂��B �B 21B JT65-HF Image Controller for W7/8 1. WSJT10 is added instead of WSPR(WSJT7) 2. Click WSJT10 Log Dir and Configure WSJT10 log forder 3. Select WSJT10. save Changes and reboot Controller. 21B JT65-HF Image Controller for W7/8 1. WSJT10���v�r�o�q�i�v�r�i�s�V�j�̑���Ɏg����l�ɂ��܂����B 2. WSJT10 Log Dir���N���b�N���ā@�v�r�i�s�P�O�̃t�H���_�[�����Ă��Ă��������B 3. WSJT10��I�сA�@�r������ Change �{�^���������ā@�ċN�����Ă��������B 20B JT65-HF Image Controller for W7/8 1. Change to WSJT-X ver 1.4 and this is compatible to also Ver 1.3 2. Click "WSJTX Log Dir" on FTP tag, then specify WSJT-X ver 1.4's Log folder which is located at Users/Uer lPC name/AppData/Local/WSJT-X, then press "Save Change" button and reboot JT65-HF Image Controller. If Ver 1.3 is used, no need Change of Configuration. 20B JT65-HF Image Controller for W7/8 1. WSJT-X ver 1.4 �ɑΉ����܂����B�@���̃v���O�����́@ver 1.3 �ɂ��g�p�ł��܂��B 2. �e�s�o�^�O�́@"WSJTX Log Dir�@���N���b�N���āA�@�v�r�i�s-�w ver 1.4 �̃��O�t�H���_�[�� �@�@�w�肵�Ă��������B�@���O�t�@�C���́@�o�b�́@�t��������/"�o�b�̖��O/�`�����c�������^�k��������/�v�r�i�s�|�w�Ɨl�� �@�@���[�U�[�t�H���_�[�̒��ɂ���܂��B �@�@���ꂩ��@�hSave Changes"�@�{�^���������ā@�i�s65-�g�e�@�h���������@�b���������������������ċN�����Ă��������B �@�@Ver 1.3�̏ꍇ�͂��̑���͕K�v����܂���B |
|||||||||||||||||||||||||||||||||||
| TOPICS�@17B/Oct/2014 INSTRUCTION HERE �Z�b�g�A�b�v���� | ||||||||||||||||||||||||||||||||||||
 �@ �@ |
17B JT65-HF Image Controller for W7/8 1. Change the method to insert His Call into sending Picture and HTML from Automatic to Manual Button. 2. Change up load timing for HTML report picture to Digi-Site. 3. As for HTML, His call is inserted on HTML by Macro button on HTML Tag His call is catched and pasted His call TextBox when select RX picture on RX Tag , select received HTMLon HTML RX Tag. or Press His Call buton on HTML Tah. During making your HTML on HTML Tag, Button will be shown in RED to be pressed. 17B JT65-HF Image Controller for W7/8 1. ���M����摜��g�s�l�k�ɑ}�����鑊��̃R�[���̎�荞�݂��@��������}�j���A���{�^���� �@�@�ύX���܂����B 2. �g�s�l�k�̎�M���|�[�g���f�W�T�C�g�ɃA�b�v���[�h����^�C�~���O��ύX���܂����B 3. �g�s�l�k�Ɋւ��ẮAHTML�^�O��MACRO�{�^���������Ƒ}������܂��B�܂��AHis Call�� �@�@RX�^�O�Ŏ�M�摜��I���A�@HTML�@RX�Ŏ�M����HTML��I���@�܂��́@HTML�^�O�� �@�@His Call�{�^�����������Ƃ��Ɂ@HTML�^�O�̃e�L�X�g�{�b�N�X�ɓ���܂��B �@�@�܂��A�@HTML�^�O��HTML���쐬���̎��Ɂ@�����ׂ��{�^�����ԐF�ŕ\������܂��B |
|||||||||||||||||||||||||||||||||||
| TOPICS�@04B/Oct/2014 INSTRUCTION HERE �Z�b�g�A�b�v���� | ||||||||||||||||||||||||||||||||||||
  |
04B JT65-HF Image Controller for W7/8 Added report function to Digi-Site for HTML, WMV, MP4 and etc. How to set A. JT65-HF Image C0ntroller Click Tag JT65-HF 1. Check Up Load Digi-Site 2. Disp Time means that when HTML and other command is received HTML is automaticaly pop up and this is time to capture its displa, 5 sec is enough and you can change it. 3. Click Picture Setting, so that determine back ground picture and report B. Received Message to Digi-SIte 4. Set background picture 5. Default is cleam color 6. To rewrite message. 7. Font Change 8. Message color 9. To confirm arrangement 10. Manual up load to Digi-Site (if 12 is checked , no need to press this button) 11. Free message to sender 12. Automatic upload to Digi-Site 13. Received picture is paste on you picture. ( Left side lower) 14. Up load is completed, all pop up will be closed. 15. Recieved picture is paste on Right side Lower) HTML, WMV, MP4 ������M�����ꍇ�Ƀ��|�[�g�摜���f�W�T�C�g�ɃA�b�v���܂��B �ݒ���@ A. JT65-HF Image C0ntroller JT65-HF�^�O���N���b�N���Ă��������B 1. Up Load Digi-Site�Ƀ`�F�b�N�����Ă��������B 2. ��M����HTML�⓮��̕\�����Ԃł��B�\�����ꂽ��ʂ��L���v�`���A���Ă��܂��̂� �@�@5�b��OK�Ǝv���܂����v����ΕύX���������B a 3. Picture�@Setting�{�^���������ā@�|�b�v�A�b�v�����ʂŏڍׂ��Ă����Ă��������B B. Received Message to Digi-SIte�@�|�b�v�A�b�v��� 4. �o�b�N�O�����h�Ŏg�p����摜��I��ł��������B 5. Default ��I�ԂƖ��n�̃N���[���F�̉�ʂɂȂ�܂��B 6. ������郁�b�Z�[�W�̊m�F�p�ł��B 7. �t�H���g��ύX����ꍇ 8. ������镶���̐F�̕ύX 9. �S�̂̃A�����W���Ċm�F����ꍇ�ł� 10. �蓮�Ńf�W�T�C�g�ɃA�b�v����ꍇ�͉����Ă�������(12�Ƀ`�F�b�N�������Ă���ꍇ�͎����������܂�) 11. ���R���b�Z�[�W�ł� 12. �����I�Ƀf�W�T�C�g�ɃA�b�v���܂��B 13. ��M�����摜��\��t����ꍇ�Ƀ`�F�b�N�����܂��B�@�����ɓ���܂� 14. �f�W�T�C�g�ւ̃A�b�v���[�h�����������Ƃ��Ƀ|�b�v�A�b�v������ʂ���܂��B 15. ��M�摜���E���ɓ\��t���܂��B ���낢�땡�G�ł��̂ō��ɂ���悤�ɐݒ肷��悤�������܂��B |
|||||||||||||||||||||||||||||||||||
| TOPICS�@10B/Sept/2014 INSTRUCTION HERE �Z �b�g�A�b�v���� | ||||||||||||||||||||||||||||||||||||
  |
10B JT65-HF Image Controller for XP 1. Added mail function as same as W7/8 version. 2. "Again" Button on TX tag, it will be error on wrinting with Manual. This problem is caused by Development pratform so delete Check box for Manual. 10B JT65-HF Image Controller for W7/8 1. Capture of displayed HTML image and received picture a. Received Picture Double click Size Text Box on RX Tag so that received picture will be saved to server stated on FTP tag as "received.jpg" b. HTML Image Press Copy button on HTML RX so that HTML image will be saved to Server stated on FTP tag as "received.jpg" c. "received.jpg" can be used for your HTML link. 10B JT65-HF Image Controller for W7/8 1. �\�����ꂽHTML�Ǝ�M�摜�̃L���b�v�`���[ a. ��M�摜 ��M�摜�́@RX�^�O�̎�M�摜�̑傫���������e�L�X�g�{�b�N�X���_�u���N���b�N���Ă��������B FTP�^�O�Œ�`���ꂽFTP��"received.jpg" �Ɓ@�������O�ŕۑ�����܂��B b. HTML HTML���\�����ꂽ���Ɂ@HTML�@RX�^�O�ɂ���@Copy�@�{�^���������Ɓ@�\�����ꂽ ��. "received.jpg" �́@�e�ǂ������HTML �Ƀ����N�Ƃ��ė��p���Ă��������B �@HTML�̃C���[�W�������l��"received.jpg" �Ƃ��ĕۑ����܂��B 08B JT65-HF Image Controller for W7/8 and XP 1. Mail Function a. Multiple Attention is OK with writing as CALL1, CALL2,CALL3, "," Conma is required between CALL. b. Link is OK on mail, if there are link(s), double click it so that you get Internet connection. 2. Others a. Pop up windows for RX, TX, HTML are memorized their location and size independently. b. Bugs fixed 07B JT65-HF Image Controller for W7/8 and XP 1. ���[���@�\ a. �����̈��悪�\�ł��B�@ CALL1, CALL2,CALL3,�@�R�[���ƃR�[���̊ԂɁ@�h,�h �J���}�� ����ĉ�����L. b. ���[���̕��͂Ƀ����N���������Ƃ��o���܂��B�@�����N�̕������_�u���N���b�N�����t �����N��Ɍq����܂��B 2. ���̑� a. RX, TX, HTML�̃|�b�v�A�b�v��ʂ̑傫���@�\���ꏊ���ʂɋL�����܂��B b. �o�O���C�����܂����B 06B JT65-HF Image Controller for W7/8 and XP 1. Added 10 11 check on Mail window, If pop up is needed when mail is received, please check To All and/or To Mine. 2. Added My Server Maintenance Window, Press My button on TX tag, My Server Maintenance Widndow will pop up. Function is as follows: 1. Selection of your server (not on XP) 2. Your server's containts. 3. Your URL and FTP configuration. 4. Display 5. Video play and stop 6. Refresh list and delete item in your sever. to display your picture, double click item. 06B JT65-HF Image Controller for W7/8 and XP 1. ���[���� 10 11�`�F�b�N��lj����܂����B�@���[������M�����Ƃ��Ƀ|�b�v�A�b�v�����������ڂ�I�ׂ܂��B, 2. ���ǂ̃T�[�o�[�������e�i���X�o����l�ɂ��܂����B�@TX�^�O�́@My�@�{�^���������Ă��������B, My Server Maintenance ��ʂ��o�ė��܂��B�@�@�\�͉��L�̒ʂ�ł��B: 1. ��������ꍇ�̃T�[�o�[�I�� 2. �T�[�o�[�̒��ɂ���摜��. 3. �T�[�o�[��URL��FTPn. 4. �摜�������ɕ\�����܂��B 5. �r�f�I�̏ꍇ�̃v���C�ƃX�g�b�v�{�^�� 6. ���X�g�����t���b�V�����܂��B�@�I�ꂽ���ڂ��폜���܂��B. �摜��\������ɂ́@���X�g�̍��ڂ��_�u���N���b�N���܂��B JT65-HF Image Controller for W7/8 and XP 1. When mail is received, Mail will be shown in both case of pop up window open or not. 2. Bugs fixed for writing character on picture. 04B JT65-HF Image Controller for W7/8 and XP 1.�@���[����M���̃|�b�v�A�b�v��ʂ��J���Ă���Ƃ����Ă���Ƃ��̗����Ɏ�M�ł���悤�� �@�@�@�����P���܂����B 2. �摜�捞�ɃG���[������܂����̂ŏC�����܂����B 03B JT65-HF Image Controller for XP 1. Bugs fixed and very sorry for not to adopted this function. 03BB JT65-HF Image Controller for W7/8 1. Bug Fixed on Call Sign Input Box (Only usage of English) 03B JT65-HF Image Controller for W7/8 1. Send to All, Check ALL, or to Others, Input his call 2. Input your mail. 3. Send your mail to server 4. Your sending mail list. 5. Select your sending mail, your mail disiplayed on 2, if you want to delete press Delete Sending Mail button. 6. Your received mail list. 7. Select your mail, contants are displayed on 7. 8. Press Delete Receiving Mail button to delete your mail. 9. Received Mail List on Folder Mail, ii is text file. 10. Mail Sending Command is Your Call/MAIL. Old version will not work soon. Please update immediately. 03B JT65-HF Image Controller for XP 1.�@�\����܂��AXP�ɂ͂��̋@�\�͂���܂���B 03BB JT65-HF Image Controller for W7/8 1.�@���[���̈���̃C���v�b�g�Ł@�S�p���甼�p�ɐ�ւ����肷��ƃG���[�ɂȂ�悤�ł��B �@�@�@���p��������Ȃ��l�ɂ��܂����B 03B JT65-HF Image Controller for W7/8 1.�@�S���ɑ���ꍇ�̓`�F�b�N�A�@����̋ǂɑ���ꍇ�̓R�[�����C���v�b�g���Ă��������B 2.�@���[�����e���C���v�b�g���Ă��������B 3.�@���[�����T�[�o�[����ɂ́@Send Mail�{�^���������Ă��������B 4.�@�M�ǂ̑��M�������[���ł��B�@�I�ԂƓ��e���\������܂��B 5.�@�\������Ă��郁�[�����������ɂ����܂��B �@6.�@�M�ǂ̎�M���[�����X�g�ł��B �@7.�@�I�ׂΓ��e���\������܂��B �@8.�@�\�����ꂽ���[�����폜���܂��B �@9.�@��M���[����M���[���́@Mail�t�H���_�[�Ƀe�L�X�g�`���ŕۑ�����Ă��܂��B �@10.�@���[����z�M����R�}���h�́@�R�[��/MAIL�@�ł��B |
|||||||||||||||||||||||||||||||||||
| TOPICS�@03B/Sept/2014 INSTRUCTION HERE �Z�b�g�A�b�v�����@ 26B/Aug/2013 for XP | ||||||||||||||||||||||||||||||||||||
 |
26B JT65-HF Image Controller for W7/8 and XP 1. WMV command is aavailable on PSK mode with PSK Image front ver 26B Aug 2014. 2. Bugs on PSK fixed. 3. URL master server will be changed in a few days, Old version will not work soon. Please update immediately. 24B JT65-HF Image Controller for W7/8 1. When HTML is transfered to server, Picture.jpg is also transfered. 2. In case of English Version Digi-Site, no reload picture happened, Bugs fixed. 3. On the HTML tag, Trasfer button sends HTML and displayed jpg file also. Reload button shows new picture which is entered on TX tag.. 20BB JT65-HF Image Controller for XP I have been reported some GUI error during receiving process. 1. Removed adding receiver's call on the received picture. 20B JT65-HF Image Controller for W7/8 and XP Method of Hybrid or Photo up loading changed. 1. Add Picture, Hybrid button to send Hybrid Server for HYBRID command. 2. Select your server, if any. W7/8 only 3. My server button to send your server for PHOTO Command. 4. Show last transefered picture. 5. Bugs fixed. 24B JT65-HF Image Controller for W7/8 1.�@HTML��]�������Ƃ��ɁA�ʏ�̂��������]�������悤�ɂ��܂����B 2.�@�p��ł̃f�W�T�C�g�v���O��m�����g���̕��Ł@��M���̉摜�̃����[�h�� �@�@�@�o���Ȃ��ꍇ������̂ŏC�����܂����B 3.�@HTML�^�O�̂Ƃ���Ł@Transfer�{�^����������HTML�t�@�C�������ł͂Ȃ� �@�@�@�\������Ă���摜��jpg�t�@�C�����]�����܂��B �@�@�@Reload�{�^���́@TX�^�O�œ��꒼�����摜���ĕ\�����܂��B 22B JT65-HF Image Controller for W7/8 1.�@HTML��]�������Ƃ��ɁA�ʏ�̂��������]�������悤�ɂ��܂����B 20BB JT65-HF Image Controller for XP �摜��M����GUI�G���[���o��Ƃ̕��܂����B 1.�@�摜�Ɏ�M�҂̃R�[���T�C��������̂𒆎~���܂����B 20B JT65-HF Image Controller for W7/8 and XP �摜�]��������@��ύX���܂����B 1.�@�摜�����Ă��������B�@HYBRID�{�^����HYBRID�T�[�o�[�ɉ摜�𑗂�܂��B �@�@�@HYBRID�R�}���h���g���ĉ������B 2.�@�����̃T�[�o�[���������̏ꍇ�͑I��ł��������B W7/8 �݂̂ł��B 3.�@My�@Server�{�^���͎����̃T�[�o�[�ɉ摜�𑗂�܂��B �@�@�@PHOTO�R�}���h���g���ĉ������B 4.�@�Ō�ɑ���ꂽ�摜��\�����܂��B 5.�@�������̃o�O���C�����܂����B �䒍�� ����A���Ă܂���PHOTO�R�}���h��NO-DATA�ɂȂ�������� �����܂������AJT65-HF Image Controller�ő���ꂽ �������t�@�C���݂̂���M����悤�ɂȂ��Ă��܂��̂� ��L��@�ʼn摜���A�b�v���[�h���Ă��������B |
|||||||||||||||||||||||||||||||||||
| TOPICS�@19B/Aug/2014 INSTRUCTION HERE �Z�b�g�A�b�v�����@ | ||||||||||||||||||||||||||||||||||||
| 19B JT65-HF Image Controller for W7/8 and XP 1. Some bugs fixed 18B JT65-HF Image Controller for W7/8 1. Some bugs fixed 2. Added tight security for PHOTO Command 3. Bug fixed on two or more video received at the same time 15B JT65-HF Image Controller for W7/8 and XP 1. Some bugs fixd. 2. Added tight security 3. Hybrid server will be changed automatically when Picture transfered or received. 4. In cse of dtecting this program by Anti-Virus software, please set it pemissible one. 11B JT65-HF Image Controller for W7/8 1. Some bugs fixd. 2. Date stamp added on Chat receive 3. Control Digi-Site OnAir, more quick 4. Memorized Check or uncheck Chat enabled 08B JT65-HF Image Controller for W7/8 and XP 1. Some bugs fixd. When XP version is released, 07B or Older version will not be comatible to 08B To be smooth action of Degi-Site, please update your program. 07B JT65-HF Image Controller for W7/8 1. Digi-Site On Air and Off Air contorlle added Recently very big file is up loaded on Digi-Site, when new file is up loaded once reload will be performed, this helps quick loading as design philosophy of Digi-Site 05B JT65-HF Image Controller for W7/8 1. Decode Speed for Photo command imporoved. 03B JT65-HF Image Controller for W7/8 1. For command similar to my sysstem and that is same as this, this version will decode and display. But if he is not on Who is on air, received picture is will only displayed but not transfered to DigiSite. 30B JT65-HF Image Controller for W7/8 and XP 1. Added more hard security. Some group sliped into my server and down load master and picture data without my permision. Therefore changed server system to protect user's data. 2. 30B is compatible to 28B untill server change. 3. W7/W8 version is first priority because of many users. Please wait XP version. |
19B JT65-HF Image Controller for W7/8 and XP 1.�@����̃o�O���C�����܂����B 18B JT65-HF Image Controller for W7/8 1.�@����̃o�O���C�����܂����B 2.�@PHOTO�R�}���h�ɂ��������Z�L�����e�B�[�����܂����B 3.�@�����ɂQ�ȏ�̓������M�����Ƃ��̕s����C�����܂����B 15B JT65-HF Image Controller for W7/8 and XP 1.�@����̃o�O���C�����܂����B 2.�@�������Z�L�����e�B�[�����܂����B 3.�@HYBRID�B�T�[�o�[�͉摜�𑗂�Ƃ��@���邢�́@��M���鎞�Ɏ����I�ɐ�ւ��܂��B 4.�@�����A���̃\�t�g�����g���̃A���`�E�B���X�\�t�g�Ŋ��m���ꂽ�ꍇ�A�@�A���`�E�E�B���X�\�t�g�� �@�@�@�������ݒ肵�Ă��������B 11B JT65-HF Image Controller for W7/8 1.�@����̃o�O���C�����܂����B 2.�@�`���b�g��M��ʂɎ�M������lj����܂����B 3.�@�f�W�T�C�g��ON AIR�\���ɕς��̂������������܂����B 4.�@�`���b�g����M���邩�ۂ��̃`�F�b�N���L�����N�����ɏI�����̏�ԂɂȂ�܂��B 08B JT65-HF Image Controller for W7/8 and XP 1.�@XP�o�[�W�����������[�X���ꂽ���́@07B�@���邢�͂�����Â��o�[�W������08B�ɃR���p�`�ł� �@�@�@�Ȃ��Ȃ�܂��B �@�@�@�f�W�T�C�g�̃X���[�Y�ȓ������m��d���邽�߁@�v���O�������X�V���Ă��������B 07B JT65-HF Image Controller for W7/8 1.�@�f�W�T�C�g��ON�@Air�@�Ɓ@O�����@Air�@�\���R���g���[����lj����܂����B �@�@�@�ŋߑ傫�ȃt�@�C�����f�W�T�C�g�ɃA�b�v���[�h����Ă��܂��B�@��x�̃����[�h�݂̂��Ȃ���� �@�@�@�l�ɂ��܂����B�@�����Digi-Site�쐬�҂̈Ӑ}�ɍ��v�����f���������[�h���s���܂��B 05B JT65-HF Image Controller for W7/8 1.�@Photo�R�}���h�̃f�R�[�h�X�s�[�h�����P���܂����B 03B JT65-HF Image Controller for W7/8 1.�@���̃V�X�e���Ǝ����悤�ȃR�}���h�Ɋւ��Ă��A�@���̃V�X�e���Ɠ����� URL���o�^����� �@�@�@����̂ł���f�R�[�h���܂��B�@ �@�@�@���M�ǂ��@Who is on air�@�ɕ\������Ă��Ȃ��ꍇ�͉摜���̕\���݂̂� �@�@�@�f�W�T�C�g�ɂ̓A�b�v���[�h����܂���B�@URL���m���ł͂Ȃ��̂ŊԈႢ�h�~�ł��B �@�@�@Who is on air�@�ɕ\��������URL�͊m���Ȃ��̂ł��B�@ �@�@�@ �@�@�@�Ȃ��A���炭���̏�Ԃœ������܂���Who is on air�ɂ����Ȃ��ǂ�URL�����������Ƃ� �@�@�@�m�F�o������ׂĂ̎�M�摜���f�W�T�C�g�ɃA�b�v���܂��B�@�v���O�����X�V�̕K�v�� �@�@�@����܂���B �@�@�@�����قǁAURL�̊m�F���ł��܂����̂Ł@PHOTO�R�}���h�̎�M�摜�̓f�W�T�C�g�� �@�@�@�A�b�v���܂��B �@�@�@�������Ȃ���A�o�^�ȊO�̃R�}���h�𑗂葱���Ă�����̂ŁA���������Ȃ��Ƃ̈ӎv�\�� �@�@�@�̗l�ł��B�]���āA�ݒ�̓f�W�T�C�g�ɃA�b�v���Ȃ��ɂȂ��Ă��܂��B(2014/08/05 7:30) 30B JT65-HF Image Controller for W7/8 and XP 1.�@�����S�Ƃ��邽�߁A�T�[�o�[�V�X�e�����������܂����B 2.�@30B��28B�ɃT�[�o�[����ւ��܂ŃR���p�b�`�ł��B 3.�@���[�U�[�̑���W7/W8�ł�D�悳���܂����B�@XP�ł͏������҂����������B |
|||||||||||||||||||||||||||||||||||
| TOPICS�@28B/Jul/2014 INSTRUCTION HERE �Z�b�g�A�b�v�����@ | ||||||||||||||||||||||||||||||||||||
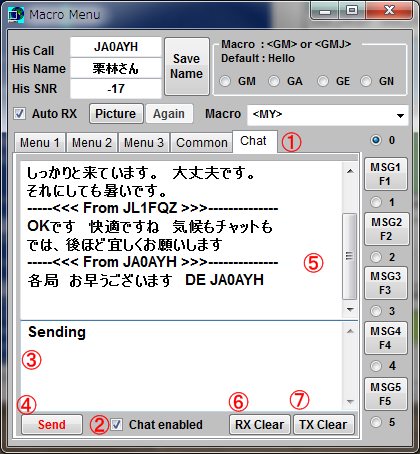 |
28B JT65-HF Image Controller for W7/8 To use Chat mode : 1. Click Chat Tag on MACRO window for Win7/8 1. Click Chat Button on RX tag window for XP. 2. Check Chat enabled and Check Who is on Air also. 3. Input your message. 4. Press Send Button to send your message to server, then color is blue. then send command Your call/CHAT . This command is effective to only JT65-HF, JT65-HF Comfort, JT65-HF HB9HQX Edition, or WSJT-X but not PSK Front or WSPR. 5. Message received area 6. Clear RX area 7. Clear TX area 8. Check of Who is on Air is mandatory requirement for Sending/Receiving All Items. 9. Bug Fixed 10. Added WSJT-X 11. Added XP version 12. Added security program Chat ���[�h���g���ɂ� �@1.�@Win7/8�̏ꍇ�@MACRO�@�E�B���h�E���J���@Chat�^�O���J���Ă��������B �@1.�@XP�̏ꍇ�@RX�^�O�@�E�B���h�E���J���@Chat�{�^���������Ă��������B 2.�@Chat�@Enabled�Ƀ`�F�b�N����ꂦ�������B�@�܂��AWho is on Air�ɂ��`�F�b�N���K�v�ł��B 3.�@���M���镶�͂�ł�����ł��������B 4.�@Send�{�^���������Ă��������B�@�T�[�o�[�ɕ��͂�����ꑗ�M�\�ƂȂ�܂��B �@�@�@�{�^���̐F�͐ɕς��܂��B�@�R�}���h�́@�R�[��/CHAT�@�𑗐M�������B �@�@�@�Ȃ��A���̃R�}���h��JT65-HF, JT65-HF Comfort JT65-HF HB9HQX Edition, WSJT-X �݂̂ɂ� �@�@�@WSPR��PSK�ł͎�܂���B 5.�@��M���ꂽ���b�Z�[�W��\�����܂��B 6.�@RX�@�G���A�̃N���A�[ 7.�@RX�@�G���A�̃N���A�[ 8.�@�K���@Who�@is on Air�Ƀ`�F�b�N�����Ă��������B�@���ׂĂ̑���ɕK�v�ƂȂ�܂��B 9.�@�o�O���C�����܂����B 10.�@WSJT-X��lj����܂����B 11.�@XP�o�[�W������lj����܂����B 12.�@�Z�L�����e�B�[������܂����B |
|||||||||||||||||||||||||||||||||||
| TOPICS�@22B/Jun/2014 INSTRUCTION HERE �Z�b�g�A�b�v�����@ | ||||||||||||||||||||||||||||||||||||
| 22B/Jun/2014 JT65-HF Image Controller for W7/8 1. AVI Command Added. As you know well, AVI file is very big so be cafull to upload. 2. PICT Command deleted, use PHOTO command. |
22B/Jun/2014 JT65-HF Image Controller for W7/8 �@1. AVI �R�}���h��lj����܂����B�@�������AAVI�t�@�C���͑傫���̂ŃA�b�v���[�h�ɂ͒��ӂ��K�v�ł��B 2. PICT�R�}���h�͂Ȃ��Ȃ�܂����BPHOTO�R�}���h���g���ĉ������B�@ |
|||||||||||||||||||||||||||||||||||
| TOPICS�@11B/Jun/2014 INSTRUCTION HERE �Z�b�g�A�b�v�����@ | ||||||||||||||||||||||||||||||||||||
 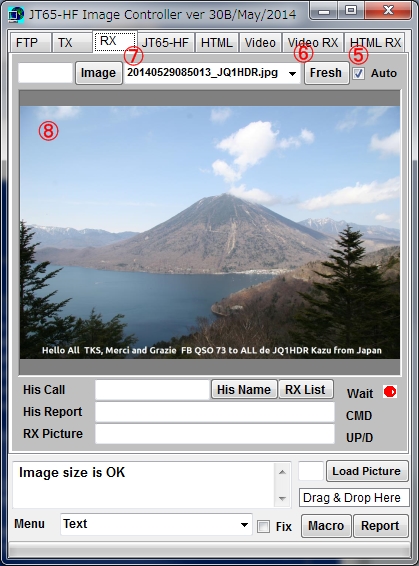 |
11B/Jun/2014 JT65-HF Image Controller for W7/8 Changes : Pasted RX Picture can be selected from previous received one. This version can add RX picture on TX picture at TX Tag. 1. Slect size of RX picture pasted on TX picture, 5 means that pasted RX picture width will be 1/5 of X picture width. 2. Press RX button to add RX picture on TX picture. RX changes red color and RX picture will be appeared on TX picture. 3. Drag with pressing mouse left side button , set a position you want. 4. Transfer to sever then RX picture will be pasted on TX picture. 5. Auto is checked, pasted RX picture will be latest received one. 6. Auto is not checked, hit fresh boutton, 7. Received picture list will be shown on 7. select 7 then RX picture will be shown on 8. This will be pasted RX picture. ���̃o�[�W�����ł͎�M�摜���s�w�摜�ɓ\��t���邱�Ƃ��o���܂��B �@1. �悸�A�\��t�����M�摜�̑傫����I�т܂��B�@�T�̈Ӗ��͓\��t������摜�̑傫���� ���M�摜�̉����̂P�^�T�̕��œ\��t����Ӗ��ł��B 2. �q�w�{�^���������Ɖ摜������t���܂��B�@ 3. �\��t����ꂽ�摜�̓}�E�X�̍��{�^���������Ȃ���ړ������邱�Ƃ��o���܂��B�@ 4 .�摜�̈ʒu���Œ肷��ɂ́@�e�h�w�@�`�F�b�N�{�b�N�X�Ƀ`�F�b�N�����Ă��������B 5. �`�������Ƀ`�F�b�N�������Ă���Ɓ@�\��t������q�w�摜�͍ŐV�̂q�w�摜�ƂȂ�܂��B�@ �@6. �`�������Ƀ`�F�b�N�������Ă��Ȃ��ꍇ�@�e���������@�{�^���������� 7. ���܂łɎ�M�����摜���X�g���\������܂��B�@�I��Œ����Ƃ��̉摜���@8�ɕ\������ �@ �\��t�������M�摜�ƂȂ�܂��B�@ |
|||||||||||||||||||||||||||||||||||
| TOPICS�@06B/May/2014 INSTRUCTION HERE �Z�b�g�A�b�v�����@ | ||||||||||||||||||||||||||||||||||||
| 06B/May/2014 JT65-HF Image Controller for W7/8 1. Open RX Tag, then click RX picture so that received picture will be transfered to clipboard. If you want to attatch it on your TX picture, use Picture editer like a Image Processor and so on and draw it on you picture. |
06B/May/2014 JT65-HF Image Controller for W7/8 1.�@�q�w�^�O���J���āA��M�����摜���N���b�N����ƃN���b�v�{�[�h�ɃR�s�[���邱�Ƃ��o���܂��B �@�@�����@��M�摜�𑗐M����摜�ɓ\��t�������ꍇ�́A�h���������@�o�����������������̗l�� �@�@�摜�G�f�B�^�[���g���ā@�N���b�v�{�[�h�����M�摜����荞�ނ��Ƃ��ł��܂��B |
|||||||||||||||||||||||||||||||||||
| TOPICS�@14B/Apr/2014 INSTRUCTION HERE �Z�b�g�A�b�v�����@ | ||||||||||||||||||||||||||||||||||||
| 14B JT65-HF Image Controller for W7/8 1. Increased Macro Menu 1 to 3. |
14B JT65-HF Image Controller for W7/8 1. �}�N���̃��j���[���@1�@����@�R�@�ɑ��₵�܂����B |
|||||||||||||||||||||||||||||||||||
| TOPICS�@07B/Apr/2014 INSTRUCTION HERE �Z�b�g�A�b�v�����@ | ||||||||||||||||||||||||||||||||||||
| 07B JT65-HF Image Controller for W7/8 1. Added down load file size and progress indicator at Video Tag 2. For the multi server user, you can set these upto 3 server in FTP.cfg file with NotePad. 3. Method of setting is as follows: Open FTP.cfg file with NotePad and add 2nd server config and/or 3rd server.
4. At TX tag, you can select your serever when you checked my server. Video and HTML files will be sent to your selected sever whether my server is checked or not. 5. In my case, Original is Degisite JQ1HDR, 2nd is JQ1HDR_2 and 3rd is Home Server, it is not configured to deigisite but used it big Video file, |
07B JT65-HF Image Controller for W7/8 1.�@�r�f�I�t�@�C���̃_�E�����[�h�ɃT�C�Y�Ɠr���o�߂��\�������悤�ɂ��܂����B 2. �T�[�o�[���g�p���Ă�����ɂ̓������łR�܂Őݒ�ł���悤�ɂ��܂����B 3.�@�T�[�o�[���Z�b�g����ɂ́A�@�������łe�s�o�D���������J���ā@���\�ɂ���悤�� �@�@�@�e�s�o20-�e�s�o204�AFTP30-FTP304��lj����Ē������OK�ɂȂ�܂��B 4.�@TX�^�O�̂Ƃ���Ł@�T�[�o�[��I��Ł@My Server �Ƀ`�F�b�N������Ƃ��̃T�[�o�[�� �@�@�@�摜�������܂��B�@�܂��A�r�f�I�t�@�C����HTML�t�@�C���́@My Server�� �@�@�@�`�F�b�N�ɊW�Ȃ��I�ꂽ�T�[�o�[�ɑ����܂��B 5.�@���̏ꍇ�́@�f�Wi�T�C�g�ɓo�^���Ă���@JQ1HDR ���I���W�i���ɁA�@JQ1HDR_2�� �@�@�@��Ԗڂ̃T�[�o�[�ɁA�@3�Ԗڂ͎���̃T�[�o�[�ɃZ�b�g���傫�ȃr�f�I�ȂǗp�� �@�@�@���Ďg�p���Ă��܂��B |
|||||||||||||||||||||||||||||||||||
| TOPICS�@22B/Mar/2014 INSTRUCTION HERE �Z�b�g�A�b�v�����@ | ||||||||||||||||||||||||||||||||||||
| 22B JT65-HF Image Controller for W7/8/XP 1. Memorized Kind of Font and Font Size 2. Digi-Site up load trouble fixed. |
22B JT65-HF Image Controller for W7/8/XP 1.�@�t�H���g�̎�ނƑ傫�����L������悤�ɂ��܂����B 2. �f�W�T�C�g�A�b�v���[�h�̕��@��ύX���܂����B |
|||||||||||||||||||||||||||||||||||
| TOPICS�@20B/Mar/2013 for Win 7 and Win 8 INSTRUCTION HERE �Z�b�g�A�b�v�����@ | ||||||||||||||||||||||||||||||||||||
| 20B JT65-HF Image Controller for W7/8 1. Memorized Kind of Font and Font Size 2. Again button bug and others fixed. |
20B JT65-HF Image Controller for W7/8 1.�@�t�H���g�̎�ނƑ傫�����L������悤�ɂ��܂����B 2.Again �{�^���̃o�O�Ƒ��̃o�O�������܂����B |
|||||||||||||||||||||||||||||||||||
| TOPICS�@14B/Mar/2014 for Win 7 and Win 8 INSTRUCTION HERE �Z�b�g�A�b�v�����@�@ | ||||||||||||||||||||||||||||||||||||
| 14B JT65-HF Image Controller for W7/8 1. RX/TX files auto delete routine added 14B JT65-HF Image Controller for XP 1. RX/TX files auto delete routine added 2. Load Picture Button is added. 3. Redraw inserted Macro button added. 12B JT65-HF Image Controller 1. Adjust location of inserted character Check "Manual " on TX Tag, then TX image will be pop upped, you can move with mouse inserted character where you want, close window to fix location on character. 2. Load Picture Button is added. 3. Report Button is added, separate box will be appered. |
14B JT65-HF Image Controller for W7/8 1.�@RX/TX�t�@�C�������郋�[�`����lj����܂����B �@TX�^�O�́@"Manual" �Ƀ`�F�b�N������� 14B JT65-HF Image Controller for XP 1.�@RX/TX�t�@�C�������郋�[�`����lj����܂����B �@TX�^�O�́@"Manual" �Ƀ`�F�b�N������� 2.�@Load�@Picture�{�^���������܂����B 3.�@�ĕ`�������{�^����lj����܂����B 12B JT65-HF Image Controller 1.�@�}�����镶���̈ʒu�����܂��B �@TX�^�O�́@"Manual" �Ƀ`�F�b�N������Ƒ��M�摜��ǂݍ����ɕʂ� �@�@�@��ʂ������オ��}�E�X�ł��̕����̈ʒu�������ł��܂��B�@����Ε����� �@�@�@�ʒu���m�肵�܂��B 2.�@Load�@Picture�{�^���������܂����B 3. Report �{�^���������܂����B�@�ʂȉ�ʂ������オ��܂��B�B |
|||||||||||||||||||||||||||||||||||
| 12B JPSK Image Front 1. Double click His command or his call on received text to get his call. |
12B JPSK Image Front 1.�@��M�����̃R�}���h�@���邢�́@�R�[�����_�u���N���b�N����Ɓ@�R�[������荞�߂܂��B |
|||||||||||||||||||||||||||||||||||
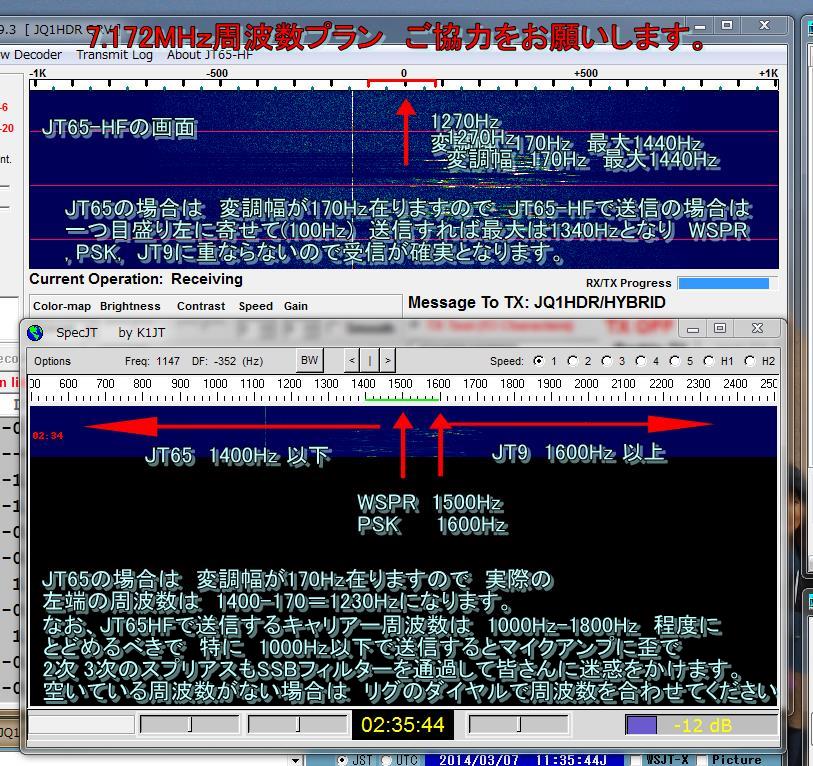 �@�Ȃ��A���̗l�Ɏ��g��������ɂ� JT65-HF�̏ꍇ �@�E�H�^�[�t�H�[���̊�]������g����(�������킹�ɂȂ�܂��j�N���b�N���܂��B �@�Ԃ��͈̓}�[�N���ړ����ā@�E���̕������P�T�O�OHz�ɂ�����Ȃ����OK�ł��� �@�v�Z���K�v�ł��B�@�ڈ��ł́@�������@�O�̂Ƃ���Ł@�E�����P�S�S�OHz�ł��̂� �@�O�����@���ڐ��@���邢�͈�ڐ��@�����ő��M����Ζ�肠��܂���B WSJT-X�̏ꍇ �@���ڎ��g�����ǂ߂܂��̂Ł@�E�H�^�[�t�H�[���̊�]������g�����N���b�N���� �@����OK�ł����@1500Hz-170Hz��1330Hz�@�ɂȂ�܂��̂Ł@�������@�]�T���݂� �@1200Hz��荶���ŏo���@1500Hz�ɔ�邱�Ƃ́@����܂���B �@�@�����Ł@���Ȃ̂́@�P�O�O�OHz�ȉ��Ł@���Ƃ��@�T�O�OHZ�œd�g���o���Ɓ@����� �@�@SSB�t�B���^�[�̃J�b�g�Ɋ|�����ė��܂��̂Ł@�p���[���o�ɂ����Ȃ�܂��B�@ �@�@�}�C�N�Q�C�����グ�Ē��߂���Ɓ@�}�C�N�A���v�Řc�������ā@���̍����g�� �@�@���Ȃ킿�@500Hzx2�@500Hzx3�@500Hzx4�@�A�A�A�A�@���@1000Hz�A1500Hz�A2000Hz�A�A�A�A �@�@SSB�t�B���^�[��ʉ߂��ăX�v���A�X�Ƃ��đ��M����܂��B�@���̂悤�ȏꍇ�̓��O�� �@�@���g�����_�C�����ō��킹�ā@LSB���[�h�ł��̂Ł@�t�ɂȂ�܂����@1000-2000Hz�� �@�@���M����悤�ɂ��Ă��������B |
||||||||||||||||||||||||||||||||||||
| TOPICS�@05B/Mar/2014 INSTRUCTION HERE �Z�b�g�A�b�v�����@�@ | ||||||||||||||||||||||||||||||||||||
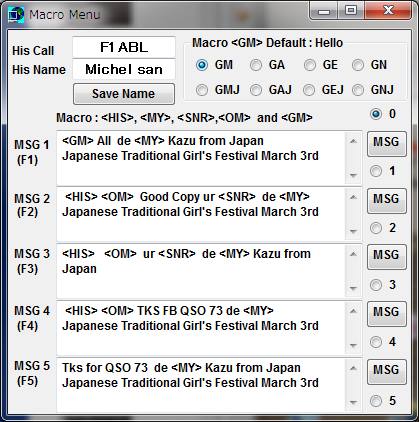 05B 1. Add Macro <GM> <OM> <GM> : Check GM(Good morning), GA(Good Afternoon), ... then checked will be added into Picture. <OM> : His name is added into Picture. 2. Add Radio check button 0 to 5 ex. Check 1, when picture is paste or drag and drop on TX Tag, Check 1 macro will be added on Piture. 3. Add Save Name First you have no name master data so write his name on "His Name" then press Save Name button. When receive his call then his name is appeared automatically. This save name procedure will be performed by RX tag "His Nmae" button. This name master is used for PSK Image front also if file name is configured on PSK Image Front. 4. Press "Name" button on PSK Image Front, then File Read box will be appeared. Read Name Master data in JT65-HF installed folder Ini/ name.text. This set up is OK with only one time, |
05B 1.�@<GM> <OM> ���}�N���ɒlj� �@<GM>�@GMJ�@�������������܂��@GMA �����́@�A�A�A�A�@�Ƀ`�F�b�N�����Ɓ@<GM> �� �摜�� ���A������܂��B <OM> �͖��O������܂��B 2.�@�`�F�b�N�{�^���@�O�|�T�́@�����@�`�F�b�N���P�ɓ��ꂽ�ꍇ�A�摜��t���@���邢�� �@�h���b�O&�h���b�v �����Ƃ��Ɂ@�`�F�b�N�����}�N�����摜�ɓ���܂��B 3. ���O�̓o�^�{�^���@�ŏ��͖��O�̃}�X�^�[������܂���̂ŁA��M�����ǂ̖��O�� �C���v�b�g���� Save�@Name�@�{�^���������Ɠo�^���o���܂��B�@����́@ ��M�����ǂ̖��O���o�Ă��܂��B ���̓o�^�́@RX �^�O�́@His�@Name�@�{�^���ł��s���܂��B�@ �܂��A�@���̖��O�̃}�X�^�[�f�[�^�� PSK�@Image�@Front�@�ɂ��@�}�X�^�[�f�[�^�����Ă��Ă��@�g�p�ł��܂��B 4. PSK Image Front ��Name�{�^�����N���b�N����Ɓ@�t�@�C���Ăэ��݂��J���܂��̂� �@JF65-HF Image Controller���C���X�g�[�����ꂽ�t�H���_�[�́@Ini\name.txt ��ǂݍ���ł��������B �@�ŏ��ɃZ�b�g����� �����ł��B |
|||||||||||||||||||||||||||||||||||
| TOPICS�@25B/Feb/2014 INSTRUCTION HERE �Z�b�g�A�b�v���� | ||||||||||||||||||||||||||||||||||||
| 13B 1. This version is available multi receive, JT65-HF or WSJT-S and WSJT 7 at the same time. 2. The first, start JT65-HF Image Controller, Select JT65-HF or WSJT-X and check the Both, 3. The second start JT65-HF or WSJT-X 4. Finally, start WSJT 7. Then you can receive JT65 or JT9 and/or WSPR signal at the same time. If the both signal is received, first JT65 or JT9 will be down loaded, then WSPR will be down loaded. 5. This function for WSPR is only applied to Call/H, Call/P, Call/M only. 6. The other bugs are fixed. 7. If you want to send the both JT65-HF or WSJT-X and WSPR, comm port should different one, if same port will be error. In my case. added one more RS232C-USB converter and diode switch connected to TX/RX. 8. If you have no comm port, Comm port for stand by JT65-HF or WSJT-X, or WSJT 7 may be 0 . 17B 9. Miner bug fix 10. Link to PSK Refer to PSK Image Front 20B 11. Miner bug fix 12. Remove Neline Character from MACRO 22B 13. Miner bug fix 14. Added set up of PSK folder on FTP Tag. 25B 15. Miner bug fix 16. To set up program folder for JT65-HF, WSJT-X, WSJT7 and PSK Front, Click each label, then folder dialog box will be opened and set it. |
13B 1. �@���̃o�[�W�����͕����̃��[�h�AJT65-HF �܂��́@�v�r�i�s�|�w�Ƃv�r�i�s�@�V����M�ł��܂��B 2.�@�ŏ���JT65-HF Image Controller�𗧂��グ�ā@JT65-HF�܂���WSJT-X��I�с@ �@�@�@�uBoth�v�`�F�b�N�����܂��B 3.�@��Ԗڂ�JT65-HF�܂���WSJY-X���N�����܂��B 4�@�Ō�Ɂ@WSJT�@7�@���N�����܂��B�@�����JT65 JT9 WSPR�̎x������M�ł��܂��B�@���������� �@�@�@JT65 �AJT9�A�@WSPR�̐M����M�����ꍇ�́@JT65, JT9���ŏ��ɏ������@����WSPR���������܂��B 5�@WSPR�̋@�\��Call/H�ACall/P�ACall/M�@�����ɓK�p���܂��B 6�@���̃o�O���C�����܂����B 7.�@JT65-HF�܂���WSJT-X��WSPR���ɑ��M����ꍇ�́@Comm�|�[�g����������̂� �@�@���Ȃ��ƃG���[�ɂȂ�܂��B���̏ꍇ��RS232C-USB�R���o�[�^��lj����A�_�C�I�[�h�X�C�b�`�� �@�@�t���Ăǂ���ł�OK�ȗl�Ƀ��O�ɂȂ��ł��܂��B 8.�@�����AComm�|�[�g���Ȃ��ꍇ�A�X�^���o�C����\�t�g��Comm�|�[�g���@�O�@�ɂ��邱�Ƃł�OK�ł��B 17B 9.�@�o�O���C�� 10. PSK�Ƃ̃����N�@PSK�@Image�@Front�@���Q�Ƃ��Ă��������B 20B 11�@�o�O���C�� 12. MACRO�W�J�̂Ƃ���ʼn��s������̂�h���܂����B 22B 13�@�o�O���C�� 14. PSK �t�H���_�[�̐ݒ��FTP�^�O�ɒlj����܂����B 25B 15�@�o�O���C�� 16. JT65-HF,WSJT-X,�@WSJT7��PSK Front�̃v���O�����̃t�H���_�[���Z�b�g����ɂ́A���ꂼ��� �@�@�@���x�����N���b�N����� �t�H���_�[�ݒ�̃_�C�A���O�{�b�N�X�������オ��܂��̂� �@�@�@�Z�b�g���Ă��������B |
|||||||||||||||||||||||||||||||||||
| TOPICS�@10B/Feb/2014 same as 09B INSTRUCTION HERE �Z�b�g�A�b�v���� | ||||||||||||||||||||||||||||||||||||
| 1. WSPR mode is added. Now program is testing by F1ABL, F1BAZ, HB9ADJ,
F1AIS, JA0AYH and others and it is at final debugging stage. 2. This mode is for Moon Bound of very weak signal, so MAX POWER should be less than 5 W. On Feb 10 2014, I contacted F6BAZ Henri san with 1W on 21.077MHz. 0.5W to 1W is enough for domestic QSO. 3. Very sorry not to prepare instruction manual. |
1. �@WSPR���[�h��lj����܂����B�@���݁A F1ABL, F6BAZ, HB9ADJ, F1AIS, JA0AYH�@����ё��̋ǂɂ�� �@�@�@�������s���Ă���A�ŏI�i�K�̃f�o�b�O���s���Ă��܂��B 2.�@���̃��[�h�͌��ʔ��˂̔���d�g�p�Ȃ̂Ł@�ő呗�M�o�͂́@5W�Ƃ��Ă��������B�@2014�N2��10���� �@�@�@F6BAZ�� �w�����[�����1W��QSO�ŗ��Ă��܂��B�@�����ł́@0.5W-1W�ŏ\���ł��B 3.�@���߂�Ȃ����@�}�j���A�����Ԃɍ����܂���ł����B |
|||||||||||||||||||||||||||||||||||
| TOPICS�@07B/Feb/2014 | ||||||||||||||||||||||||||||||||||||
| 1. HTML will be saved on HTML RX tag, As you know well, HTML file
and linked picture will be only one file so saved it will be last received HTML. 2. This will not require HTML Pop UP checked, only HTML RX save should be checked. 3. Available multiline draw on picture. Please set again Editor configuration. |
1. �@HTML�ő���ꂽ���̂�HTML RX�^�O�̂Ƃ���ŕۑ����Ă��܂��B�@�����m�̂悤�Ɂ@HTML�t�@�C���� �@�@�@�����Ƀ����N����摜�͈��������܂���̂Ł@�ۑ�����Ă���HTML�͍Ō�̕��ɂȂ�܂��B 2.�@����𗘗p����ɂ�HTML�|�b�v�A�b�v�̃`�F�b�N�͕K�v����܂���B�@HTML RX�̂Ƃ���Ł@HTML RX �@�@�@save�Ƀ`�F�b�N��t���Ă��������B 3.�@�����s�̕����𑗐M��ʏ�ɏ����܂�. HTML �G�f�B�^�[�̃Z�b�g���ēx���肢���܂��B |
|||||||||||||||||||||||||||||||||||
| TOPICS�@02B/Feb/20143 | ||||||||||||||||||||||||||||||||||||
| 1. Bugs that when Macro is applied to Master.html, two byte character
will be gable is fixed. 2. Your HTML editer can be configured. Click Edite bottun on HTNL Tag, then specify your HTML editer's exe. |
1. �@HTML�t�@�C����MACRO�W�J����Ɓ@���Ɋ����ŕ����������o�܂������C�����܂����B 2.�@���g�p��HTML�G�f�B�^�[���`�ł��܂��BHTML�^�O��Editer�{�^���������ā@���g�p��HTML�G�f�B�^�[�� �@�@�@exe���w�肵�Ă��������B |
|||||||||||||||||||||||||||||||||||
| TOPICS�@25B/Jan/2014 | ||||||||||||||||||||||||||||||||||||
| 1. Up load process has been changed for quick action and comapct
program. 2. Bugs on changing freqency for Who is On Air is fixed. 3. Initial set up bug fixed. |
1. �@�A�b�v���[�h�ߒ��̃v���O�����𑁂��A�R���p�N�g�ɂ��܂��� 2.�@Who is On Air�̎��g���ύX�̃o�O���폜���܂����B 3.�@�Z�b�g�A�b�v�̎��ɋN����s����������܂����B |
|||||||||||||||||||||||||||||||||||
| TOPICS�@21B/Jan/2014 | ||||||||||||||||||||||||||||||||||||
| Two different server can be configured on your different PC. Example : PC1/Server1 :Digi-Site JQ1HDR for 7.172MHz LSB Use Call JQ1HDR for command PC2/Server2 : Digi-Site JQ1HDR/15 21.076MHz USB Use Call JQ1HDR2 for command. URL related to JQ1HDR and JQ1HDR2 must be registered into URL Master tabel by JQ1HDR. If you want receiver to down load from Server2, use any command with JQ1HDR2/xxxx except HYBRID. Receiver can down load picture or video from your sever2. As you know well, video file is mostly very big and it takes a time to down load. This version is applied Back Goud process for Up Loading and Down Loading Video files so that you can do any other things on JT65-HF Image Controller. Multi-Receiving of Pictures and/or Videos st the same time are also OK on this version. Other bugs are fixed. |
PC2��ɂ��ꂼ��قȂ�f�W�T�C�g�ւ̐ݒ肪�o���܂��B �T���v�� PC1/Server1 :�f�W�T�C�g JQ1HDR / 7.172MHz LSB �@JQ1HDR ���R�}���h�Ɏg�p PC2/Server2 : �f�W�T�C�g Q1HDR/15 21.076MHz USB JQ1HDR2 ���R�}���h�Ɏg�p. JQ1HDR ����с@JQ1HDR2 �Ɋ֘A����URL�́@JQ1HDR�ɂ��}�X�^�[�e�[�u���ɓo�^����Ă��Ȃ���� �Ȃ�܂���B �����A�T�[�o�[�����M�҂ɉ摜����M������ɂ́@JQ1HDR2/xxxxx�@�Ɓ@���ׂẴR�}���h�𑗂��. ��M�҂̓T�[�o2����摜��r�f�I���_�E�����[�h���Ď�M�ł��܂��B�@�������A�@HYBRID�R�}���h�͏����܂��B �����m�̂悤�ɁA�@�����Ă��r�f�I�t�@�C���͑傫���̂ł��̃_�E�����[�h��A�b�v���[�h�Ɏ��Ԃ��|����܂� ���̃v���O�����ł́@�����̏������o�b�N�O�����h�����Ƃ��Ă��܂��̂Ł@���̊ԁ@JT65-HF Image Controller�ő��̍�Ƃ��o���܂��B �Î~��A���擙�̕���������M�����̃o�[�W�����ł͉\�ł��B�@���̃o�O���C�����܂����B |
|||||||||||||||||||||||||||||||||||
| TOPICS�@12B/Jan/2014 | ||||||||||||||||||||||||||||||||||||
| ON Air Frequency Plan on 21.077MHz USB mode Set Dial Frequency of TX/RX on 21.077MHz USB 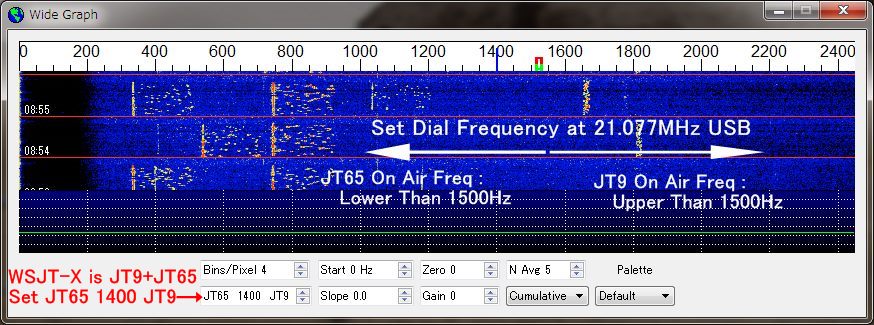 WSJT-X is JT9+JT65 Mode. Operating frequency for JT65 will be 1000Hz to 1500Hz to prevent spurious. For the other band, like 14MHz, 18MHz , 28MHz and etc. will be same manner as 21MHz band. So set dial frequency at 14.077MHz, 18.103MHz, 28.077MHz and so on. We hope to get your the both signals. |
||||||||||||||||||||||||||||||||||||
| ON Air Frequency Plan on 7.172MHz LSB mode �^�p���g����ā@�V�D�P�V�Q�l�g���@LSB  1. Set Mode JT9+JT65 �@�@�@�@�@�@���[�h�̐ݒ���@JT�X+JT�U�T�Ƃ���  �Q. Set JT65 and JT9 Separate Frequency at 1400Hz as above �@JT65��JT9�̎d�����̎��g����1400Hz �Ƃ��� On Air Frequency : JT65 : 1400Hz and/or lower �@�@�@JT65��1400Hz�ȉ��ʼn^�p�@ PSK31 : 1500Hz�@�@�@�@�@�@�@�@�@�@�@PSK31��1500H���ʼn^�p�@�@�@ JT9 : 1600Hz and/or upper�@�@�@�@JT9��1600Hz�ȏ�ʼn^�p�@�@�@ This plan will perform that WSJT-X will decode JT9/JT65l mode signals at same time. ���̒�Ă�WSJT-X��JT9/JT65���Ƀf�R�[�h���܂��B |
||||||||||||||||||||||||||||||||||||
| TOPICS�@09B/Jan/2014 | ||||||||||||||||||||||||||||||||||||
 |
1. Checked, when mwv video received in case of Video popup off at FTP tag, all received wmv file will be saved into Tepm folder and dislayed at Vide RX. 2. When Video popuo is not checked, DL checked allow all video files will ve saved. Received files will be shown at list box. 3. Refresh received list box. 5. Video file size. 6. Select video in lst box and click this button to display. Only WMV file is displayed here. 1. �@FTP �^�O�łu���������@������u���Ƀ`�F�b�N�������Ă��Ȃ����AAuto Play�Ƀ`�F�b�N�������Ă����wmv�摜�� ��M�����Ƃ���Video RX�ŕ\�����܂��B 2 �@FTP �^�O�łu���������@������u���Ƀ`�F�b�N�������Ă��Ȃ����ADL�Ƀ`�F�b�N�������Ă���Ǝ�M�����摜�t�@�C���� Temp�t�H���_�[�ɕۑ����܂��B��M�����t�@�C���̓��X�g�{�b�N�X�ɕ\�����܂��B 3.�@���X�g�{�b�N�X���ŐV�ɂ��܂��B 4.�@���X�g�{�b�N�X�̉摜�t�@�C����I�сAPlay�������Ɓ@�Đ����J�n���܂��B 5.�@�摜�t�@�C���̑傫���ł��B 6.�@�Đ��𒆎~���܂��B WMV�摜�݂̂������ōĐ�����܂��B |
|||||||||||||||||||||||||||||||||||
| TOPICS�@03B/Jan/2014 | ||||||||||||||||||||||||||||||||||||
| Video can be sent to others by JT65-HF Image Controller ver
29B Dec 2013 Kind of Video: 1. WMV 2. MP4 only others are rejected from receiving side. Important : This function will be applied to station having own server or web site. �i�s65-�g�e�@�h���������@�b�������������������@�@�u����29�a�@�c�����@�Q�O�P�R�ł͓���𑗐M�ł��܂��B ����̎�ނ́@�v�l�u�Ƃl�o�S�ł���ȊO�̓���͎�M���ŏ��O���܂��B �Ȃ��A���̋@�\�͂����g�̃T�[�o�[���邢�̓E�F�u���������̕��݂̂ƂȂ�܂��B  |
1. Click Tag Video 2. Click Display Video List Button and select your video folder. 3. Then your video list will be displayed. and select sending item fro them. 4. Video size will be displayed. Size will be depend on your server capacity. A big video file will be full up your server and take a lots of time to up load file. 5. Click Check Video to see and confirm your Video, it will be displayed on Windows Media Player or your configured Movie Software. 6. If all is OK, click Transfer to send your file to your server. 7. Your using command to send with JT65 will be shown. Notice : Video files sent by this method, don't up load to Digi-Site to display. As you know well, Video file is too big so that refresh of Digi-Site will take much times and too slow PC could not display them. 1. �@�u���������^�O���N���b�N���Ă������� 2.�@Display�@Video�@List�{�^���������Ă��������B�@�t�H���_�[���w�肷��� 3.�@�r�f�I���X�g���\������܂��B�@���M����r�f�I��I��ł������� 4.�@�r�f�I�T�C�Y���\������܂��B�@����t�@�C���̑傫���͂����g�̃T�[�o�̗e�ʂɂ��܂��B �@�@�傫�ȃt�@�C���𑗂�@�T�[�o�[�̗e�ʂ��܂����@�܂��@�A�b�v���[�h�Ɏ��Ԃ��|����܂��B 5.�@Check�@Video�̃{�^���������Ɓ@Widows Media Player ���邢�́@�����g�����g���̃\�t�g���N���� �@�@���e���m�F�ł��܂��B 6.�@���ׂĂ�OK�ł���@Transfer �{�^���������Ă��������B�@�����g�̃T�[�o�[�ɑ����܂��B 7.�@���M���鎞�Ɏg�p����R�}���h���\������܂��B �Ȃ��A�@����ɂ�著��ꂽ�r�f�I�t�@�C���́@�����ā@�f�W�T�C�g�ɕ\�����Ȃ��悤�ɂ��肢���܂��B �傫�ȃt�@�C���ɂȂ�܂��̂Ł@�f�W�T�C�g�̕\���Ɏ��Ԃ��|��������@�x��PC�ł͕\���ł��Ȃ����Ƃ����� �܂� |
|||||||||||||||||||||||||||||||||||
| TOPICS�@22B/Dec/2013 | ||||||||||||||||||||||||||||||||||||
| Now beta version will be under creation, it can use the both user server
and Hybrid server to continue QSO during Hybrid server shutdown. Command is as follows: Your Call/HYBRID : Picture in Hybrid server will be displayed Your Call/PHOTO : Picture in your server will be displayed Your Call/HTML : Receiver can link your web site and creation of your HTML file can be made and transfered to your server with JT65-HF Image Controller. As you are aware of, it is necessary to register your URL in master table, if I can find your URL on Digi-Site, I will register it into Master. PSK master will be used for Japanese station. These commands are applicable to JT65-HF not WSJT-X, please wait a while. �g�x�a�q�h�c�T�[�o�[����~�����Ƃ��ł��@�p�r�n������������悤�Ɂ@���[�U�[�̃T�[�o�[�𗘗p�ł���悤�Ƀv���O������ύX���ł��B �R�}���h�� �g�x�a�q�h�c�@�F�@�g�����������T�[�o�[���g�p���� �o�g�n�s�n�@�F�@���[�U�[�̃T�[�o�[�𗘗p���� �g�s�l�k�@�F�@���[�U�[�̃T�C�g�Ƀ����N�ł���悤�ɂ��܂��B�@�g�s�l�k�t�@�C���̍쐬�̓v���O������ŏo���@�]�����s���܂��B ���C�Â��̗l�Ɂ@���[�U�[�T�[�o�[���p�ɂ́@�t�q�k�̓o�^���K�v�ł��B�@�f�W�T�C�g���łt�q�k�̊J��������悤�ł����� �����œo�^���������Ǝv���܂����@���ʁA���{�ǂ͂o�r�j�ŗ��p���Ă���}�X�^�[�Ƃ����Ē����܂��B �����̃R�}���h�͂i�s65-�g�e�ɓK�p�ł��܂��B�@�v�r�i�s�|�w�ɂ��Ă͂��炭���҂����������B |
||||||||||||||||||||||||||||||||||||
| How to setup for using your server | ||||||||||||||||||||||||||||||||||||
 FTP and URL must be configured on FTP tag. FTP 1 to 4 are FTP configuration. don't change these item. URL Your using URL must be wrote in 5. If you have Digi-Site , you can see it Setup-Edit a site. But Image1 is not needed at 5 and last letter must be /. If you have no your server, no setting is required and you can see their PHOTO or HTML command on your display. Program has a master table for URL and it is made same as Digi-Site URL. Don't change it on this program. |
 How to use PHOTO How to use PHOTOcommand. 6. Check My Server Past or drag & drop your picture. 7. Click Transfer button. 8. Message id displayed. 9. Click TX Image button. If your URL setting is correct, same picture will be pop upped, or not correct black image will be displayed. If black, check your URL setting. All is OK, you can use PHOTO command and received station can down load your picture from your web site according to master URL table. |
|||||||||||||||||||||||||||||||||||
 How to use HTML 10. Select HTML tag. 11. Standard HTML is displayed on List box. This Master.html file is made by Japanese Home Page builder so character set must be changed for your country. It includes MACRO such as <HISCALL> <MYCALL>. 12. Select HTML file, then Click MACRO button, Temporary file will be made and <HISCALL> and <MYCALL> have been replaced . 13. Temporary file name. Also picture sent your server will be displayed . 14. Click Check IE button, Temp.html will be shown on Inter net Explore with you picture. 15. Click Edit button for Temp.html, Notepad will show HTML Code and you can edit it as you want. 16. Click Transfer button, then you can send HTML command. This Master.html is very simple only showing picture and if you want to show slide, big picture and/or movies copy your HTML file into HTML folder in JT65-HF_Controller and Click Refresh button. Then your html will be displayed at 11. After this, do same procedure as the above. Please promise that don't up load Picture, Slide and/or Movies sent by HTML command to Digi-Site �� �g�s�l�k�ɂ�著��ꂽ�@�摜�A�X���C�h�A���擙�̓f�W�T�C�g�ɃA�b�v���[�h���Ȃ����Ƃł��̃v���O������ ���̂������g�p���������B �܂��A���̕��@�ł����Ă����l�ɂ��肢���܂��B |
||||||||||||||||||||||||||||||||||||

